Bright light

gulfdawg

Member
On my 74 100 the right brake light is brighter than the left. I have gone through the wiring as someone has hacked in a trailer wiring harness. I have repaired the harness and restored the connections to stock. I have cleaned the grounds and replaced the bolts. The right brake light is still brighter. The running lights are the same it is just the brake light. I have of course replaced the bulbs and the sockets look to be in good shape. The other question that I have is for the harness. On the frame under the steering column the harness is butt connected together. Now I am not sure if this is factory or someones repair. The butt connectors are sealed with silicone and it appears to be a fairly sound repair, but I am still sceptical. Is this something the factory did? Any help would be appreciated. Thanks justin.
 
Are ya sure the bulbs for the stop/turn/tail are the same numbers??? That means the same wattage rating. If the bulbs are identical in wattage, then your issue is a poor/high resistance ground.

The other problem is that the light buckets are the ground point where they mount to the body. That is a very poor oem design. So clean the bucket mounting points at the mounting screw pads, clean the body ground points on all light buckets, use new mounting screws, and consider running separate grounds for each light bucket which is the most viable workaround.

As for the butt splicing you found with the butt connectors, no...that is not an oem methodology. However, if done correctly with proper terminals, that is a perfectly acceptable method of repairing a harness, pigtail, or adding accessories. Using rtv is overkill and I never do that...if ya feel that exclusion of external contaminants is needed, then use heatshrink over any crimp terminal or. I never do that either except in a situation where I wanna make a wire marker a permanently readable item for the future.

In fact...I've found that the use of rtv in areas like that actually enhances corrosion unless it's applied perfectly to seal out any possible penetration...otherwise it becomes a moisture trap.
 
The bulbs are new and out of the same package. They are ge 1157 bulbs. I will work on that light bucket and clean them up.

As for the butt splices, I am not sure what to think other than there was a major problem at one time and this was someones fix. They didnt do a bad job but it still makes me wonder.

I also did notice when the blinkers/brake lights are flashing the reverse lights are also flashing. But they are very dim. I am pretty sure that is not supposed to happen
 
Ok. The 1157 is a good choice for bulb wattage for that application and both sides match!

What you describe regarding the pulsating backup lamps describes the classic " IH rotten light bucket ground" syndrome justin. Clean up those grounds, your life will be changed forever.

Not only that...I bet you are seeing some weirdness in the turn signal system also as the electrical path is seeking an "alternative" ground back through another filament. If ya haven't seen that yet...you will!

This same scenario holds true for any ihc-produced vehicle, not just the fullsize stuff.
 
You are correct... The backup lights should not flash.

Do you have the correct bulbs -- 1156?

If you do -- they are single filament bulbs and if they flash it means the circuit is grounding out or are connected to the turn signal flasher - my only idea of why they would blink...

On the bright taillight -- does it get brighter when the brake pedal is pushed or does it stay the same intensity?

My only idea is you have a "couple" wires "crossed" / "mis-connected" -- at the taillights / possibly at the steering column.
 
With the mounting points all cleaned up on the light buckets and new hardware the bulbs are now the same brightness on both sides.

I have a trailer hitch I was going to mount up today but am running out of time so it will have to wait. But what is the best way to wire in a trailer light harness. The harness that was hacked in before is unacceptable. What is the best way?

Thanks for the quick and great feedback. That is why this is the only forum I go to.

Thanks justin
 
Ain't it amazing how decent electrical ground points can change your life in several ways?? But don't get too complacent, you have just begun your journey through the ground path on these chunks of rust and rot!

As for your trailer harness, are you going to do a simple "four flat" connector as used with trailers that do not incorporate a battery charging circuit, electric brake controller, and an auxiliary circuit???? Or are you going to set up a complete "rv-style" seven pole connector with "flat" terminals inside the connector???

I spent several years in distributing, retailing, and installing towing products for all kinds of motor vehicles/trailers. My advice...set up only a true "flat seven" rv connector on the tow rig from the gitgo. That single connector can be used with many different adapters that are off-the-shelf items nowadays...stuff we always had to fabricate onna individual basis years ago. Even if you do not run the auxiliary circuits for brakes, etc. At this time, the connector will be already set up and ya can go back later and run the additional circuitry as needed.

So I'd obtain a female (vehicle end) rv flat seven connector that is pre-wired with a pigtail out, that is properly color-coded for the industry standards, and you will only actually use four of the conductors, the ground, the left stop/turn, the right stop/turn, and the tail light. The color codes on those connectors is not the same as the code for a plain old "flat four".

The pre-wired connector will have complete instructions included as to the function/color of each terminal, then ya simply connect each wire in turn into the vehicle harness found on the inside/rear of the frame rail. A test light or volt meter can be used to probe for "which" oem wires are need to mate up, though if you have a wiring diagram ya can id this visually.

Do not use "scotchlok" connectors to wire the trailer connector. That is a pisspoor way of doing anything! Simply cut the wire and use crimp connectors to interface the wire runs, then wrap it all neatly in electrical tape and use tiewraps to secure.

If ya wanna go ahead and set the connector up for a brake control and battery charging, then you will need to run two additional wires from the engine bay that are fed from proper circuit breakers...those wires need to be ten gauge, one will carry a fairly significant current load for the brake system, the other will carry a significant current for charging one/two batteries on any so-equipped trailer. I always runs those two new circuits from an auxiliary fuse panel installed in the engine bay for electrical load distribution, only the panel does not use fuses, it uses circuit breakers per the rv code.

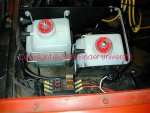
The pic shows a very inexpensive auxiliary fuse panel I use quite often in my work, it's fed from a dual battery setup with an isolator incorporated, and is used for the trailer brakes, charging circuit (two batteries on the trailer), and another circuit I power my vehicle sound system from. So by using the isolator, I have three batteries to pull from for the trailer loads and no possibility of draining my primary "crank" battery.

This link will take ya to one of the best rv/trailer wiring pages on the 'net:

trailer wiring diagrams

And when setting up a tow harness on your rig, do not scrimp on the ground connection!!!! The connector must have a solid/clean ground path to the vehicle frame!

Back in the day, IH offered as an accessory item, the forerunner of the rv-style harness connector we use today. But it was not a "plug and play" type as found today for modern vehicles. It was simply a metallic (not plastic) connector that was pre-wired with a pigtail. And included instructions on which vehicle harness wires to tap into.
 

Attachments

  • AUX distribution panel.jpg
    AUX distribution panel.jpg
    87.1 KB · Views: 422
Thanks everyone. That is a nice piece of info in that link you provided in the last post michael. As soon as I get the hitch mounted I will wire in the 7 pin plug. Is splicing into the existing vehicle harness what people do? I have some cool splices from work I just want to make sure that is the best option.
 
thanks everyone. That is a nice piece of info in that link you provided in the last post michael. As soon as I get the hitch mounted I will wire in the 7 pin plug. Is splicing into the existing vehicle harness what people do? I have some cool splices from work I just want to make sure that is the best option.

Yes, just splice the trailer harness pigtail into the existing vehicle lighting wire runs per the color-code callouts. If you need a schematic for the "rear" section of the frame for a "late squarebody, here it is in .pdf. The '74/'75 squarebody platform is considerable different in many details as compared with the '69>'73...the electrical systems and wiring are considerably different due to the option anti-skid brake system. That is why that is a separate callout in this schematic set.

Disregard all the stuff regarding the "brake resistor", etc. Those items are for the oldskool electro/hydraulic trailer brake controllers. The modern controllers don't use any of that hocus-pocus stuff and are very simple to install and operate! But when setting up any brake controller on any modern vehicle that has anti-lock brakes, special attention and practices are needed including the use of a oem-supplied sub-harness in many cases.

But...run a separate ground wire from the connector pigtail (white wire) directly to the frame at a clean spot of bare metal. That will prolly be the best ground on the entire rig!
 

Attachments

  • 74_75 Fullsize Rear Lighting.PDF
    1.8 MB · Views: 409
I have a schematic for the 75 150 200 which should be the same. The ground wire is often forgot about yet the most important part. I will heed your advice. Thank you michael.
 
My Travelall is equipped with a factory trail tow harness. It plugs in just like the modern aftermarket units do. At each side there is a harness that plugs between each tail light and the harness and one of the back up lights. There are 2 wires that run to the front for the brake and trailer charge feed. The other ends of the wires were unterminated and are stamped similar to other IH wiring except instead of cir# it says l turn, r turn, tail ect.

For one of my siis I made up a copy of that harness' tail light portion for plug and play action w/o any cutting or splicing of the original wires.
 
Back
Top