

Dealbreaker74
Member
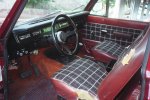
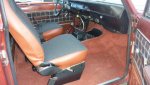
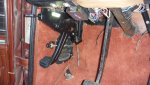
I was getting tired of the moldy, skanky carpet in the '79. Since acc is the only game in town, I picked a color that looked close, and here's how it turned out. I also recovered the seats as well. No luck finding the john denver plaid pattern though...
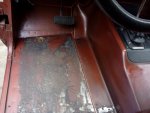
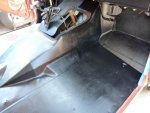
Both sides puddled up during the rain, so I was happy to see this was the only damage. Some rustoleum "red lead" sealed it up after the wire wheel treatment.
Just for good measure, I then hit it with some rustoleum "bed liner." its good stuff, but if you're expecting a rhino liner style job, this is not it. It goes on thicker than paint, and dries with a texture. But there is no granular rubber added. I paid about $75 for a gallon at grainger. And like I said, its not a bad product. Seems tough as nails when dry. Its just not a bed liner.
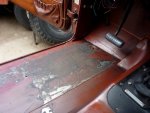
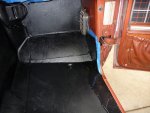
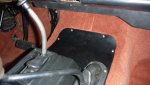
Later in the week, we got some rain, and this is what I found. The waterproofing worked like a champ, but the leak was a problem. Turned out to be coming from the foot vent. Water drained down the fender and hit the vent housing and followed it into the cab. I had to re-seal the flanges on each vent. I also found some 3/4" bulb weather stripping for the doors. This is bigger than the stock stuff and seemed to fill in the gap at the roof/window/a-pillar area. I could see daylight through the old stuff in that location.
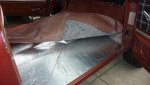
Next went down some imitation dynamat I found at the long beach swap meet. I know I probably used too much, but two rolls were $50 so I let it fly.
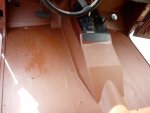
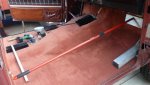
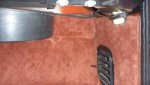
The carpet was then ready to go down. I left it out in the sun for a couple hours to soften it up. In the past I have used contact cement to glue it down, but that stuff is pretty unforgiving when you land your material in the wrong position. I tried outdoor carpet adhesive this time. It dries much slower, and lets you move things around for final adjustment.
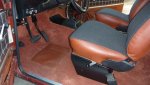
The kit I had did not want to pull down tight in the foot well area without making the gaps along the door too wide for the molding to hide. So I had to cut it in the center into what would be the shifter area. By allowing that gap to open up to 2" or so, I was able to stretch the sides out to the door sills and still get the corners to settle properly in the foot wells. Later I patched the gap. Not my best work, but when the shifter plate went back down, its pretty hard to see. There were some other small spots that needed patches here and there. I used the piece I cut for the shifter opening for those.
The seats were also recovered. A close match on the vinyl, and not a bad substitute for the plaid. The door panels will soon get some love, but looking to do something with the dash next.
I'll keep it coming as it happens.
Both sides puddled up during the rain, so I was happy to see this was the only damage. Some rustoleum "red lead" sealed it up after the wire wheel treatment.
Just for good measure, I then hit it with some rustoleum "bed liner." its good stuff, but if you're expecting a rhino liner style job, this is not it. It goes on thicker than paint, and dries with a texture. But there is no granular rubber added. I paid about $75 for a gallon at grainger. And like I said, its not a bad product. Seems tough as nails when dry. Its just not a bed liner.
Later in the week, we got some rain, and this is what I found. The waterproofing worked like a champ, but the leak was a problem. Turned out to be coming from the foot vent. Water drained down the fender and hit the vent housing and followed it into the cab. I had to re-seal the flanges on each vent. I also found some 3/4" bulb weather stripping for the doors. This is bigger than the stock stuff and seemed to fill in the gap at the roof/window/a-pillar area. I could see daylight through the old stuff in that location.
Next went down some imitation dynamat I found at the long beach swap meet. I know I probably used too much, but two rolls were $50 so I let it fly.
The carpet was then ready to go down. I left it out in the sun for a couple hours to soften it up. In the past I have used contact cement to glue it down, but that stuff is pretty unforgiving when you land your material in the wrong position. I tried outdoor carpet adhesive this time. It dries much slower, and lets you move things around for final adjustment.
The kit I had did not want to pull down tight in the foot well area without making the gaps along the door too wide for the molding to hide. So I had to cut it in the center into what would be the shifter area. By allowing that gap to open up to 2" or so, I was able to stretch the sides out to the door sills and still get the corners to settle properly in the foot wells. Later I patched the gap. Not my best work, but when the shifter plate went back down, its pretty hard to see. There were some other small spots that needed patches here and there. I used the piece I cut for the shifter opening for those.
The seats were also recovered. A close match on the vinyl, and not a bad substitute for the plaid. The door panels will soon get some love, but looking to do something with the dash next.
I'll keep it coming as it happens.
Attachments
-
 31740013.jpg68 KB · Views: 512
 -
 P1010294.jpg50.4 KB · Views: 471
 -
 P1010298.jpg57.6 KB · Views: 471
 -
 P1010300.jpg38 KB · Views: 450
 -
 P1010303.jpg58 KB · Views: 455
 -
 P1010313.jpg61.8 KB · Views: 448
 -
 P1010319.jpg48.6 KB · Views: 446
 -
 P1010324.jpg48.6 KB · Views: 474
 -
 P1010350.jpg53.8 KB · Views: 446
 -
 P1010351.jpg48.5 KB · Views: 453
 -
 P1010354.jpg53.9 KB · Views: 458
 -
 P1010358.jpg61.9 KB · Views: 469
 -
 P1010359.jpg70.1 KB · Views: 480