62 Crew Cab 4x4 restoration project

what about the old Ford pinto's ? They had rear end tanks, and would explode if hit in the rear ! ? a side tank is better than that ? the d-series truck's are on the outside of the frame . just too much thinking ? Jeff:icon_mrgreen:[/quote ]

hi,

possibly true - just trying to think through things and with only a very limited frame of reference as mine is the only IH pick-up I've ever seen, and so many things are done so very wrong on this truck by po's, I never know for sure .

I've seen videos of the exploding pintos - mainly because the back of the car collapses on impact - much like the side of my truck would if hit from the side . don't want to be in that fireball . all I can say is its probably much less likely to be hit in the side as rear ended .

thanks .

steve
 
great looking truck my friend. Just started following it today. Curious though, do you have a manual for this truck? Have you thought about buying one? I bought one for my Scout II and it was like somebody turned on the light switch. This forum has a lot of great info but I would highly recommened a manual. I know the feeling with doing a driveway budget builder. The limitations suck! Hang in there with all the po finds. I have had my Scout for 2 years and still find stuff all fuged up. Look forward to more posts and hope you get that thing more on a "drivability" state. Even if its to the local liqour store for a 6 pack. Get that truck out there so it can be appreciated. Keep up the good work man. Kcco!

Hi chico,

great point - but yes, I do have a photocopy of the service manual for my truck, and a photocopy of the parts manual too. That was the first thing I got. I actually started my postings on another forum, so to support that forum, at that time I bought the photocopied manual from them.

However, the manual is not complete, and its missing some sections, and many sections are duplicates. The manual is setup like a lot of individual pamphlets. I think that's the way they did it for trucks in 62. Not only is the Scout line not touched upon in my service pamphlet manual collection, but many procedures are not mentioned - how to r n r the gas tank, the motor mounts, disassemble and reassemble the heater/vent controls, etc - things I can figure out, but take a lot more time with no IH experience and no frame of reference from manuals and clearly improperly done by previous owners over the years. But the service manual appears good for such things as setting the ring and pinion, etc.

The parts manual photocopy can also be very misleading - and the pictures are not very clear. For example, it shows the vent line of the gas tank going to a point near the filler cap, when in reality it apparently just is supposed to hang loose, exposed to the elements, per replies to my questions here:
http://forums.IHPartsAmerica.com/basic-tech-questions/9971-am-I-missing-something.html

This past week has been mostly spent in research, mostly on power steering conversions for my truck. I've had no time to do actual work on the truck. And as far as the fuel tank repair, I have the dilemma of fixing it properly or trying something custom.

It needs both filler hoses, both sold here. However, one is $78.95 and the other is $66.95 - $145 for just two hoses is a bit pricey - although that is the fair going market price for them.
fuel tank lower filler hose,front fender fill style, 61'-68' pickup/Travelall - International Scout parts
d-series lower fuel tank filler hose - International Scout parts

Consequently I'm going to take a chance that the filler shown below will work in place of the top hose. It's made for a 67-68 Ford mustang, but I went to the auto parts store with my filler plate, and a mustang gas cap fit it ok, so my gas cap should fit the mustang filler... I hope. The other years, in particular the 64 to 66 and 69 and later years do not have as much of a 90 degree bend. New, this metal filler is only $24.95 from a reputable mustang parts manufacturer (scott drake) and on ebay go for $15 to $45. Just need a cheap piece of straight fuel filler hose to connect it.

I'll let you know how it works out once it arrives and I have time to start working on the truck again.

Steve

.
.
http://forums.IHPartsAmerica.com/attachments/readers-rides/20368d1372452158-62-crew-cab-4x4-restoration-project-fuel_filler1.jpg[/img ]
.
.
[img]http://forums.IHPartsAmerica.com/attachments/readers-rides/20369d1372452158-62-crew-cab-4x4-restoration-project-fuel_filler2.jpg[/img ]
.
.
[img]http://forums.IHPartsAmerica.com/attachments/readers-rides/20370d1372452193-62-crew-cab-4x4-restoration-project-fuel_filler3.jpg[/img ]
.
.
[img]http://forums.IHPartsAmerica.com/attachments/readers-rides/20371d1372452193-62-crew-cab-4x4-restoration-project-fuel_filler_gasket.jpg[/img ]
.
.
 

Attachments

  • fuel_filler1.jpg
    fuel_filler1.jpg
    43.4 KB · Views: 723
  • fuel_filler2.jpg
    fuel_filler2.jpg
    19.5 KB · Views: 721
  • fuel_filler3.jpg
    fuel_filler3.jpg
    46.7 KB · Views: 711
  • fuel_filler_gasket.jpg
    fuel_filler_gasket.jpg
    46.5 KB · Views: 709
Last edited:
Well on my b model truck it also has outside frame rails mounted saddle tanks. It wasn't so much that I was nervous about going up in flames but being right behind the front tire and hanging a bit low. When I redid the tank I had to patch 2 holes tig welded them up the po had super putty on them and had a few good dents from rocks flying up hitting the tank. Soo not wanting to damage the tank anymore or get stranded from a rock going through it or a tire blow out, I am going to make up a skid plate that wraps the tanks belly and upper front. I haven't mocked it up yet:( but have you thought about doing something like that?? You could make a full sided steel skid plate and underneath for that just in case situation to have aliatl more protection on impact? Just a thought:) like 3/16 plate should do in a emergency or 1/4
 
well on my b model truck it also has outside frame rails mounted saddle tanks. It wasn't so much that I was nervous about going up in flames but being right behind the front tire and hanging a bit low. When I redid the tank I had to patch 2 holes tig welded them up the po had super putty on them and had a few good dents from rocks flying up hitting the tank. Soo not wanting to damage the tank anymore or get stranded from a rock going through it or a tire blow out, I am going to make up a skid plate that wraps the tanks belly and upper front. I haven't mocked it up yet:( but have you thought about doing something like that?? You could make a full sided steel skid plate and underneath for that just in case situation to have aliatl more protection on impact? Just a thought:) like 3/16 plate should do in a emergency or 1/4

a nice set of rock sliders/running boards will solve the problem too.

Hi,
great ideas. Actually I was thinking to eventually make something using both those ideas - perhaps a 1/4 inch box wrapped around the entire gas tank, except for the side facing the rear differential. That way if anyone really smashes into the side of the truck, it will blow out towards the back. And with a good solid rock slider, that should give all the more protection.

I used to know someone who worked for a tow yard with a police impound contract. Because usually freeway crashes are cleaned up and gone in a half hour, most people don't realize how many there really are, and how bad they can get. He used to give me regular tours of all the new crashed cars and trucks in the yard when I went to visit.

But I think the most gruesome thing I ever saw there was a totaled near-new mercedes. But it was not totaled because of a crash. There wasn't a scratch on the car, the windows were all rolled up, and it ran just fine.
It was totaled because someone blew their brains out in it - literally. Part of their skull and scalp was embedded in the roof of the car, and brains and blood were splattered throughout the inside of the car. In addition to the blood, the inside of all the windows, especially the drivers side window clearly had brain and skull pieces coating it. The rank smell was indescribable. He said when the police and coroner were there they all had lit cigarettes in their mouth trying to hide some of the smell. Per law they had to keep that vehicle sitting there, cooking in the hot sun for 30 days. :eek:

I've made a gas tank in the past, a big 56 gallon tank put behind the differential of a 1 ton 4x4 57 chev panel truck. It went from frame rail to frame rail, and about an inch from the bottom of the floor it hung down to about the height of the rear axle tubes. Even though it was put between the frame rails, and had protection from strong cross channel iron from the tow hitch on the back end of the frame, I still used a steel skid plate, but never anything as thick as 1/4 inch, and it was still strong enough to put a jack under and lift the entire back end of the truck.

But this crew cab truck does not have much after-differential overhang, so whatever size tank I put back there, I will still want a gas tank on each frame side too.

But first I need to make the truck a dependable driver, then I can work on these fun modifications.

Steve

I wonder if anyone dares to give me a like on this post... :icon_eek:
 
Last edited:
ive got the original factory manuals. They are about 5 inches thick. Lets set up a day to get together.

Hi,

yeah, that sounds great!

I have not done anything with my truck the past 3 weeks as I've been trying to resolve a major headache with my honda car. It's a 96 and it just failed to pass smog. I've had two verbal estimates, one for $500 and one for $650 but no one would put it in writing. And I don't feel like going into someplace with a blank check, but perhaps that's what I need to do.
Know anyone who will do a pre-test as the car is worked on?

The car is just not worth putting that kind of money into. But with all I spent on windows and paint on my truck, I don't really have enough to buy another car right now. Regardless, my next vehicle will be a pre-70's something, pick-up, Scout, Travelall or whatever works out. I'm tired of going through this smog check crap every two years.

Look for my pm.

Thanks.

Steve
 
Last edited:
Smog checks are lame :mad2: ive been a master tech for toyota and mercedes but recently started working for tesla... Sooo much easier. Before you dump a ton of money into the honda lets take a look at it and see if its even worth it.
 
smog checks are lame :mad2: ive been a master tech for toyota and mercedes but recently started working for tesla... Sooo much easier. Before you dump a ton of money into the honda lets take a look at it and see if its even worth it.

Tesla, the all electric car company? Cool! Is that the one on santa monica blvd?
How is the company doing? What limited info I've read about the company is that its still very shakey and if it wasn't for a regular infusion of government incentive money, the company would not stay in business. What models are in actual production now? Too bad they don't make a cheaper model as I so like the concept. I've driven the ev1 and it was fast! Too bad GM bought the rights to the battery technology under the pretense of using it in their delco battery division then selling it to texaco, who, of course, buried it. It's taken years to develop another battery technology, and so far its only the expensive lithium ion.

I spent a ton of money on smogging my car. What a waste. It has the expensive catalytic converter that's built into the exhaust manifold rather than added to the tail pipe like a muffler. Ever price a new catalytic exhaust manifold - big $$. But its still cheaper than buying another car.

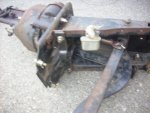
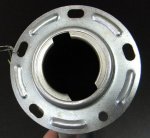
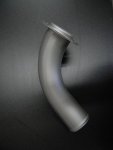
I've been doing a lot of research on upgrades for my truck. And I've bought a few parts to help that research along.

Also acquired most of the parts to convert to power steering.
.
http://forums.IHPartsAmerica.com/attachments/axle-tech-questions/20968d1377927344-c120-vs-c1500-axles-conversion-set_7a-110.jpg[/img ]
.
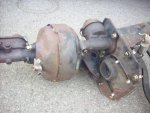
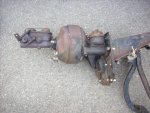
And finally sourced the parts to convert from single circuit brakes to dual circuit brakes. I've driven trucks for years with single circuit brakes with no problems, but the brakes in this truck just plain scare me - broken brake drum, missing rear parking brake links, deep gashes in the new rubber flex lines, and they rub against the knuckle every time the wheels are turned, the pedal is hard but if traveling over 35 mph this truck just will not stop standing on the brake pedal. I know, all things that can be fixed, but if fixing this stuff, I'd rather be putting the time into something more substantial - like the brakes in the axles above rather than my little knuckle d44.

The dual circuit brake parts came as just a big box of disconnected brackets, pins and levers. And having never seen how it came apart, it was a fun puzzle to put back together, the kind of truck work I prefer to do. I know I'll need to get new master brake and clutch cylinders and power booster, but this was just a test assembly to see how it all goes together, and if any parts were missing. Only got one pedal spring - I think it goes on the clutch pedal. Shouldn't there be a a spring on the brake pedal too, or is it unnecessary because it has the vacuum booster?

So I'll be going from this first pic to the second pic:
.
[img]http://forums.IHPartsAmerica.com/attachments/axle-tech-questions/20971d1377927608-c120-vs-c1500-axles-conversion-set_7a-208.jpg
.
http://forums.IHPartsAmerica.com/attachments/readers-rides/21296d1381468251-62-crew-cab-4x4-restoration-project-set_7a-424.jpg[/img ]
.
[img]http://forums.IHPartsAmerica.com/attachments/readers-rides/21297d1381468251-62-crew-cab-4x4-restoration-project-set_7a-425.jpg
.
http://forums.IHPartsAmerica.com/attachments/readers-rides/21298d1381468251-62-crew-cab-4x4-restoration-project-set_7a-426.jpg[/img ]
.

Now if the weather holds out, and other things don't distract me, hopefully I can get back to working on my truck. I'll do a detailed write up on all these things when I get to them.

Steve
 

Attachments

  • set_7a 426.jpg
    set_7a 426.jpg
    55.6 KB · Views: 653
  • set_7a 425.jpg
    set_7a 425.jpg
    64.4 KB · Views: 687
  • set_7a 424.jpg
    set_7a 424.jpg
    81.1 KB · Views: 1,141
Last edited:
Indeed - having to go get smog checks out right blows. I haven't had a vehicle that needed the ole sniff test in well over 6 years. All my current rigs are all pre-smog.

I have been into the ole numi plant, in fremont, before it was shut down and most of it was turned into the tesla plant. Another member on here used to work there as an electrician when it was numi. At the time, they made yota tacoma among a few other cars.
 
Hi,
well its been a long time since I posted anything on this build. Plans change, and life gets in the way sometimes. But I have been doing a lot of research during all this time. Also acquired more parts, such as the drivers side gas tank assembly, t/case pto, and lots of other small parts.
I'll begin a proper build write-up when I finally begin doing some major work to the truck.
Finally got the line setting tickets for my two trucks. Now trying to figure them out. Do they give specifications such as wheel base?
Thanks.
Steve
.
24274d1393994612-62-crew-cab-4x4-restoration-project-image002.jpg

.
http://forums.IHPartsAmerica.com/attachments/readers-rides/24275d1393994612-62-crew-cab-4x4-restoration-project-image004.jpg[/img ]
.
[img]http://forums.IHPartsAmerica.com/attachments/readers-rides/24267d1393910359-62-crew-cab-4x4-restoration-project-LST-loadstar4x4_2.jpg
.
http://forums.IHPartsAmerica.com/attachments/readers-rides/24276d1393994612-62-crew-cab-4x4-restoration-project-image006.jpg[/img ]
.
[img]http://forums.IHPartsAmerica.com/attachments/readers-rides/24277d1393994612-62-crew-cab-4x4-restoration-project-image008.jpg
.
http://forums.IHPartsAmerica.com/attachments/readers-rides/24269d1393910359-62-crew-cab-4x4-restoration-project-LST-travelette4x4_2.jpg[/img ]
.
 

Attachments

  • LST-Loadstar4x4_1.jpg
    LST-Loadstar4x4_1.jpg
    54.4 KB · Views: 421
  • LST-Loadstar4x4_2.jpg
    LST-Loadstar4x4_2.jpg
    45.2 KB · Views: 838
  • LST-Travelette4x4_1.jpg
    LST-Travelette4x4_1.jpg
    41.7 KB · Views: 702
  • LST-Travelette4x4_2.jpg
    LST-Travelette4x4_2.jpg
    35.8 KB · Views: 805
  • image008.jpg
    image008.jpg
    48.5 KB · Views: 466
  • image006.jpg
    image006.jpg
    51 KB · Views: 474
  • image004.jpg
    image004.jpg
    55 KB · Views: 790
  • image002.jpg
    image002.jpg
    66.4 KB · Views: 874
  • LST_1600_A.pdf
    5.3 MB · Views: 449
  • LST_1600_B.pdf
    7.5 MB · Views: 423
  • LST_C120_B.pdf
    7.2 MB · Views: 415
  • LST_C120_A.pdf
    5 MB · Views: 424
Last edited:
The first line 1600 4x4 139 15000
139" (hard to read) = wheel base
15000 # frame setup weight rating

120 4x4 140 7000
140" wheel base
7000# weight rating

the other line items have a code and descriptor and can be researched for better detail.
 
Thank you.
Any idea what the other numbers on that line or above mean?
And what is the other page that is with each line setting ticket? Even when I flip and enlarge them, they are still too blurry to read.
Thank you.
Steve
 

Attachments

  • LST_Loadstar_1600_4x4_1.pdf
    5.3 MB · Views: 1,037
  • LST_Loadstar_1600_4x4_2.pdf
    7.5 MB · Views: 644
  • LST_Travelette_C120_4x4_1.pdf
    5 MB · Views: 607
  • LST_Travelette_C120_4x4_2.pdf
    7.2 MB · Views: 443
Last edited:
The first/top page indicates the axles are 6.16 ratio. The lower spec page shows the front axle as 4.09 ratio and rear ratio as 4.10. That .01 difference won't matter. "increased cooling' gets you the 3 row radiator instead of the 2 row radiator.
Bill
 
Back
Top