Worthy Fuel Tank?

Hey guys,

another IH newbie question:

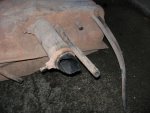
based on nothing more than visual inspection and comparing with parts images online I believe I have a 19gal fuel tank. (gas, 73 Scout II)

I was lucky to get this thrown in with my rig "as a spare"...the po brilliantly hacksawed through the lower part of the filler neck seen here, snipped all the remaining tubing, then trashed the rest. He then began fabbing up the saddest excuse for an off-road remote fuel tank I've ever seen.

So based on these pics, can anyone confirm if indeed this is the oem 19gal version, and/or whether it's worth cleaning up and reinstalling? I'm hoping not to buy a new tank if at all possible.

And of course there's some trace mystery liquid sloshing around in it...any suggestions on how to clean/purge easily?

Also, can anyone confirm these:

fuel tank strap for Scout II - International Scout parts

As the correct straps to reinstall my tank properly?


Thanks in advance. This community is pure gold.lb
 

Attachments

  • DSCN6295.jpg
    DSCN6295.jpg
    70.3 KB · Views: 320
  • DSCN6296.jpg
    DSCN6296.jpg
    74.5 KB · Views: 306
Looks like a stock sii tank. Take it to a radiator shop. They'll boil it out and pressure test it for you. Should be less than $50 for the service. Those are the correct tank straps. They require the use of long j bolts at the rear mounting location.
 
If your radiator shop won't work on it, (my local one wouldn't) eastwood sells a good kit. Its about a 4 step process, but it works. Its important to get something inside the tank, such as a length of chain or some clean coarse gravel, as a media to abrade the funk from the metal. Toughest thing is agitating the tank with the media inside. A friend suggested strapping the tank to the inside of the rear wheel of his backhoe. Lift the backhoe off the ground with the outriggers, put her in gear and let it do its thing. Once clean, the eastwood product worked well. If you have to agitate manually, patience, grasshopper!!! Whatever it takes to get it clean will be well worth the time!!!
 
if your radiator shop won't work on it, (my local one wouldn't) eastwood sells a good kit. Its about a 4 step process, but it works. Its important to get something inside the tank, such as a length of chain or some clean coarse gravel, as a media to abrade the funk from the metal. Toughest thing is agitating the tank with the media inside. A friend suggested strapping the tank to the inside of the rear wheel of his backhoe. Lift the backhoe off the ground with the outriggers, put her in gear and let it do its thing. Once clean, the eastwood product worked well. If you have to agitate manually, patience, grasshopper!!! Whatever it takes to get it clean will be well worth the time!!!

Thanks for the tip...makes sense. But how much agitation time we talkin' here? A whole afternoon? Does it need to turn real slow? Maybe I could do the same thing by securely strapping it to one of the back wheels (up on jack stands) of the Scout itself then idle it in 1st for a while...?
 
I would not use the Scout for several reasons. First, it won't be safe!! Second, I don't think there's clearance.

That said, the tank fits inside the backhoe wheel pretty good and can be strapped securely. The outriggers keep the machine well off the ground. All holes in the tank have to be closed with tape or plugs. The amount of funk and quanity of "media" (chain or stones) has an effect on the amount of time required to acheive the desired result. After about 10 minutes, remove the tape or plug from the fill opening and look inside with a flashlight and mirror. It should be clean. I would also assume, if there are thin areas in the tank metal, you'll see the resulting holes.
 
I've done small tanks by filling them with nails and shaking them for maybe 15-20 min. If there's a handy backhoe around, that does sound like an easy way to do it.
 
I've done small tanks by filling them with nails and shaking them for maybe 15-20 min. If there's a handy backhoe around, that does sound like an easy way to do it.

No backhoes (at least not that kind:ciappa:) around here.

I can't imagine how heavy this thing is gonna get when fully loaded with nails/chain/media etc. I suspect I'm not gonna be able to pick it up let alone shake it around...perhaps I could "adapt" something to somehow utilize the paint mixer at work...?
 
I would not use the Scout for several reasons. First, it won't be safe!! Second, I don't think there's clearance.

That said, the tank fits inside the backhoe wheel pretty good and can be strapped securely. The outriggers keep the machine well off the ground. All holes in the tank have to be closed with tape or plugs. The amount of funk and quanity of "media" (chain or stones) has an effect on the amount of time required to acheive the desired result. After about 10 minutes, remove the tape or plug from the fill opening and look inside with a flashlight and mirror. It should be clean. I would also assume, if there are thin areas in the tank metal, you'll see the resulting holes.

Actually, based on a quick eyeball just now, I'm pretty sure I could just strap it up onto one of the back wheels pretty securely and have it clear just fine. This motha's got 4" of body lift and a body that deserves a few more scratches anyway.

I'm thinking I might dry fit it (empty) then fill it up while its strapped on there, then just rotate it by hand. Then even if the whole rig were to fall off the jackstands, it ain't goin' anywhere.

I'll try the dry fit this weekend and snap a photo. I don't have the acid kit yet anyway. Anyone else recommend the eastwood stuff? Seems awful pricy and looks like it's got some pretty bad reviews...I could almost afford the local radiator shop for $50...
 
Around 5 lbs of "media" will work. I've found drywall screws work well and always seem to have some handy.
 
I'd vote for the phosphoric acid cleaning. Phosphoric acid is commonly known as "rust converter"

https://en.wikipedia.org/wiki/phosphoric_acid
Rust removal

phosphoric acid May be used as a "rust converter", by direct application to rusted iron, steel tools, or surfaces. The phosphoric acid converts reddish-brown iron(iii) oxide, fe2o3 (rust) to black ferric phosphate, fepo4.

"rust converter" is sometimes a greenish liquid suitable for dipping (in the same sort of acid bath as is used for pickling metal), but it is more often formulated as a gel, commonly called "naval jelly". It is sometimes sold under other names, such as "rust remover" or "rust killer". As a thick gel, it May be applied to sloping, vertical, or even overhead surfaces.

After treatment, the black ferric-phosphate coating can be scrubbed off, leaving a fresh metal surface. Multiple applications of phosphoric acid May be required to remove all rust. The black phosphate coating can also be left in place, where it will provide moderate further corrosion resistance (such protection is also provided by the superficially similar parkerizing and blued electrochemical conversion coating processes).
 
Thanks chappie. I'll check it out.

But first I have a dumb question:

it's an aluminum fuel tank. (at least I think so somewhere under all that dirt).

If the phosphoric acid's meant to eat iron/steel rust, is it appropriate for this tank? Perhaps more concerning, is it possible that it'll react with the aluminum metal itself, causing holes or tank weakening?
 
Well I finally got down to business on the tank last weekend. Wirecupped the outside pretty good, and turns out I'm an idiot...yes indeed it's a steel tank, so I went and got the phosphoric acid. I shoulda put a magnet on it in the first place.:icon_xp:

will try the acid out on a couple exterior spots this weekend first then when I got the hang of it, I'll do the inside as well.

Any good ideas for plugging up the fill and all the small hose fittings?
 
I would recommend an old tennis ball. Can hammer it into place with a plastic mallet and cut it out later. Just my pennies.

Not sure about the other fittings. Duct tape?:icon_question:
 
Just a thought, but would aluminum duct tape work better? Sometimes called foil tape, its the very thin type of aluminum foil with adhesive backing, not the kind with a thick layer of sealant. Sold by places like grainger. Hope that helps. Bill
 
So as usual, the domino effect is around every turn on my fuel tank install. I now have the tank cleaned, sealed, lined, and loose hanging in place as I repair/replace all the hoses and lines. It took quite a while, but I'm fairly happy with the results and cost so far.

My question now is whether or not I really need the vapor canister? It's totally gone (thanks alot po), and the long vapor line that leads to it is in many pieces (thanks again po). Even the nipple for the line is snapped off from the top corner of the condenser (you guessed it). Looks to me like a lot of $ and heartache for such a trivial thing.

Can I just plug the condenser vapor nipple and be done with it? Or just leave it open as-is? Either way any big drawbacks expected?
 
Last edited:
Back
Top