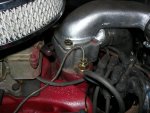
chipped intake - what to do?

Hey guys,

new IH user/owner/addict here, sounding off.

My rig's got serious po blues, and I'm slowly picking away at it with help from all the invaluable info here. (in about a month of ownership so far, I've already fixed countless shade-tree blunders, and have a long and growing list still).

So first off, thanks to all you IH jedis who contribute on here.

I'm trying to start on the most serious issue(s) first of course, and also keep a tight leash on my parts budget. It's a verified 345 and she's running now...rough, but I'm making daily progress on timing/tuning/adjustments...hooray!

...but now I'm looking at opening up the cooling system as the next can of worms. The po put in an aftermarket alum radiator, which appears to have been jerryrigged every bit of the way. I've stopped all the biggest & easiest coolant leaks, though there's still at least one very slow drip coming from somewhere near the top of the water pump.


Anyway,


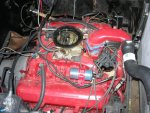
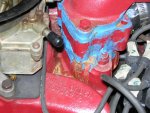
before I tear into the whole coolant system and redo it all, I need a bit of advice: how serious is the rusty chip out of the intake manifold shown here (just below the thermostat housing/throat)? You can just barely make out the bolt threads peeking through the rust, so...:yikes:

I'm guessing based on the liberal use of blue rtv, that the po tried to both seal and hide issues in and around the thermostat/waterpump area that he couldn't solve properly.

Again, I know the right way would be to replace the manifold and build back up all the way from there...but what (if any) other options do I have that might allow me to at least tidy up and reassemble the coolant system without too much additional heartache?

I've got lots of time and elbow grease, and am even willing to buy additional tools as needed...but I'm trying to keep the parts budget really under control.

Thanks in advance.
 

Attachments

  • DSCN6291.jpg
    DSCN6291.jpg
    91.8 KB · Views: 536
  • DSCN6294.jpg
    DSCN6294.jpg
    88.8 KB · Views: 516
There is a product called belzona that have used before. Im not selling it, etc. Just used it with good success is all. When done right the stuff is machineable. I have no idea whats its worth, shop buys it, we use it. But you might be able to buy a used intake for less hassle in the long run. Image there is a few around as people upgrade to the 4 barrell intake manifold.
 
Holy blue man group, batman! I haven't seen that much blue monkey spit since I walked in on hefty smurf and smurfette!:yikes: he was smurfing her like there was no tomorrow. If the casting has been compromised to the point that coolant is seeping, there's probably not much to done for the long term beyond replacing the part. I'm just wondering if the evidence of coolant leak May not be from the blue shit rather than the casting chip. There's no better way to seal that thermostat housing than with the actual correct gaskets, which IHPA sells for dirt cheap. Maybe clean all that blue spewge off, slap some gaskets on there and see if you get lucky.
 
I think you need to remove the t-stat housing and clean the manifold to see what you are actually dealing with. It May be that a suitable fix May just be drilling deeper and tapping, and the p.o. Didn't have enough mental candlepower to figure that out, so he covered it all in blue snot. If the surface between the bolt and the coolant is sound, that could put sufficient pressure on the gasket to prevent leakage.

I can't see that if drilling put you into a water passage, it would be a big deal. Just coat the threads in permatex #2. If you happened to break into a vacuum passage, then I'd re-think it.
 
Thanks guys.

I was indeed planning on disassembling and refitting with proper gaskets anyhow. In the event that the thread chasing and/or belzona still leak, I'll bite the bullet and buy a whole new manifold. Have just been hoping to stick to the coolant repairs for now and avoid the snowball effect of taking apart too many subsystems at once.

Btw scoutboy I might start calling this rig smurfette thanks to you. Good times.
 
Doesn't that vacuum port at the base of the carb need to be plugged? The small fitting alongside the thermostat housing (with the blue stuff covering it) would be your temperature sending unit. Is their linkage to open the choke?
 
Last edited:
doesn't that vacuum port at the base of the carb need to be plugged? The small fitting alongside the thermostat housing (with the blue stuff covering it) would be your temperature sending unit. Is their linkage to open the choke?

Thanks bill.
Can you clarify which carb port are you talking about? Almost all of this guy's vac plug "solutions" are different...(black electrical tape, various bolts, glue, misc vinyl caps, bic-pen-cap-yeah-really, golf tee, and of course blue smurf sauce squirted into a short scrap of hose. I've found all these so far, and probably a few more will show up as I go.)

I'll soon be removing and going through the entire carb carefully, but if there's any obvious quick-fix issues you spot here, by all means, point them out!:icon_wink:

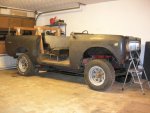
re temp sending unit: unfortunately no, the linkage for this is history and was replaced by a push-mower grade 'performance' manual choke cable (partially visible-silver cable in the upper left of the second pic). This too will get gone when I pull the carb.
 
re temp sending unit: unfortunately no, the linkage for this is history and was replaced by a push-mower grade 'performance' manual choke cable (partially visible-silver cable in the upper left of the second pic). This too will get gone when I pull the carb.

The item bill referenced is the temperature gauge sender and you can see it in your first pic if you look carefully. It is a smallish object threaded into the casting just at the base of the thermo housing. It is partially covered in smurf sludge. It originally had a wire connected to it than ran through the bulkhead connector into the cab terminating at the temp gauge. There is no wire connected to it now, which is one obvious reason, but not the only potential cause for the temp gauge not functioning.

Your battree is on the wrong dayem side! Where did captain brainiac relocate the heater box to on this pig?:yikes:
 
Believe it or not, you could clean the chip up and use metal putty or jb weld to fix it. Dress it with a file and some paint and it would be good as new.

When we got ruthie's 80, the po was a smurf user.....everywhere. I ended up having to pull all the lifters out and disassemble all of them to get the blue crap out of them, so that they would work right. Rtv has its place and uses, but some people think that it can be used on anything. :shocked:
 
the item bill referenced is the temperature gauge sender and you can see it in your first pic if you look carefully. It is a smallish object threaded into the casting just at the base of the thermo housing. It is partially covered in smurf sludge. It originally had a wire connected to it than ran through the bulkhead connector into the cab terminating at the temp gauge. There is no wire connected to it now, which is one obvious reason, but not the only potential cause for the temp gauge not functioning.

Your battree is on the wrong dayem side! Where did captain brainiac relocate the heater box to on this pig?:yikes:

Re temp sender: understood, but if you saw the "interior" of this rig you'd see why I'm not really too concerned with correctly operating gauges quite yet.

Likewise the entire hvac system is presumably under a rock in the po's back 40 somewhere. I will be moving the battery eventually as well. You should see how much spare battery cable is dangling down! I'll snap a couple more general photos this weekend for y'all. She's quite a beaut this one.:ihih:
 
Sounds like a gen-yoo-wine joejaw peach! That's no matter. There's been plenty of po'd rigs returned to respectability. You just really wish some folks knew when to say when and just leave well enough alone. It makes things so much harder for the next owner. Its bad enough that the rig is 40 years old.
 
thanks bill.
Can you clarify which carb port are you talking about? Almost all of this guy's vac plug "solutions" are different...(black electrical tape, various bolts, glue, misc vinyl caps, bic-pen-cap-yeah-really, golf tee, and of course blue smurf sauce squirted into a short scrap of hose. I've found all these so far, and probably a few more will show up as I go.)

I'll soon be removing and going through the entire carb carefully, but if there's any obvious quick-fix issues you spot here, by all means, point them out!:icon_wink:

re temp sending unit: unfortunately no, the linkage for this is history and was replaced by a push-mower grade 'performance' manual choke cable (partially visible-silver cable in the upper left of the second pic). This too will get gone when I pull the carb.
Looking at the passenger side of the carb, the 'tube'(?) between the front hold down ear and the throttle shaft looks like it could be a vacuum source for something. Same with - what could be a tube behind the rear carb mount ear. Can't tell because the bracket for 'whatever', is in the way. As I don't have that carb or the vacuum tees, I don't know how they operate, but if the vacuum tees open when the motor reaches operating temp, that just increases the number of vacuum leaks. Plug anything that 'hisses' when the motor is running. For the temp sender, you will need 'green wire' to make it work again!! :ihih:
 
The vac trees are just a plug when there is no vacuum source connected, as in the case of the ones on this engine. The ports don't even need to be capped.
 
I'm in metro atlanta. I picked up this gem recently in rural sc, outside of greenville...do you recognize it?

Hahaha no, not familiar with the truck and definitely not the po.

No I was asking cuz I have a spare 2 barrel manifold that I occasionally stub my toe on in the garage. Thought if you were close you might want it. Speaking from experience, you don't want to pay shipping on one of these.
 
That truck gots luv written all over it. A labor of love fer sure.

Redturbo has a damn good idea. We've used belzona at work, and if it works good on old pump casings; I think it'll save your manifold. It's not cheap, but it'll do the job.

I can't really see how bad it is, and tear down is in order as we're only guessing at this point.
 
that truck gots luv written all over it. A labor of love fer sure.

Heh. Yep. And clearly its seen plenty of smurf love all over it as well.

I've currently got all the coolant parts removed to the workbench and am in the process of a thorough bare metal clean-up. I'll post some pics as I get it back together. It's looking a lot better already.

Meantime, I've already acetoned and wire brushed the chipped spot to a sparkle, then made a steel stick patch. Filed it down flush, drilled down a little bit more, and chased the threads, so we'll see once I get the coolant parts back on.

Can anybody recommend the torque I need on those tstat housing bolts?
 
Just an update:

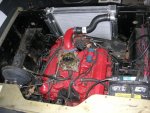
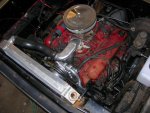
I got the last few coolant parts put back on and ran some rust-flush through this afternoon. Snapped a few pics of the whole setup again. It's not so 'smurfy' anymore, though there's still a few traces in the area on plugwires and stuff. While I was at it, I reinstalled the po's aftermarket temp gauge, though it took a little fiddling around to make a step-down adapter fitting to relocate it to the proper spot next to the t-stat.

Here's a photo of the chip repair here. You can tell if you know what to look for, but overall it turned out pretty clean. Time will tell how well it holds a seal.

Overall, I was quite pleased at how well these heavy cast coolant parts have held up over the years. Seems totally rust-prone, but they cleaned up surprisingly well. I did replace the waterpump, but only because I wanted the newer style for easier fan mounting.

And before anybody scolds me, 2 things: I went for the cheap napa t-stat at this phase. If the summer heat changes my mind, I'll upgrade to the shaw one later...and I'm still brewing up some sort of fan shroud. The body lift on this turkey makes that a 'custom' endeavor. So far she stays pegged right at 180 though. So much better than before.
 

Attachments

  • DSCN6334.jpg
    DSCN6334.jpg
    81.5 KB · Views: 409
  • DSCN6337.jpg
    DSCN6337.jpg
    77.5 KB · Views: 406
Last edited:
Back
Top