

You are using an out of date browser. It may not display this or other websites correctly.
You should upgrade or use an alternative browser.
You should upgrade or use an alternative browser.
Heli coil?
- Thread starter JohnnyC
- Start date
It depends on how damaged the current bolt hole is...
I would think that you could use the one sized for the current pan bolt.
There are also different lengths of heli-coils for different applications / "places". You do not want one that is too long.
Heli-coils are based on the thread size of the bolt to be used.
The instructions tell you what drill bit size you need and what tap you need for a given size heli-coil -- kits May include the drill bit and tap.
You drill out the stripped hole with correct size drill bit -- need to be able to drill a "straight" hole.
Then, you run the tap in creating new threads for the heil-coil.
Using vaseline or similiar on the bit / tap will help "capture" the small metal bits.
I do not know if the pan bolts go thru into the interior of the 727 case or not.
Then, you "screw in" the helicoil with needlenose pliers and once it is in, you break off the tab "releasing" the helicoil.
There are other products that accomplish the same thing, but I cannot remember their names...
Michael Mayben
IHPA Tech Moderator - Retired & No Longer Online
Stripped pan bolts on the 727 are as common as oil leaks, nearly every one has at least one hole stripped.
The standard helicoil insert is a nominal 1/2" in length and is used in virtually all holes, whether thru-drilled or blind. There are many different "lengths" available (and extraordinarily expensive!!) but they are for specialty installs only and not commonly found through typical fastener supply houses.
The pan bolt thread form is 5/16" 18tpi (that is a "coarse" pitch). None of the holes in the pan rail penetrate the interior of the case, the ones along each side are actually thru-drilled. There is no danger of getting debris inside the transmission when installing thread repair inserts without removing the pan. But you must not drill any deeper than the original hole depth, otherwise on some of the holes you will break thru the case.
Helicoils are installed with a proper installation tool that varies with the size, some are nylon, some are steel, the tool is included in each installation kit, along with the special tap. Once the insert is installed and seated just below the surface of the starting thread, then another tool included in the kit is used to break off the tang up inside the hole, the insert has a "weak spot" made into it that allows the tang to break right off and it will fall out due to gravity.
I do thread repair on these units quite often without removing the pan. Do not be tempted to drill the hole oversize and then tap for a larger bolt, the wall of those cases/holes won't allow that without possibility of damage.
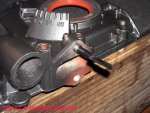
This pic shows a helicoil going into the boss on an sv engine timing cover where the fuel pump mounts. Those holes are very easily stripped and from now on, whenever I have a timing cover off an engine, it gets helicoiled on a routine basis. You can see the nylon installation tool has just started the insert into the hole. I seat the insert 1/2 turn below flush.
The standard helicoil insert is a nominal 1/2" in length and is used in virtually all holes, whether thru-drilled or blind. There are many different "lengths" available (and extraordinarily expensive!!) but they are for specialty installs only and not commonly found through typical fastener supply houses.
The pan bolt thread form is 5/16" 18tpi (that is a "coarse" pitch). None of the holes in the pan rail penetrate the interior of the case, the ones along each side are actually thru-drilled. There is no danger of getting debris inside the transmission when installing thread repair inserts without removing the pan. But you must not drill any deeper than the original hole depth, otherwise on some of the holes you will break thru the case.
Helicoils are installed with a proper installation tool that varies with the size, some are nylon, some are steel, the tool is included in each installation kit, along with the special tap. Once the insert is installed and seated just below the surface of the starting thread, then another tool included in the kit is used to break off the tang up inside the hole, the insert has a "weak spot" made into it that allows the tang to break right off and it will fall out due to gravity.
I do thread repair on these units quite often without removing the pan. Do not be tempted to drill the hole oversize and then tap for a larger bolt, the wall of those cases/holes won't allow that without possibility of damage.
This pic shows a helicoil going into the boss on an sv engine timing cover where the fuel pump mounts. Those holes are very easily stripped and from now on, whenever I have a timing cover off an engine, it gets helicoiled on a routine basis. You can see the nylon installation tool has just started the insert into the hole. I seat the insert 1/2 turn below flush.
Attachments
Michael Mayben
IHPA Tech Moderator - Retired & No Longer Online
hey Mike, great info. Should the coil be inserted with a drop of thread locker?
Back in the old days, I did use loktite on occasion lou...but no longer. I've never had a helicoil-brand insert fail, back out, or give any problem. Not so with other types of thread repair inserts, some of which use a different methodology to retain.
When the helicoil is inserted using the install tool, it's under a "spring tension" which is highly engineered to hold in all materials. That is why the special tap included in the kits are a must, any other thread form will lead to failure. Some of the clones of the helicoil system are designed to use standard screw thread forms and are shit in my opinion, that is just a workaround to reduce the cost of the kit to make it more attractive to the folks who won't pay the price for the helicoil brand.
There are some alternatives to helicoil that are excellent (such as keensert), but many of those are just not appropriate for some locations on engines, trannys, etc., this is not a single system solution and when faced with thread repair ya gotta do some thinkin' and plannin'!
But for the 727 pan rail deal, the helicoil is the only system I'll use. Same for stripped spark plug ports on both aluminum and cast iron, the helicoil install on those is a bit more involved and "pre-winder" installation tool is used with those which absolutely prevents the helicoil from ever backing out in use.
The other problem area on the 727 are the brass (sometimes steel) flare fittings (transitions) used for the cooler plumbing. Most especially the rear one. We do have a specially-engineered repair system for that location that will prevent cracking the case at that location which is very common when the po virus rears it's head! That is an npt thread and yes, there is a helicoil repair system for npt available as well, but the aftermarket developed an alternative to helicoil that works well for those stripped cooler ports.
When the helicoil is inserted using the install tool, it's under a "spring tension" which is highly engineered to hold in all materials. That is why the special tap included in the kits are a must, any other thread form will lead to failure.
Some of the clones of the helicoil system are designed to use standard screw thread forms and are shit in my opinion, that is just a workaround to reduce the cost of the kit to make it more attractive to the folks who won't pay the price for the helicoil brand.
I agree that you should not use any "heli-coil clones"..
I forgot about the installation tool -- which I found (with the tap and drill bit) when I finally rummaged thru one of my closets and found my "supply".
JohnnyC
Member
Tranny pan gasket.
Hey I'm back again, I finally got the tranny back up in the Scout and now the tranny pan is leaking like a water fall. The tranny gasket was brand new when I installed it. Its never leaked like this before. Is there a special gasket or trick to seal this thing???
Hey I'm back again, I finally got the tranny back up in the Scout and now the tranny pan is leaking like a water fall. The tranny gasket was brand new when I installed it. Its never leaked like this before. Is there a special gasket or trick to seal this thing???
Michael Mayben
IHPA Tech Moderator - Retired & No Longer Online
Something is definitely wrong if the pan is leaking like that.
There are many variations of the 727 pan gasket as far as materials are concerned, but only one design/shape/type of gasket.
For the composite rubber/cork gaskets, I use either 3m trim cement, gasgacinch, or permatex #97 to stick the gasket to the pan only, nothing against the pan rail.
For the "brown" paper/fiber gasket that have the shiny coating and look like thick, stiff cardboard, I use no sealant whatever, that coating is a pressure-sensitive/heat-reactive coating that works really well if both surfaces are clean and dry with no oil trace present.
For the black rubber gaskets with no reinforcement molded in, I use the same sealant as for the composite cork only I put sealant on both side of the gasket.
For that high end molded gasket available through mopar that has what appears to be a molded "o: ring formed on both side, I use nothing, those are the best but normally retail around $40 and are considered reusable if not overtightened.
No gasket will leak like you describe initially, no matter what sealant is used. There is something wrong...a bent/damaged pan flange, a gooched pan rail on the case, a crack through a bolt hole, damaged shift shaft/throttle pressure seal set, the locknut on the kickdown band is loose, problem with the cooler fitting on the driver side of the case, etc.
Scoutboy74
Moderator
Front right huh. Is this looking at the tranny from the front or the rear?
Michael Mayben
IHPA Tech Moderator - Retired & No Longer Online
mayben,
ok, I exagerated a bit, but it is a steady drip from the front right area of the pan.
How tight should the pan bolts be?
Do you carry any seals that you recommend or use yourself?
The spec'd torque for the 5/16-18 pan bolts threaded into aluminum is 150in./lbs. Or use 12 ft./lbs.
Right front facing forward? If so, the oil is droolin' down from the dipstick tube seal. Very common! The stick tube is retained in the case only by an "o" ring and the bolt through it's securing bracket at the bellhousing. Clean very carefully around the tube and then remove it, you will see the "o" ring in the end in the recess. Replace it installing dry with no sealant of any kind and re-install. Leak will vanish!
I don't spend the big bucks for that mopar molded pan gasket unless a customer specifies and is willing to pay the price. I now prefer to use these newer aftermarket impregnated fiber gaskets that look like brown cardboard with the shiny coating. Those are contained in the soft parts kits we use for tranny builds, and the same soft goods are contained in the B&M transmission parts sets we are currently using for customer work. B&M does not manufacture those soft kits, they are bought out and are supplied to B&M through transtec/transtar.
JohnnyC
Member
Ok im finally back. I replaced the pan gasket once again and it is still leaking. I couldnt find any auto store in cheyenne that had a composite/cardboard or cork gasket. Only those stupid rubber/composite ones. The darn gaskets just squeeze and crinkle when I hand tighten the bolts with a 1/4 ratchet. What gaskets does IH only carry? I'll buy one on Monday!