Installing a "stored" 727

raleighrugger

New member
I've looked at the trans tech section over and over trying to find some information on installing a 727 that has been sitting for quite a while into a sii.

If anyone can point me in the right direction to a thread where this is previously discussed that would be great.

If this hasn't been discussed, I'll continue with my question.

I'm doing a tub swap on my 75 sii, and when I get to the point where I have the old body off the frame, I was hoping to ditch my t-90 and install a tf727 I picked up some time ago. When I bought it, it was attached to a 304v8 that was very clean but not running at the time. It was pulled from a sii that was rusted out beyond repair, so the po decided to part it out. I was told it was working just fine by the po, however I've learned to take that with a grain of salt.

The trans is very clean, with no evidence of leaking anywhere. Being the cautious type, I didn't want to just bolt it up, change the atf, reconnect everything and go. I believe I have all the accessory components to do the manual to auto swap so that shouldn't be an issue.

Is there a similar procedure to installing a trans that has been sitting a while, like there is with a motor? While I have it out and on the bench, what can I do to ensure it is truly ok? I'd hate to install it, then find out that it has issues and need to be pulled out to be worked on. I have read over the band adjustment and diy re-seal stickies posted by Mike mayben, but was unsure if I needed to perform these.

A reputable trans shop locally quoted me $300 to look it over and do a pre-inspection before I installed it. As I've got a lot of things I need to purchase for my Scout, I'm trying to save $$$ where I can.
 
We haven't really addressed this issue before, but it is something I deal with very often! Thanks for bringing this question up!!

A slushbox is not an engine, completely different scenario, so the issues we see regarding long-term engine non-rotation don't apply to trannys! Same for the "pre-lube" deal, it's just not needed nor is there any way to do that effectively without a closed-loop dedicated pump system.

And for $300 I'd internally inspect six of these units if ya brought 'em to me!!!! In the bizz, that's called "stealing from the customer"!!!

The killer on any trans is moisture internally!!! You can see the damage done in many of those 727 threads I've posted. The working fluid does nothing to inhibit moisture-induced corrosion on machined surfaces and the growth of "mung" in the myriad passages throughout the trans and valve body.

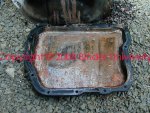
But...by simply pulling the pan carefully and retaining the contents, you will quickly be able to see if the waterbug has infested! Do that and take good pics of what ya see as it comes apart and then post 'em here for evaluation. The pic posted is a dodge motorhome trans I did a conversion on for maranda's "pink" mud drag rig a few years ago, about the worst I've ever delt with. But that unit cleaned up just fine in overhaul and is still going strong today.

Scoutboy 74 and I are doing a 727 rebuild video now that will be posted on the forum soon, one of those was equally as nastee inside.

Don't ever do any type of "flush treatment" to any automatic transmission, that always results in disaster! It's simply a worthless "up-sell" in a quicklube operation or shithole transmission shop that knows it's a way to force a transmission rebuild that generates real cash.

While the pan is off, do the band adjustments. And carefully inspect all pan rail threaded holes to determine if any need helicoils. Carefully inspect the front and rear transmission cooler transition fittings where they screw into the case. The rear-most cooler port transition is the problematic area for the case cracking (due to ham-fisted po shit!) or stripped threads.

Replace the two seals behind the bull gear, they are identical in size, but one is installed "backwards", this is something that everyone (including transmission shops) pays no attention to, a leak in that area will show as a fluid leak out of the vent hole in the transfer case adapter, and trans fluid will flood the transfer case, increasing it's fluid level to the point it blows a mix of gear lube and tranny fluid out all the seals and the vent! Review this thread, beginning with post #13:

http://www.forums.IHPartsAmerica.co...-torqueflite-727-guapo.html?highlight=bearing

What else??
 

Attachments

  • Pink's Pan.jpg
    Pink's Pan.jpg
    115 KB · Views: 1,001
By the way...the trans in the previous pic posted I did for pink was not a simple "cleanout/inspection", it was a full-on hd build involving swapping output shafts and tailhousings!

There is no way to "clean" a trans like the one in the pic, that is simply a core/donor going in, but we needed to use the case as a match for the "b" block 440. Turns out I used all the parts after cleanup, nothing damaged at all, and just installed the fresh rebuild stuff in a normal fashion. The cleanup alone however added about five hours to the labor time, including rust removal!!
 
But...by simply pulling the pan carefully and retaining the contents, you will quickly be able to see if the waterbug has infested! Do that and take good pics of what ya see as it comes apart and then post 'em here for evaluation.

May sound like a dumb question, but do you want me to pull the pan without draining it first? Or do you want me to drain it, drop the pan, then take pics of the contents and post?
 
As I understand it now, the transmission can be placed "on the bench" now?? The pan if original does not have a drain plug, the only way to drain it is to pull the bolts carefully, then break a corner loose with one bolt left kinda snug and drain the contents into a clean container. No way around making a mess, so be prepared!!! It is possible to install an aftermarket drain plug "kit" while the pan is off for future use.

Check this thread:

http://www.forums.IHPartsAmerica.com/I-h-s-t-o/3401-IHSTO-binder-u-727-cluster-class.html

One can never completely drain one of these units without total disassembly and solvent washing the parts. And for this inspection, there is no need to remove the valve body or disturb anything else.

So drain it first, then remove the pan and take pics, we want to see the "residue" left in the pan without washing it out! And we want to see the condition (and smell it!!) of the atf being dumped, we're looking for evidence of metallic/friction material elements, moisture, and/or overheating.

Moisture will show up with that milky appearance (and rust deposits on the ferrous components), burning/overheating darkens the atf and you can certainly smell it! Atf is normally dyed a red color for identification, though in some cases, specialty atf May be a different proprietary color.

We're looking for pics of any residue in the pan, any rust appearance inside the case/components, and the "smell" of the fluid residue!

So if everything looks and smells ok, all you would need to go back together would be a replacement filter and pan gasket, normally sold as a "kit" in a single package...it May also have two different pan gaskets, the other would one fit a tf 904 trans which IH never used! A 904 is simply a "smaller" 727 essentially!

Do you also have a torque converter for this application to use??? If so, is it the one that came from the same tranny donor app?? Does it have a drain plug??? If so, drain it into a separate container for inspection, let it "drain" for at least four hours, but again it's impossible to drain one completely and any metallic residue which might be inside will have to stay there unless the tc is cut apart for reman, this concept of "flushing" a torque converter is total bs, they are too cheeep to obtain fresh if there is any doubt as to internal condition. And no IH product ever used one of the so-called "lockup converters" that are famous for self-destruction internally from that era, those were only used in select light duty chrysler automobile apps, never used in any truck, even a dodge pickup or ramcharger, or Jeep app!

If the tc does not have a drain, then it can be turned upside down on a coffee can and left overnight, that is the only way to get anything pout of one. Do not "flush" it with any type of solvent or parts washer!
 
Last edited:
Ok here is what I found.
Here are a few pictures of the tranmission before I drained the fluid.
dscn0887.jpg
dscn0888.jpg

dscn0889.jpg
dscn0890.jpg

I then drained the fluid. It was pretty red, and didn't smell all that bad. I've seen worse atf on newer cars back in my college days working at the "jiff" (jiffy-lube).
dscn0906.jpg
dscn0892.jpg

dscn0898.jpg

I dropped the pan and here are the results.... Insert drum roll here
dscn0905.jpg
dscn0895.jpg

dscn0894.jpg

There was a little bit of a milky substance down there, and a bit of metallic residue. Very fine though.
This is what concerned me
dscn0904.jpg
dscn0900.jpg

dscn0907.jpg

I found this metal piece in the corner of the pan, and this little c-clip by the magnetic drain plug. Any idea on what it is? I haven't drained the torque converter quite yet.
 
I forgot to mention, that the filter looked pretty decent and I didn't see any rust or corrosion on the valve body. Now I haven't flipped it yet, so we shall when I do.
 
Nice work! Ya ain't messin' arount today huh???

The stuff that looks like "sand" is perfectly normal! That is why it's in the pan and impregnated in the filter! That is organic fiber and brass particulate, which is the friction material that lines the two bands. The friction material on the clutch plates is normally (not always), a different type material. In addition steel particulate is sluffed from the pressed metal drums and the steel plates in the clutch packs. Again, this is perfectly normal and that is why we drain the oil (not flush or pump it out!!!!) and replace the filter. The transgo kits use a fine brass filter "screen" (high flow) that is cleaned in solvent and reused during service.

There are definitely traces of water in the oil...most likely that trans was stored outside and not protected from the elements. Rain/snow can penetrate at several points...this is exactly why I recommended you do this process!!!! This is an excellent teaching moment for tranny service!!!!

Since the unit has been sitting non-rotated, then the trace moisture is kinda "entrained" in the oil and you can easily dump it all! Perfect situation here, since atf has settled over time!

I see this time and time again! Folks pick up these units that have been boneyarded and have simply rotted away internally because they cannot be exposed to the elements! You are looking at a very sophisticated and technical hydraulic system here with working tolerances between components much tighter than any engine incorporates. All it takes is a microscopic piece of contamination to stick a valve and the tranny can self-destruct in a few seconds under some conditions!

The magnet in the pan is a kinda unusual thing that was done for IH apps, not all 727 pans will have that. But a magnet (such as a gutted-out speaker magnet) can be put in any steel pan which aids in attracting/holding the ferrous sluff material.

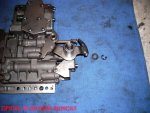
As for the two mystery items...the rectangular piece I can't make out, can you get me a much tighter close-up that is well focused??? I think I know what it is, but I don't wanna lead ya astray until I'm certain.

There are three e clips used in these units. The first one is mounted under the throttle pressure control lever on the outside of the control tower. That retains the shim and soft-case seal to the throttle pressure shaft. You can see that clip if you review the thread regarding "re-seal" of the 727. That one would not be inside unless someone placed it there on purpose!

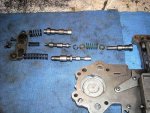
A second similar clip is used in the valve body itself. That retains the "shuttle valve" in the proper bore position in the valve body and is removed from the outside, it "could" have fallen out if it was never properly installed. In order to inspect that point you must drop the valve body out and turn it over and do a visual. If needed, I'll post a pic of one properly installed. This pic show that clip removed in the disassembly sequence for the valve body.

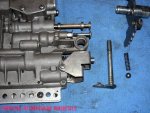
Third and most likely...the "e" clip you found in the pan retains the parking rod to the top of the "rooster comb" on the valve body, with a bit of finesse and those long needle nose pliers ya can reinstall it. I've attached a pic here of that item and where it goes.

I'll bet that the tranny was built at some point in time, and the e clip was not fully seated, seen that before! The rod really can't jump out of it's hole though unless it's pushed out with a tool or finger, so no doubt the parking pawl/park position is working?? You can test that by manually shifting the trans selector arm through the detents while rotating the output shaft. Take some time to play with all that stuff so ya fully understand how the valve body "indexes", the throttle pressure control (kickdown) works, and how the parking pawl locks down the output shaft. Also analyze the nss system and how the switch interacts with the rooster comb on the shift selector shaft.
 

Attachments

  • Shuttle Valve E Clip.jpg
    Shuttle Valve E Clip.jpg
    133.5 KB · Views: 1,527
Here's a pic of the e clip and the retainer groove on the park rod clevis. The clevis end goes into that hole on the rooster comb and held in place with the clip. It can be a bitch to get that clip installed if the park rod was removed from the rooster comb to facilitate valve body removal previously
 

Attachments

  • Park rod clip.jpg
    Park rod clip.jpg
    84.8 KB · Views: 1,890
Here are some pictures of what I found when I started to search for where the e-clip and little metal piece came from
dscn0912.jpg
dscn0911.jpg

dscn0918.jpg
dscn0914.jpg

dscn0920.jpg

I found out where the rectangular metal piece came from
dscn0924.jpg

Is this going to be an issue? It cycles through the shifting cycle ok, from what I can tell.
I also figured out that the e-clip came off the park rod clevis. Got that put on with a little patients and the occasional outburst of wtf! Sorry I didn't take a picture.

So with what I've uncovered in these pictures, putting the e-clip back in place, and the condition of the valve body and fluid, is this trans going to be ok with a band adjustment and filter/fluid change?

Thanks again for your help with this.
 
That is exactly what I thought you would find from what I could see of the broken piece!

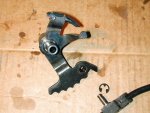
That piece is referred to as the "cam" portion of the throttle pressure control shaft. It contacts the adjustable "stop" screw and is an adjustment that is set during valve body overhaul but not normally changed except when installing/tuning some variations of shift reprogramming kits from various supplier.

I've never seen this before and can't explain why it broke off! Only explanation I would have is that somehow the throttle pressure lever was whacked with an external blow, or maybe got hit when the trans was removed or was in storage???? There is really no pressure against that tab, in conjunction with the adjustment screw it simply sets the freeplay of the throttle pressure valve once the tranny is operating and the circuit is charged with hydraulic pressure.

I "think" (but since this is new to me I can't be certain), that if you carefully re-install the throttle pressure lever (it can only be installed in one single position), and then operate it by hand to fully compress the throttle pressure valve (as when the kickdown linkage operates the valve to fully depress it during wot operation), it will move in completely. When the lever is released, it will travel out completely and then have much more slop than it should have. However, the throttle pressure control rod (kickdown linkage) will not let the lever travel too far out, so therefore this won't really affect tranny operation.

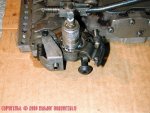
In normal installed fashion, the throttle pressure control system traveling down from the carb linkage allows that lever to have quite a bit of freeplay before it starts pushing the throttle pressure control valve in against it's balance spring. That freeplay is what the adjustment of that stop screw against the cam tab sets.

This pic shows the normal position of the throttle pressure control tab in relation to the stop screw.

Best case would be to replace it! I have no spares, but some tranny shops do have stuff like that they have scrapped out. And, if ya have a good welder in your area, that part could be easily repaired using a tig process!

Otherwise, you should be good to go!
 

Attachments

  • Throttle Pressure Control Stop.jpg
    Throttle Pressure Control Stop.jpg
    88.5 KB · Views: 1,825
how exactly do you remove this thing to replace or repair?

Remove the valve body and place on a clean towel on the bench.

Then remove the "e" clip and shim from the throttle pressure shaft.

Notice that detent ball and spring that engages the depressions on the rooster comb, be careful that doesn't go flying out and down the storm drain!
 

Attachments

  • Rooster Comb Removal.jpg
    Rooster Comb Removal.jpg
    107.3 KB · Views: 1,430
Pull the rooster comb straight up out of it's bore in the valve body. Hold the spring and detent ball and set aside for reinstallation.

At that point the throttle pressure shaft/cam will simply fall out, it's not connected to anything, and is only retained by the clip/shim at the top of the shift tower.

While the valve body is down, keep it covered up or in a pan to keep out any possible contamination, consider this brain surgery for slushboxes.
 

Attachments

  • Throttle Pressure Lever Removed.jpg
    Throttle Pressure Lever Removed.jpg
    112.7 KB · Views: 1,455
While I have the valve body down, is this a good time to install any kind of shift kit? If so, do you recommend a certain brand and model?
 
I highly recommend a shift kit be installed any time a 727 is down for service. Go here:

http://www.forums.IHPartsAmerica.co...-transgo-shift-reprogramming-kit-install.html

I'm now also using the B&M transpak kit. Ihon is a dealer for that product. I've throughly researched 'em (I have two in stock here now) and they are virtually identical in installation process to the transgo tf-2. A few points are different, but the end result will be the same.

I've not always been a fan of B&M stuff, but I decided to give their products a spin again. I'm building two 727 units now for customers using B&M components, the pricing is very competitive!
 
Well I have a transgo tf-2 kit heading my way and I'm going to take the throttle pressure shaft to a local welder for a little fixin.
After reading your thread on installing tf-2, particularly your warning on install experience, I'm now getting a bit concerned if it's within my ability. Is it really that hard to perform with the supplied transgo instructions? Is it in my best interest to maybe drop the valve body and take it to a trans shop to have them do it? How long does it take to do the modification? I figure I'd ask so that a trans shop doesn't over exaggerate on shop time.
 
well I have a transgo tf-2 kit heading my way and I'm going to take the throttle pressure shaft to a local welder for a little fixin.
After reading your thread on installing tf-2, particularly your warning on install experience, I'm now getting a bit concerned if it's within my ability. Is it really that hard to perform with the supplied transgo instructions? Is it in my best interest to maybe drop the valve body and take it to a trans shop to have them do it? How long does it take to do the modification? I figure I'd ask so that a trans shop doesn't over exaggerate on shop time.

You are perfectly capable of doing the transgo tf-2 install! And if ya run into problems, just ask! I know your ability to take good pics will help out!

I have much more info and pics regarding the install, including copies of the much older instructions that are somewhat different.

Also, we'll be shooting a video of the valve body service the last weekend of the month as we try and wrap up the 727 rebuild project, that won't include doing a tf-2 install, but maybe we'll do that later if there is enough interest.

Go for it, we can talk ya through the rough spots, just be sloooow and meticulous, and ya can't be too sterile in working with these!

I'd guesstimate that an experienced tranny bench guy would do just the valve body portion of the kit install in about 1.5 labor hours if he's done some of these kits before (this is a very common process in shops that still work with the older slushboxes, some don't do that anymore).
 
Thanks for the vote of confindence and praise of my picture taking skills:cornut: if you can email me the set of old transgo instructions it would be nice to have both side by side while doing the install. I plan on not Doing my normal mode of operation, which is to simply dive in without reading the instructions on this one!

I can't wait to see your 727 rebuild video. I've always shied away from working with slushboxes in the past, since most books are hard to follow and I'm a visual learner.
 
The old tf-2 instructions are way too large a file to email.

I can send you a copy by snailmail if ya gimme your snailmail to addy, send it to:

michael@IHPartsAmerica.com.

However, since several areas are "different" they May be somewhat confusing, you need to use the instruction set that is packed with the kit that you have now. There was a time when some versions of that kit included a "how-to" video, however I think it was more of a hindrance since it delt with only one variation of valve body and was not representative of the exact stuff used in the IH units.

The earlier instructions have several supplements, including one for the "no yo-yo" modded valve that is part of that package. That used to be a separate item and modification available from transgo, it is now included in the kit that you have, thus that is part of the revised instructions.

The thread that I have here on the forum involves the exact kit that you are dealing with, not the earlier version!

Also, the "munroe" book which we talk about alot and is an essential tool for dealing with the 727 has a section devoted to the tf-2 install, but it is the early version and also includes several shots of different valve body variations, so while it is an excellent reference for this also, ya still must be very exacting in dealing with the valve body you have. So take detailed start-to-finish pics of all that you do so you will have that for reference. Then if ya need clarification, we'll compare your pics/stuff with what I have so we can work through it!
 
Back
Top