Trouble Starting after Rebuild

Jimbo75

Member
I have a 1975 Scout 2 w/ 345, Holley 2210?, points distributor.

Over the last two years have taken engine down to long block for cleaning, paint and new gaskets. Have reassembled and decided test fire before installing new radiator... And trouble.

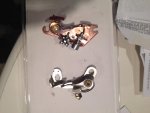
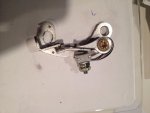
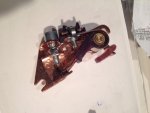
Engine is turning over, getting fuel to carb. (too much at this point) but not getting spark. New plugs, new plug wires, same carb, same distributor. Have 12 + volts at battery and also on charger. 12 + volts at + and - of coil when ignition switched on. Voltmeter showing 12 + volts through coil wire when disconnected from distributor. Not seeing steady spark when placed on intake (ground) and cranking engine.

I have fouled one set of plugs and think I have also fouled the second set. Don't want to replace again until spark is confirmed. Have tried reconfirming tdc at least twice and also rotating distr. 180*. This May also be premature if no spark to distr.?

Don't think there was a problem with coil but did try switching this also, no change to lack of spark.

Need help please. Getting frustrated and know that I have to fix this. No traveling IH mechanic in the bay area, as far as I know.
Thank you.
 
Hi chappie.
Thanks for jumping into the middle of this with me. Not sure what the resistance is. Do have a multimeter but should be noted that I am not an electrician or mechanic.

Stayed up late last night going though posts looking for ideas/solutions. I did see a few that involved business cards and/or extra sets of hands. Currently working on this project solo and would prefer not to electrocute myself.

Do you have a simple set of instructions for dummies on this resistance testing? Or better yet, pictures?

Do I need another person? Also purchased new points, condenser, rotor and cap yesterday but not installed. Should I just swap parts instead of testing? If yes, how do I set points gap?

Thanks again.
 
Since you already have them, just put the new points in. The points are just an electrical switch. They let current flow through the coil when closed and when the points are opened the current stops and the high voltage spark is created. When points are dirty less current can flow and the spark gets weaker/erratic. The ohm's scale on your multi-meter measures resistance to electrical flow.

Just for grins, use your multi-meter to measure how many ohm's of resistance the new points have vs. The old set after you take them out. The measurement will be taken from the mounting frame of the points to the terminal with the nut.
 
Thanks again chappie.

So not officially "running" or able to idle but we do now have spark. I didn't do any resistance testing on the points but was a points problem. Points had been moved during reinstallation and were not closing. Tweaked them a little with ignition on until I got spark when rotating crank by hand.

I am getting the occasional backfire and a slow "lope" when starting. Will not idle and am only getting the "lope" while feathering gas pedal. Have tried retarding and advancing distributor to find a "sweet spot", no luck so far.

Could this still be points (dirty, poor adjustment or just bad)?

I am getting fuel to the carb, could this be fuel delivery?

Any other thoughts?
 
Install the new points and condenser and set to spec. Place your finger over the hole for #8 spark plug crank motor until you start to feel compression. Turn motor by hand and set to 10deg advance on the damper wheel. Rotate dizzy until points just start to open. Now make sure rotor is pointing to the #8 plug wire. Check the firing order from there. Should start right up of not totally flooded.
 
Thanks chappie for your concise plan, I was excited to try these steps last night.

Few setbacks though

points
the brand new points that I picked up last weekend were not the right part, will post pics. There was only once store in town that had them in stock and they swear it is the only option for my year (standard dr2270p). Now I need to track down the right replacements, hopefully today.
I was using part # echlin cs757p, is there a better number or different number? Pic # 1 both points, old on bottom, pic # 2 old points (right), pic # 3 new points (wrong).

Battery
only had about 1/2 hour to work last night. Did set the points gap with the old points just to see if that helped with starting. Not sure because I only got about 5 seconds of cranking before battery crapped out. I was getting good voltage ratings when testing previously and have also been running a charger to keep voltage up. Pulled charger last night and tested battery this morning, down to 10.5 volts. So...new battery is now on the parts list for today.
 

Attachments

  • IMG_3438.jpg
    IMG_3438.jpg
    40.8 KB · Views: 325
  • IMG_3440.jpg
    IMG_3440.jpg
    37.5 KB · Views: 315
  • IMG_3441.jpg
    IMG_3441.jpg
    43.5 KB · Views: 330
Your old points are shot, the contact don't mate squarely even. Been a long time since I've done points as all my rigs use pertronics ignitors, but it looks like you've got a curved point dizzy.
 
She's alive !!!!!!

Chappie thanks for sticking with me and answering stupid questions. The method you suggested worked almost perfectly. Instead of the "finger over hole" technique for compression testing, I used the "toilet paper wrapped in plastic bag" technique. The points did take a couple rounds of adjustment to get dialed in. Also a little adjustment (I think advance) on distributor, turned vacuum port clockwise towards passenger side.

Did not want to idle too long without coolant and radiator installed. Plumbed those in and gave just a little more warm up before pissing off neighbors.

Did notice a tiny amount of coolant coming from passenger side water tube at pump. Know this is now a different issue but... Will this seal itself? O ring expansion or swelling?

Ah the swings of Scout ownership and mechanicdom. Greatly appreciated to all for input, hopefully this May help the person. Happy labor day!
 
Great news. I knew you could do it.

As for the coolant leak. Did you thoroughly clean and sand the bore in the housing before putting the o ring in with some silicone grease? If not it would be best to pull it apart and do it right to be sure it won't let loose when you're in the middle of nowhere on a dark and stormy night.
 
Bores were cleaned, both water tubes were replaced with new and o rings were soaked in brake fluid prior to install. It did take a couple of tries with each side to get o ring seated correctly (what felt correct since you can't see to verify).
Unfortunately, I think I agree with chappie. Losing a day now May save much more time down the road.

Was hoping that somebody would say there is an external method to seal or something that could be run through the coolant lines for minor leaks.
 
It's hard do a good job sealing rust. Hopefully you used dot 4 or 5 and not dot 3 brake fluid on those o rings. I've seen dot 3 fluid destroy rubber parts not designed for it.
 
Back
Top