Stock Pushrod Length for a 304

I've never had the opportunity to try replacing the cam bearings while in the truck but I suppose it is possible. Probably more trouble than just yanking it out and doing it on the stand.

My thought on your deal is a wiped out babbitt layer since it was quiet at first. Take a look at the pm linked photos I sent you of the other engine with the same problem. It has since been repaired and a new cam installed. The cam bearing journals were also polished to make sure the new bearings didn't die a similar death. The other new cam that was installed upon rebuild the first time had a very poor journal finish with bad so it was sent back for replacement.

The report I got is that the engine is fine now after some miles.
 
Really the trans has to come off of the engine but not out of the truck.

I just don't know what dropping the trans will gain you. Can't do anything to fix what you might find and if you can't see any discernible issue the engine has to come out to diagnose anyway.

If you do pull the trans first post or email me some hi-def pix of the rear bearing/cam and I'll see if I can tell what the issue is. :idea:
 
I'd never try and r&r cam bearings with the motor still in the truck. It's tedious enough to do it on the engine stand to verify proper alignment and positioning! And that is with the heads off so that if the oil spit holes in the bearing don't quite align, a correction can be made using appropriate long shank drill bits and a small die grinder to "tune".

As for the camshaft/cam bearing surface finish issue that Robert mentioned, two weeks ago I personally inspected the shitpile that was removed from that engine!! Obviously this was a huge manufacturing defect on the part of the cam grinder (no, it was not isky, delta, schneider, comp, etc.). And the cam blank had obviously been allowed to rust while sitting on the shelf before it was finished, and rust is still evident inside the oil holes now. The cam bearings (except for #1) were totally destroyed due to the bogus surface finish with babbit material smeared right into the oil ports effectively blocking them, thus valve train noise increased over the very short time the motor was run. Only cam journal #1 had anywhere near a proper finish, and it's corresponding bearing was not affected.

There is always a root cause for this lifter noise issue...always! Pop the motor out and let's determine what it is!

By the way, the engine with the bogus cam? By not going the chevrolet swap route, the owner was able to work through this and ended up with a beautiful rig in the process that is totally silent and a show-winner!
 
Thanks michael!
How do I remove the cam bearings?
Do you guys have a recommendation for a stand? I was using an old 33" BFG on a pallet before I put it in the chassis! If I still have my old motor mounts, maybe I can weld up a cradle with them and another point of contact where the tranny bolts on and put it on a pallet??

When I remove the cam, I'll check it for any wear. As far as the bearings, if the babit layer is worn, the cam should be as well, correct?
Robert mentioned the finish of the block where the bearings are "pressed". That would be a machine shop job? How do you inspect that? Wouldn't you need to remove the intake and windage tray to see them?

I remember when the #2 and #4 bearings were lined-up the volume of oil was pretty large squirting out of the rocker shaft supply holes. There was also about 50 psi at approx. 1800 rpm on my drill. Would you suggest removing the heads anyways to verify alignment of those bearings? Is it a visual verification or do you stick the long bit shaft down the hole and see if it comes thru the bearing?
Thanks!
 
Cam bearings are removed with the same tool that is used to install 'em. They are driven out to the rear (one at a time), just like when doing the install except you aren't concerned with the depth/alignment issue, just drive 'em on out the back of each bearing saddle. Here's the tool/instructions I have:

http://www.lislecorp.com/uploads/instructions/18000_webinstr_cc56dd9726db5.pdf

For an engine stand, the typical chinee 1,000lb. Stand sold by most auto parts stores, harbor freight, etc. Is just fine. However, you will have to fab an extension for one of the mounting arms in order to span the ihc block bolt pattern on the rear of the sv or I-4 engines. Don't try and get by with just three mounts attached.

Hf has those sometimes for $39.95, I have three of 'em plus one or two others that are similar but came from other sources.

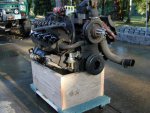
I now simply set a bare block on a large "box" made from 2x12 for knocking in bearings and douching all the oil galleries so I can access all points from both front and rear. With an engine stand you have to demount a block to comfortably access all the cleanout points. I knock the cam bearings in while the block is on the box, then remount on the engine stand to complete.

The babbit layer of that type bearing is very soft. The bearing can be totally destroyed yet the finish on the cam journal not be affected at all. But each journal must be checked for "roundness" and surface finish of course.

The "saddle" in the block for the cam bearings to seat in must be the correct diameter also, otherwise a bearing will spin. The nature of these engines is to not spin a cam bearing, since the bearing material disintegrates well before the bearing May try and seize to the journal as the cam rotates.

Your oil delivery test would indicate only that #2 and #4 cam bearings are serviceable (maybe), the rear cam bearing (#5) is the one that is critical for oil delivery to the lifter gallery. #3 is just..."a bearing" and #1 controls oil delivery to the cam/crank/distributor gears. The only way to determine bearing condition is to do a visual inspection. That can be done by simply removing the cam (carefully!!) from the front of the engine without pulling the heads. You will need to inspect each bearing, front-to-rear very closely with a strong light, any surface deterioration will be very apparent.

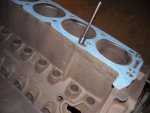
When installing the bearings in a shortblock I use the drill bit or a suitable dowel for verifying alignment. Since the oil port in the head is "offset" from the corresponding oil port in the block, you can't simply look down through the orifice or run a wire or drill bit through. The head gasket has an oval seal area at the port junction to seal the oil path through that offset.

I have several pics of cam bearing installation, along with modding the oil delivery port area for the #5 bearing in order to "un-restrict" the oil supply to the lifter gallery I can post when you need 'em.

There is no windage tray used on these engines...removing the intake manifold really doesn't allow any better view of oil port alignment or cam bearing finish since the casting is solid except for the knock-outs used for oil drainback at each end of the lifter chamber.

This pic shows how I use the aircraft drill bit with a drill stop collar to "align" the oil hole for #2 and #4 if it needs to be corrected. That also involves using a micro die grinder inside the bearing to chamfer the hole in new bearing before sticking the cam in. One more reason to not do this with an engine block installed in the vehicle! Notice the opening in the head gasket I mentioned. The head gasket was placed on this block in order to illustrate this process, the block was in very early stages of cleanup and has not yet been honed nor gone through the final cleaning process.

 

Attachments

  • Rocker Assly Lube Passage 005.jpg
    Rocker Assly Lube Passage 005.jpg
    61.4 KB · Views: 351
Here's a pic of a sii version 345 on the "block box" with the pan removed. The mover's dolly is a hf item also, good for 1,000lbs., I have many of those for placing heavy items in the shop so they are easily moved.
 

Attachments

  • Block Box.jpg
    Block Box.jpg
    86 KB · Views: 364
Robert mentioned the finish of the block where the bearings are "pressed". That would be a machine shop job? How do you inspect that? Wouldn't you need to remove the intake and windage tray to see them?

Perhaps misinterpreted. I said the cam shaft journals need to be inspected for finish and polished if in doubt.

I anticipate your problem will be blatantly apparent once the engine is out and apart.:shocked:
 
Last edited:
Back
Top