Looking real good david!
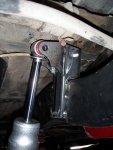
My only concern/suggestion is where you powdercoated the spindles and caliper supports. Any surface that is bolted together such as these two parts should not have any paint/powerdercoat/dirt in between them as this May cause the parts to eventually loosen.
My only concern/suggestion is where you powdercoated the spindles and caliper supports. Any surface that is bolted together such as these two parts should not have any paint/powerdercoat/dirt in between them as this May cause the parts to eventually loosen.
 thanks for the info from ihochad ;


 I don't think it would stand up to a toyota prius. Or would it?