That is a real scruuball "vacuum port" design on the part of IH engineering! That crap cost about half as much as installing a proper vacuum fitting! They used to use proper fittings...but cost reduction drove the ship for Scout II production and that was carried over to some other platforms also. That is one way they plumbed the pcv into the intake plenum on "some" manifolds". And what you have found is very common but it's a good thing you have now found that, that is a major vacuum leak point! The pcv is connected directly from the baffled, valley cover/chamber, to the manifold vacuum source, the internal design/calibration of the pcv valve itself "meters" proper crankcase ventilation to attempt to maintain a slight negative pressure in the crankcase when the engine is running.
All motor vehicle engines sold after about 1961 must have some form of pcv. And the carburetor itself is calibrated during engineering to take the pcv system into consideration, since that is an "engineered" vacuum leak, the idle mixture circuits on the carb are adjustable to compensate for the pcv "vacuum leak" if it's a metered leak. But what you see is an "un-metered" vacuum leak!
Ez fix...remove the tube from the hose. And most likely you could stand to replace the pcv hose anyway!
Then "lightly" tap a tapered punch/drift into the end where it engages the hole in the manifold. Ya wanna "very slightly" swell the end of the tube. Then push it back into the hole and tap the end carefully to drive it into a seated position. I drive 'em in dry, if it does not fit tightly with no movement, then I use locktite stud/bearing grade liquid on the fitting before driving back in.
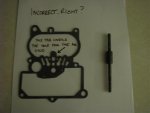
Good thing I sent ya an extra gasket!
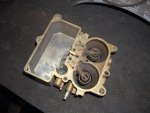
So the accel pump system is working as it should, but you will need to tweek it for max output early in the throttle plate rotation.
I'll go ahead and drop the parts to you tomorrow, I can't think of anything else I can send ya right now!
As for the heat dam insulator gasket. If the paper is not torn or damaged, then pop out all four of the "bushings". They are either delrin-type plastic (really nice quality stuff) or steel with an oxide finish. Then lightly sand/grind about 0.005">0.010" off one end of all four. Then re-install. That will insure proper gasket crush when the bolts are snugged down. I have to do that quite often on those gaskets when new due to manufacturing tolerances and poor qc on the part of fel-pro or their root manufacturing contractor.
All these little details you are finding/correcting will make a difference! These smogerators are ragged edge lean and that is why they are so tedious to try and restore to operation! They allow no margin of adjustability. Originally, there were "limit" caps on the mixture screws and only a dealer mechanic was supposed to mess with 'em! They have a very fine line between "work ok" and "pure crap" as far as drivability is concerned, right now you are trying to emerge from the pure crap stage!
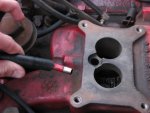
Once the engine is running again (even though not perfectly??), I want ya to do a redneck test on the egr valve. That is that flat can-looking device below your hand in your pic. With the engine idling the best it can, use a couple of fingers underneath the valve and you will feel some openings or slots. Be careful, the edges of those slots are sharp! Then push with your fingers up on the diaphragm of the egr valve, that is the fabric-appearing item underneath the cover. When you push up, the engine should start stumbling and the idle quality goes to hell. You just manually "opened" the egr passage. When ya release it, idle returns to ok (we hope!). Do that several times to cycle the valve. If idle quality comes and goes, then the valve is at least sealing when it should (at idle). If not, then the valve pintle needs to be cleaned, it will be clogged with carbon. It's "possible" that right now, the valve is clogged/stuck in the "open" or partially open position, that just creates one more vacuum leak point!
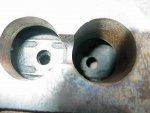
When you look straight down into the intake manifold on the floor of the plenums, you will see two holes about 1/4" in diameter. For the egr system to function properly, those holes need to be cleaned out, ya can poke the shit with a pick and then use a vacuum cleaner to suck the debris out. Then...plug the fuel line where it goes into the carb so it can't squirt fuel. Crank the engine over several times (pull the coil wire out first!) and you will see mt. St. Helens erupt from those two holes! Use vacuum again to pull any remaining particles outta the plenum, ya don't want that stuff going into the combustion chambers!
The pic shows the same thing I've just described. However, the manifold in the pic is on an amc 401 engine inna '73 Travelall. But that engine came originally with the same carb you are struggling with! See the carbon accumulation in the left hand plenum??