One stuck nut! D300

I recently picked up a d300. For disassembly, I have bolted it to my stout workbench built up of 2x6s and 3/4" plywood, so I can try to remove the rear output shaft. Holy crap! I've soaked the threads and I'm pulling on it with well over 200 ft/lbs and it won't budge (my bench was beginning to bend!). I even tried heating the nut with a propane torch. Impact wrench, well, it laughed at that.

Begin to cut the nut?

Ideas?
 
Put the case on the floor and hold the yoke with a yoke holder or large pipe wrench while you loosen the nut with a 1/2" breaker bar with a cheater bar on it. Maybe get a second person to help hold and stabilize the yoke holder and t-case while you loosen. Should break loose no problem. Or.....get a better impact !
 
Something like this, big piece of pipe on the yoke holder and jack handle on the already big breaker bar!

attachment.php
[/img]
 

Attachments

  • DSCN4375.jpg
    DSCN4375.jpg
    104.2 KB · Views: 336
  • DSCN4374.jpg
    DSCN4374.jpg
    66.4 KB · Views: 662
Exactly what hondo is showing in the picture. You'll also need that setup to properly torque the nut back down to the 120-150 ft/lb spec when you put it back together. Hondo, I like the insulation on the cheater bar! :icon_cool:
 
something like this, big piece of pipe on the yoke holder and jack handle on the already big breaker bar!

attachment.php
[/img]

That looks like a 3/4" drive... Tomorrow I'll go out and buy about 4' of pipe and give it a shot...I've had 1/2" drives break before, so I'm thinking a trip to hf to buy a cheap 3/4" bar.

I have a huge pipe wrench I can clamp around the yoke on one end, that should reach a big vise mounted on the bench as well.

Too bad it isn't actually mounted in the Scout!
 
If it were mine, and I try to everything myself, I'd take it to a shop and pay them a 20 spot to get'er done. Don't hurt your self.
 
Looks like a 1/2" craftsman breaker bar, should be more than fine. That nut shouldn't be on there that tight. I've never had a t-case or pinion nut that my 1/2" impact wouldn't take off and I've worked on a lot of them. Is your air pressure on you're compressor output at least 90 psi?
 
Looks like a 1/2" craftsman breaker bar, should be more than fine. That nut shouldn't be on there that tight. I've never had a t-case or pinion nut that my 1/2" impact wouldn't take off and I've worked on a lot of them. Is your air pressure on you're compressor output at least 90 psi?
 
That is a 1/2 inch craftsman breaker bar in the picture. I think I'd trust that more than a harbor freight 3/4. The insulation is padding on the floor jack handle because my floor jacks (3) get stored under the front of my mustang. If you plan on doing much work on transfer cases and differentials, a yoke holder is a good investment.
 
Hondo beat me to it with posting up one of the best ways to remove the yokes. Can even be used while still mounted in the vehicle. I made my own yrs ago, with material I had laying around. Drilled for multiple sizes of yokes. I also use it on the axle yokes too. Before I made the yoke tool, I was using a big pipe wrench and/or crescent wrench.

1/2" drive should be sufficient. If more persuasion is needed to remove the nut, then use cheater pipe on breaker bar as hondo showed. My craftsman 1/2" drive torque wrench goes to 150 ft lbs.
 

Attachments

  • Yoke Tool.jpg
    Yoke Tool.jpg
    39.8 KB · Views: 402
Thanks, everyone…I bolted the d300 close enough to the vise so as to hold the big pipe wrench, then heated the nut, and slipped on a 5 foot long piece of pipe. It finally budged, and now is off. Oh, wife took the picture. When I explained the problem and how I was going to put a five foot long pipe on it for leverage, she said, "I want to watch!"


edit: now it's the front one I'm having trouble getting a grip on. I've stripped most of the parts except for the front output shaft. It's stuck just as bad…this one will take a little more time


IMG_1525.jpg

IMG_1527.jpg
 
Last edited:
Got it all apart. Incredibly, an extra ball bearing came out of somewhere, somewhat smaller than the two for the shift rails. This should have two ball bearings, two springs, and two interlock plugs, right???

Btw, does anyone know what color the springs should be? I think the one that runs the rail for the front output is a violet color. Anything I should know about these springs?
 
Good to see you have tenacity, it will serve you well while working on these dinosaurs . Don't know how much you know about these transfer cases, but those springs are what keep them from popping out of gear - typically low range when you least want them to. The pills are interlocks to keep you from putting the front and rear in different gear ranges if you twin stick, or something weird happens to the shift linkage. Since you now know what it takes to change those springs, you will want new ones - they usually come with the rebuild kits with some washer shims to put under them if you plan to twin stick. My advise is to use the shims regardless, or find some beefier springs. I didn't get enough spring under the ball for the rear output shift rail on mine. It popped out of rear low a couple of times on a steep downhill on the initial test drive, so the brand new twin sticks came out. Have had no problems with the single stick.
 
I've been around IH iron for decades… anyway, I'm aware of tired springs, but I've never had a t/c that popped out of gear. Now that I'm into this d300, I'm just wondering how one would assess a tired spring if one never had the t/c in a running vehicle. The purple spring (front output) has a free length of 1.012", the rear output has no color and is 0.86" long.

Why not have both springs the same, I.e., stiff? Why don't they do that from the outset?
 
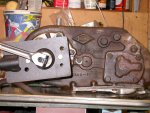
I picked up a copy of the d300 service bulletin. It's pretty good but has a few details about the d300 that I found surprising. Aside from the gasket between the unit and the transmission, no formal gaskets were referenced, just using some suitable rtv type sealant. I think the right stuff will suffice! The two poppet springs are listed as being the same with one "exploded diagram" number. Mine has a plain spring (rear) and red spring (front). The red spring is noticeably stiffer. Also, the output yokes are to be torqued to 150 ft./lbs., instead of the d20's normal 200-300 lbs.

Otherwise, I really like the improvements over a d20 and the use of sliding collars to link gears and power flow vs. Sliding gears with their dogs. However, it is plain that setting up the rear output shaft's clearance will be a pain compared to a d20.

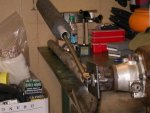
Hopefully get the new bearings, cups, and intermediate shaft kit first of the year. I took measurements before I disassembled it. The output shafts had end plays around 0.008" and the im shaft had 0.013" clearance (new thrust washers usually end up <0.005"); so a refreshing was definitely in order.
 
Back
Top