My Traveler Ride

Thanks! Recently completed my front bumper. Has tow points, incorporates the Warn winch, nothing fancy. Here's some pictures. Mostly made of 11 gauge plate/ sheet, middle of it is made of 1/4" with a 3/8" plate for the winch mount.
 

Attachments

  • 20180121_164052.jpg
    20180121_164052.jpg
    69 KB · Views: 487
New Front Bumper Fabrication

Here it is with the push bar. 1 1/4" schedule 40 piping.
 

Attachments

  • 20180123_152544.jpg
    20180123_152544.jpg
    83 KB · Views: 481
Winch and New Front Bumper in Action!

https://www.youtube.com/watch?v=vFO6pcYDgAc&t=38s

Here's the winch and bumper in action! Got my 28 horse Cub Cadet 7260 thoroughly stuck. Had to double line the cable to get enough power to drag it out. Video doesn't do the pull justice. Front wheels of the tractor were buried in dirt. Couldn't see the top of them.
 
Tri Y Header Repair

So I heard the start of what sounded like an exhaust leak weeks ago. Got to work, look at the header to exhaust connection, and the collector had rotted off the end of the 4 header tubes at the collector flange! Lesson- don't wrap your headers unless you absolutely need to. Here's some pics.

Instead of replacing, I decided to patch and weld up what I had. I cut it apart at the header flange, cleaned best I could, then back welded the tubes individually to the collector flange, patched a hole in one tube, then welded it all back together. Took about two hours.

Not sure how long the rest of this header will last. The tubes are getting pretty thin. I've since bought factory OE replacement cast iron manifolds as replacements. May use them, may not. Ideally, I'd like to build a set of SS headers. We'll see. THis got me back on the road.
 

Attachments

  • 20181002_210217(1).jpg
    20181002_210217(1).jpg
    81.3 KB · Views: 440
  • 20181002_210223.jpg
    20181002_210223.jpg
    78.2 KB · Views: 428
  • 20181002_210358.jpg
    20181002_210358.jpg
    73.8 KB · Views: 452
  • 20181013_124339.jpg
    20181013_124339.jpg
    65 KB · Views: 446
  • 20181013_125931.jpg
    20181013_125931.jpg
    74 KB · Views: 439
  • 20181013_135126.jpg
    20181013_135126.jpg
    60.5 KB · Views: 432
Tri Y Header Repair Part 2

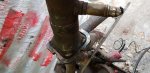
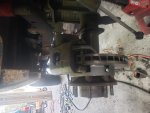
I realized I didn't post the fix. Here's some photos. Don't wrap your headers in anything. If a heat shield is needed, I'll use/ make metal shields next time.

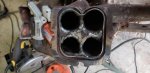
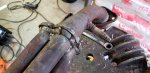
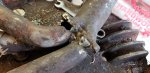
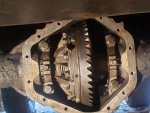
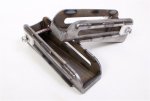
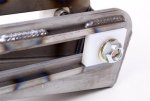
You can see the damage. I cut some 16 gauge exhaust piping sections and patched away in two spots, then welded the hell out of it. I couldn't have done this without the MIG.

Got me back on the road for now.

Headers aren't worth it for me. Loud exhaust, PITA maintenance, flanges loosen up, flanges warp. Look cool for a while though.

Next time I do major engine work, I'll install the replacement cast headers I got.
 

Attachments

  • 20181013_124351.jpg
    20181013_124351.jpg
    59.2 KB · Views: 419
  • 20181013_124343.jpg
    20181013_124343.jpg
    59.2 KB · Views: 377
  • 20181013_134903.jpg
    20181013_134903.jpg
    44.5 KB · Views: 370
  • 20181013_135131.jpg
    20181013_135131.jpg
    52.7 KB · Views: 404
Need Tips on Installing Front Dana 60

Anyone with experience?

It's one of those things where I don't need it, but couldn't pass it up. I bought a D60 DRW front Chevy D60 for $150 with matching 4.10 gears to my GM C&C rear. Good shape mostly.

So far I've turned down and modified the DRW hubs to SRW dimensions.

Have a low buck high steer springless high steer arms. Both may not be needed.

Have the 2 1/2" front hangers for reverse shackle.

Have some J20 7 leaf front spring packs, need new bushings.

Have a leaf spring D60 front swap kit that includes spring plates, hardware, shock tabs.

Have some Chevy D60 front 3/4T disc brake swap brake caliper mounts to use my current 3/4T 8 lug brake setup (late 70s Chevy fronts).

I'll build a new tie rod and drag link using factory 1T GM TREs.

My front axle WMS currently is around 60 1/2" with the Scout D44 and Chevy brake and hub. My rear axle is at 63 1/2" WMS GM C&C 14 bolt.

I'm thinking of not shortening the front D60. I believe it will be at 69" WMS once assembled. A few inches wider each side compared to the rear. It's good to be wider on the front than the rear anyway. Helps outfits track better in my experience.

I run 17x9 8 lug wheels with 4 3/4" backspacing. I think it will be fine. Save on axle shaft cost anyways.

I plan to remove the front D44 axle, unbolt the reverse shackles and set them aside, cut off the old front reverse shackle 2" wide fangs and clean everything up. I'm going to cut off all the bracketry on the D6, bolt up the Jeep front leafs, and roll it under there to see what I've got.

I guess the only unknown is what I'll need to button up the steering- tie rod and drag link (I'm currently using a Wagoneer pitman arm) and what do I do about a driveshaft.

Is a front CV driveline best or stick with a u joint shaft? I run a NP241C and TH4L60 behind my 345. NP241C has a 4 bolt drive flange on it (factory 91 Chevy Blazer I think).

Opinions welcomed. Thanks.
 

Attachments

  • 20180414_135847.jpg
    20180414_135847.jpg
    72.3 KB · Views: 450
Installed Detroit Locker in Rear

Got around to installing the Detroit locker in the GM 14-bolt rear end.

Also swapped my cab and chassis hubs for srw hubs, to give extra width for the Dana 60 front swap. Required different disc brake brackets, welded in place.

Reused my old Chevy half-ton calipers, bought and installed replacement brake flex line as the outer protective sleeves were cracked.

The locker installation was easier than I thought it would be. It took me about 6 hours total, between swapping the hubs and installing the locker.

Still need to do something about lower shock mounts as the locations need to change because I swapped disc brake brackets.

With swapping hubs, welding on new disc brake brackets, and installing the locker, it took me about eight hours total.
 

Attachments

  • 20200317_152910.jpg
    20200317_152910.jpg
    73.5 KB · Views: 303
  • 20200315_145144.jpg
    20200315_145144.jpg
    65 KB · Views: 309
  • 20200314_152919.jpg
    20200314_152919.jpg
    65.3 KB · Views: 287
Attached is a driver side view of the new SRW installation. Shows the revised disc brake bracket, offset of SRW compared to the DRW.

I used Dorman 610-283 wheel studs. Actually, I reused them.

New wheel bearings, races, seals, etc were installed in the SRW hubs. New rotors, reused old calipers as previously noted.
Capture.JPG
Capture.JPG
 
Attached are pics of slider boxes I'll be using in lieu of traditional shackles on the front suspension. These will be in a reverse shackle style configuration. If they work out well, I may duplicate them to use for the rear.

Front suspension will be Jeep OEM Wagoneer 7 leaf packs O" lift, Chevy D60, CPT front leaf reverse shackle spring mounts, slider boxes for the rear mounts, Bilstein shocks, 90s F350 front shock towers, urethane bump stops, undecided what make and model.
 

Attachments

  • LII-SBK%201%20(Small).jpg
    LII-SBK%201%20(Small).jpg
    43.5 KB · Views: 301
  • LII-SBK%202%20(Small).jpg
    LII-SBK%202%20(Small).jpg
    42.9 KB · Views: 299
  • LII-SBK%203%20(Small).jpg
    LII-SBK%203%20(Small).jpg
    53 KB · Views: 294
Back
Top