Identifying part of a Gauge on 74 S2

Yellowscout74

New member
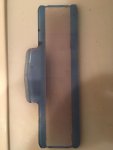
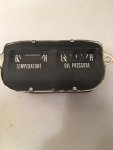
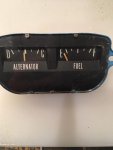
Please see the pics included. This is for a 74 Scout 2. 345 automatic. I am looking to clean up the plexiglass over the gauges, especially the cloudy speedo.

Any ideas on how to clean up the foggy looking plexi?

I also came across a questionable wiring job as well as a question on what something is.

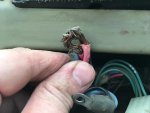
Pic 1: wire connected to back of the Alternator. Does someone have a pic of what this is SUPPOSED to look like? does this simply need to have all the wires put together with a crimp connector and eyelet that goes over the post on the back of the gauge?

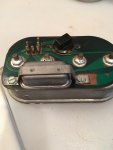
Pic 3: Back of Temperature Gauge. What is the metal block under the bar that is screwed down. If this is not working would that make the temp gauge not work?
 

Attachments

  • Pic 1 wire to alternator.jpg
    Pic 1 wire to alternator.jpg
    51.5 KB · Views: 298
  • pic 2 back of alternator gauge.jpg
    pic 2 back of alternator gauge.jpg
    32.6 KB · Views: 287
  • Pic 3 back of temp gauge.jpg
    Pic 3 back of temp gauge.jpg
    28 KB · Views: 287
You can make the plexiglass look like new if you do a fine grit wet sand and then spray some acrylic clear coat on it. I wouldn't waste your time on the two individual gauge pod lenses as you can get them new https://www.ihpartsamerica.com/store/SL384366.html

On the sketchy wiring, the factory had individual crimp connectors that all joined there.

The "metal block" on your Temp./Oil Pressure gauge is called the CVR "voltage regulator". It regulates the voltage from 12 - 5 volts in a pulsing action which then averages the gauge needle to the appropriate setting. If your temp. gauge is not moving at all, yes the CVR could be a probable culprit, test it with a DVOM and report back.
 
The CVR is used for the OIL, TEMP and FUEL gauges. If all three are faulty, the CVR is a likely culprit. If any one of those gauges is functioning correctly, that rules out the CVR as an issue. Yep, individual ring/eyelet terminals for each of the wires. That is a very hokey, yet typical previous owner repair where they should have quit while they were ahead.
 
The fuel gauge works fine as well as the alternator gauge. Cant remember if the oil temp works or not. all of the gauges are out of the vehicle right now so hard to test.

The plexi on the small gauges is fine and just needs to be cleaned and buffed a little. its the smoky speedo i need to fix

I am reconditioning the gauges and had a question on the needle color for each gauge. i want to repaint them but not sure if the color is Fluorescent red or orange? any tips or color or paint to buy? recommendations?

Thanks!
 

Attachments

  • speedo plexi 1.jpg
    speedo plexi 1.jpg
    26.7 KB · Views: 279
  • speedo plexi.jpg
    speedo plexi.jpg
    14.9 KB · Views: 291
  • gauge 1.jpg
    gauge 1.jpg
    18.4 KB · Views: 290
  • Fuel gauge.jpg
    Fuel gauge.jpg
    19.7 KB · Views: 292
You can test the gauge out of the vehicle with a 3V battery or two D cells in series. One positive lead and one negative lead to the gauge terminals should make the gauge go full swing without damage to it.

I have polished plastic with Bon-Ami, it puts a like new mirror surface on the plastic by removing the craze or plastic "oxide". Today's head light rejuvenation kits do the same thing, I bet they would work too.

The alternator "gauge" is an ammeter with occasional high current through it. It looks like toast from the looks of the PCB. Do not trust it. Leave it in for a legacy look but rewire for a voltmeter or another ammeter somewhere else on the dash.
 
The gauge needle color is orange. Keep in mind that the Ammeter/Alternator gauge is in series with the battery, so it differs from the OIL/TEMP/FUEL gauges in that it DOES NOT utilize the CVR, while the O/T/F all must use it. Another thing with those three little pigs, is each of them have their own unique sender and their own unique wiring circuitry running between those unique senders to each of the gauges.
 
Back
Top