Holes for body bushing bolts

jmalloy

Member
1980 turbo diesel traveler

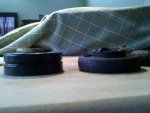
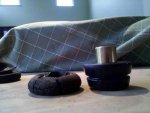
I finally got my suspension finished - r/c 2-1/2" lift, new shocks, 5" shackles front and rear, new sway bar. Before I go size tires for this thing I decided I'd also take care of the body bushings since they're shot and they will affect the body height.

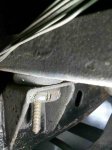
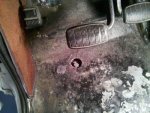
Looking at the bolts I see two sets that are going to be annoying. The ones at the rear of the truck and the ones behind the front seat are both "blind". I assume I'll need to drill holes in the floorpan to get at them. The rear ones have a "bump" in the floorpan that's easy to spot. The others have no markings whatsoever.

Any advice on how to get at these? Barring any better ideas I'm going to take my measurements and drill at my best guess as to where the bolts are.

Let me know - I should get back to this project on Thursday.

(body mounts, tires, and an alignment and I should have a truck I'm willing to drive outside of my neighborhood!)
 
When I did mine I just lifted up the floor mats. It fixed a lot of squeaks and clunks too. The poly bushings are holding up well after about 15 years of hard use.
 
Ah -

if the po hadn't replaced the floorpans, there would be access holes. Makes sense. Other than that, this seems like a pretty simple operation. General notes:

1. Do one side at a time (other side loose)
2. Don't lift the tub high enough to mess with brake lines, fan shrouds, etc.
3. Save and replace any shims for body leveling

what's the proper torque spec for body bushings? I'm finding answers anywhere from 35-55 foot pounds. 45 - 50 seems most popular. Thoughts?
 
Perhaps you can leave a nut on the end of the bolt and use an approved striking device to dimple the floor pan where the head of the bolt is. Then use a 1" hole saw to open the hole.

When my floor pans were done they tried to cover the body bolts. I made them cut the pans and weld around the recesses for the bolts. Good thing too as the dunces managed to melt one of the body mounts in the process.
 
Between my last reply and this one I looked again at the problem mounts. The "bumps" above the rear-most mounts are not caps or covers, they are the tops of carriage bolts that go through the bed floor. It was hard to tell through the many coats of paint. They were easy to loosen/remove.

Interesting idea on marking the location. I'm off to buy a 1" hole saw, I don't own one yet:) I'll let you know what I end up doing for marking the locations, and how well it works out.

Any thoughts on torque specs? I'm going to use 50 foot pounds unless a more definitive answer comes along.
 
Bushings replaced, no major issues. I used Energy Suspension body mounts (they sell them here...). It looks like the new ones are about 1/2 inch taller than the old, squashed ones.

First two pics, upper and lower bushings, old and new. It's not quite correct to talk about upper and lower with the old ones since they are one piece. (how did they squish that thing through the mount, and why??) I got them out by grabbing a serrated knife from the kitchen and cutting them in half. There's a metal ring in the middle that you need - pry it out. The new upper bushings didn't look like they would fit into the ring, but they popped in when I torqued down the bolts. I stopped at 35 foot pounds. The bushings were starting to deform, and it seemed like enough. I'll check them frequently for a while.

http://forums.IHPartsAmerica.com/attachment.php?attachmentid=14416&stc=1&d=1316319803
http://forums.IHPartsAmerica.com/attachment.php?attachmentid=14417&stc=1&d=1316319803


Here's a pic of one of the original rear bushings. Slightly squashed...

http://forums.IHPartsAmerica.com/attachment.php?attachmentid=14418&stc=1&d=1316319803

Striking the bolt to Mark the spot on the floorpan didn't work for me. Perhaps I wasn't using an approved striking device. I measured and marked, and miraculously hit the right spot on both sides.

http://forums.IHPartsAmerica.com/attachment.php?attachmentid=14419&stc=1&d=1316319803
 

Attachments

  • Upper_bushing.jpg
    Upper_bushing.jpg
    45 KB · Views: 667
  • lower_bushing.jpg
    lower_bushing.jpg
    49.1 KB · Views: 588
  • Rear_Bushing.jpg
    Rear_Bushing.jpg
    37.7 KB · Views: 595
  • Floorpan_hole.jpg
    Floorpan_hole.jpg
    80.3 KB · Views: 553
One more note -

if you have a manual transmission, the clutch pedal linkage will need to be adjusted to account for the extra height between the body and frame. I'd recommend disconnecting the linkage before jacking up the frame. You're going to have to pull the pin to adjust the pedal anyhow, and if you pull up too hard on that mechanism bad things happen. Trust me, I know: http://www.forums.IHPartsAmerica.com/transmission-tech/6317-t-19-throttle-linkage-broke.html

Despite my prior experience, I didn't disconnect the clutch. When I went to pull the Scout out of the garage this afternoon it didn't want to go into reverse - it ground gears instead. It seemed pretty obvious what had happened, so I re-adjusted the pedal for about 1/4" play and tried again. No grinding, but also no motion! With the Scout in any gear there was absolutely no engine load. I spent quite a while troubleshooting this before I realized someone (maybe me, maybe my helper) had bumped the transfer case into neutral.

D'oh!

Always check the obvious - it saves a lot of time:)
 
Yet another note -

my radiator now leaks. Looking at the way the radiator mounts (rigidly attached at four points...), I suspect it flexed when I jacked up the body.

One more thing to fix before I can get this thing on the road :(
 
Back
Top