Calling all body men?

superc_1

Member
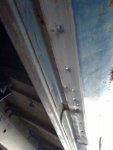
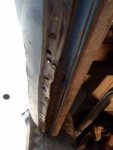
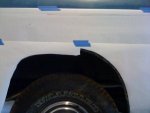
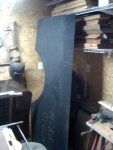
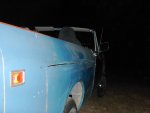
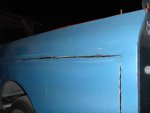
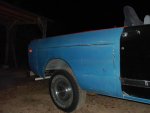
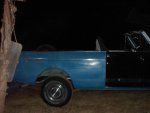
Last night the patch panel replacement began, and I would love for anyboody to chime in on the method they would use if this was there project. I have a whole side replacement panel that I got off of epay and its made to replace the whole ps qtr. Panel, but its not a true qtr. Panel but pretty close. I have included pictures that show my cut and the cut is rough and I May recut the top line since I have alittle room left and I finally figured out the best way to cut the panel about the time I was getting to the end.
My method is after I drill the spot welds out I will lay the cut-out panel over my replacement and Mark that panel then be more careful cutting the new panel. Does a person need those cleco clips to join the old and new panel or is there another way to hold the panels together? Here's the pictures and please feel free to comment with any tips?
 

Attachments

  • photopanel.jpg
    photopanel.jpg
    33.6 KB · Views: 412
  • PICT1424.jpg
    PICT1424.jpg
    32.9 KB · Views: 391
  • PICT1423.jpg
    PICT1423.jpg
    33.7 KB · Views: 595
  • PICT1422.jpg
    PICT1422.jpg
    38.4 KB · Views: 339
  • PICT1421.jpg
    PICT1421.jpg
    37.3 KB · Views: 355
Cut some strips of metal and pop rivet them under the old panel, then to the new panel. Tack weld the seams, drill out the rivets, weld in the holes. :icon_up:
 
The metal strip idea is good gives you a thicker surface to weld to but the best metohd imho is to use a flange tool. Makes a nice 5/16 lip all the way around the area then the new panel sits down in the flange flush with the original sheet metal. Welding is easier and stronger than a typical butt weld. Be sure to use weld thru primer on all bare metal. This prevents rust from setting in between the weld joints. Be sure to weld in small increments at different points throughout the job as not to warp the metal. In other words weld a few spots on one end ,then move to the other end.
The best grinder wheels I have found are the good flap wheels from the welding supply store. They produce less heat cut good and the finish it good. Be sure to etch primer all bare metal before you apply any space age microspherical plastic body filler, aka bondo!!! Ive been doin body and paint work for almost 30 yrs feel free to ask me if you need help! Good luck man!
 
I'm gonna go ahead and disagree with towpainter.

If I was doing that job I would remove that bad area you cut out, grind the paint back at least 1/2 inch on both sides of the remaining metal, fit up the new patch and tack it together.

To reduce the amount of warping you will get, stitch weld that seam about 1/4 inch at a time while jumping around the length of the seam to avoid building up heat in any one area.

I usually grind down the prouds of the tacks in stages, not after all the welding is done. I take a thin cut-off wheel in my wheel-of-death and use the edge of the wheel to take off just the proud of the weld and not any surrounding metal.

Given the budget and/or time I might remove the entire rear quarter after tacking in the patch panel. That way I can weld, dress and paint the whole inside of that cavity on both sides as well as metal finish the whole panel to reduce the amount of filler needed. I will also be able to see any more rust not yet visible. After painting and treating with zinc weld-thru primer (where necessary) I would reposition the panel and plug weld where it was originally spot welded.

Since you cannot dress the back of those welds without taking the whole panel off it is more likely to rust quicker, flanging it and doing a lap weld will make it rust even sooner.
 
Towpainter and that guy,
thanks for the advise! I'm going to do the butt weld on the two panels, but before that I plan on por 15 all the areas behind the panels to help on the rust. That guy I want to thank you for your thread on removing the whole qtr. Panel and I May tack this in then remove the whole panel to prep the whole panel as you suggested. I would love to find the whole qtr. Panel for the terra and just r&r the whole side, but nobody has replied to my want ads. I'll proceed this way then I can always go back and replace the whole panel at a later date if this turns into a mess :). Anyway thanks everybody.
 
Were are all super lazy here, so you need to post the pics so we can see them.

11324d1286976106-calling-all-body-men-pict1423.jpg


I like that your when under the body line, that will make that part easier. The real trick will be getting a super tight fight. If you have 1/8 gaps that means more welding and grinding which never seems to work well on sheet metal. Sooooo.

I would sand the inside and outside back to clean metal. Any coating will vaporize and cause funky welds. If you have gaps and have access to the back side, copper can be used as a backer as the weld does not stick to it. Do what that guy said stitch weld and then wait until cool to touch before starting the process over. I tack like every 2" trying to get get it lined up and then go from there. I suspect you using a mig, I've used both mig and tig, nice thing about tig is no weld to grind.
 
Well I'm back and had a chance to do alittle more work over the weekend.
I was able to recut my top line and it has turned out very nice and straight. Sunday I pulled it into my garage and got to use the spot weld cutter for the first time ; so, heres a few pictures. First pic is were I pre-drilled the center of the spot welds. The second shows the dirt that lays behind them panels. The thrid is hard to see but some of the holes have the spot cuts and I found that you dont have to cut out the whole weld just get a good circle started and thats good enough. You might have to go back and cut alittle more if it's going to be stubbon but it really doesn't take much;also, the picture shows the the bottm edge seperated from the rocker panel. I then moved on to the wheel well and repeated the process. The last picture shows how I took some plotter paper and taped to my panel and then I made alot of reference marks. I then used a razor blade and cut as close to the outer most line as possible to make a template to transfer to the new patch panel. I will cut my new patch panel about 1/4" beyond my template then cut my panel from there to line everything up as close as I can get it.
 

Attachments

  • photo.jpg
    photo.jpg
    28.3 KB · Views: 323
  • photo2u.jpg
    photo2u.jpg
    119.7 KB · Views: 316
  • photo1u.jpg
    photo1u.jpg
    25.4 KB · Views: 315
  • photo4u.jpg
    photo4u.jpg
    136.2 KB · Views: 308
Good idea with the template and cutting it bit large. It's easier to cut it smaller than cut it bigger.

Take your time an make it fit right before you start welding.

Strong magnets help line things up for butt welds if you don't have clecos.
 
Well, I think I have a little problem with my patch panel? The guy off ebay said it was for the passager side; so, I believed him and last night I was checking my panel against my template and something seemed way off? I go find some card board and trace the new panels wheel well out line and put it up against the bad one and it doesn't fit. I turned the card board template around and its a perfect fit :( . I think the panel is for the drivers side instead of the passager side. Anyway does anybody want to buy the panel, or I would trade for a passager side panel off of a terra or traveler?

Could a person rework the wheel well enough to make it work? I looks close but I hate to do all this work and it not look right.
 
You'll not likely be able to reshape it enough to look like it belongs on that side. Better off getting the correct panel. How's the other side, it May be as rusty as this one, you might need that panel soon.
 
Tg. The whole tub is in great shape except that side. It had been gone through before the kid wrecked that side a month after it was fixed then set there for awhile. I've trying to locate another straight one and even if its got rust I'll just weld some patches in to fix it. I only want to do this one time and be done with it! Thanks.
 
Back
Top