
Hello ive got a 63 4x4 Scout 152 4cyl ive been through most of it im thinking of changing out the body mounts & puting in a 1 inch lift with the new ones I figure the origanal ones are 49 yrs old. I have two manuels & neither have any thing about this is this a bugger of a project? Is it worth doing?? Should I stay with stock? Id like to get all projects like this done before paint. Im pretty sure my front springs are pretty worn what do most folks do to fix that problem?? Thanks for your help ak rob


You are using an out of date browser. It may not display this or other websites correctly.
You should upgrade or use an alternative browser.
You should upgrade or use an alternative browser.
bodymounts
- Thread starter alaskarob
- Start date
Michael Mayben
IHPA Tech Moderator - Retired & No Longer Online
The oem body insulators were crap when new! Nothing more than a variation of a hose washer hacked out of some fabric-reinforced sheeting.
It is a bitch to replace 'em, that is due to the fact that the fasteners have all grown together over time due to corrosion. And you most likely will find that the areas at the rear sill locations are partially/fully rotted away. There is also a large rectangular "pad" mount below the radiator that retains the core support portion of the body to the chassis that is often overlooked.
This will not be a "Saturday morning" kinda project! But it's certainly doable. Plan on wasting all the oem hardware, it's much easier to torch the stuff off than try and save the partially rotten stuff. New hardware is imperative.
I've done the springs and body insulators on my 65, and the combination of both greatly improved the ride quality.
For the springs, I went with custom 4 inch lift springs from alcan. The hardest part of doing the springs is getting the old bushings and sleeves out. There are many threads on this, but I used a combination of propane to melt the old bushings and then an air hammer to get the old sleeves out. I've read where some people have used a ball joint removal/installation tool to remove the old sleeves, but I didn't have one of those available.
There are 9 body insulators. As Mike said, there is a rectangular one under the radiator that is by far the most difficult one to replace. There are 2 more right under the front floor pans, 2 more near the gas tanks and 4 across the back of the Scout. I used a large floor jack and various lengths of 2x8's to lift the body high enough to replace each insulator. The problem with the one under the radiator is that there is a bolt that is welded on the bottom of the radiator support. That bolt then goes through the insulator and then the frame and is nutted on the other end. You've got to lift the front of the body high enough to get that bolt to come out of the frame and old insulator. If I remember correctly, I had to lift it about 6 to 8 inches to get the new one in.
The other insulators are easier because you remove the bolts and nuts holding everything together before you replace the insulator. As Mike said, you'll need new hardware for these as your existing ones will likely be un-usable once you get them out. I think I had to take a sawzall to a couple of them. That said, the hardware that came with mine were incorrect for my application (note that I did not purchase this kit from IH Parts America), and I had to go to my local hardware store to get the correct length bolts
I did the insulators in one full day if I remember correctly. The springs probably took 2 days because getting those old sleeves out was extremely time consuming.
Would I do it again? Heck yeah cause as I mentioned, the ride quality improved greatly.
Attachments
Hey thanks for the response that was kinda what I figured it would be a cussin hide the kids ,, wheres the big fn hammer type job but im really looking for some ride improvement & if that is a step in the right direction ill smash a couple knuckles .. Pluss probably one of the cheepest things ill get to do nine pieces for a hundred bucks now thats value
brained
Member
With the exception of the one under the radiator I didn't think it was too bad. Cut them all with the sawzall except the front one - just loosened it, put the hi-lift under the door with a block and did one side loosely, moved the hi-lift to the other side and did the rest, then snugged them all tight.
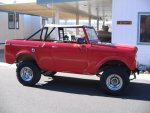
I forgot I wanted to tell jtownsly nice ride is that a 4 inch lift what size are your tires I like that look .. If I rember theres a couple different types of theese bushings what did you guys use ? That szall is a tool I know well being a home builder it can erase a mistake quick ak rob
I forgot I wanted to tell jtownsly nice ride is that a 4 inch lift what size are your tires I like that look .. If I rember theres a couple different types of theese bushings what did you guys use ? That szall is a tool I know well being a home builder it can erase a mistake quick ak rob
Rob,
the tires on this Scout are 31 x 10.5. The ones in the pictures are long gone. I replaced them with mud terrains in the same size. If I were to do it again, I would have gone with 33's.
lorenzalizares
Banned
Spammer
Last edited by a moderator: