best price on pertronix 1141?

Plug Ugly

Member
Did a little surfing and came up with the following link
pertronix ignitors for International Harvester trucks

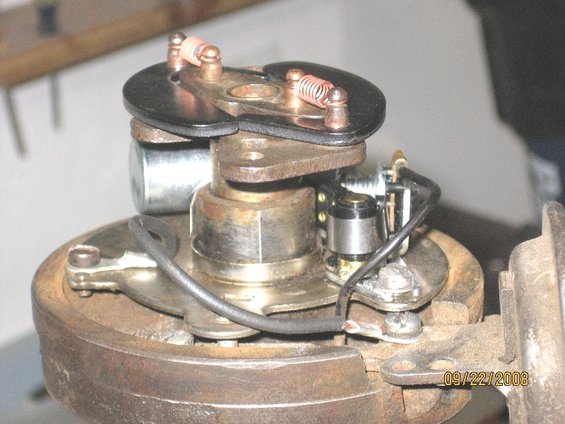
For 80 bucks, I dont see how its worth redoing my delco dist. The po removed the points, springs, wires, everything. I figure I would be 40 to 50 bucks into new parts.

Is there anywhere cheaper than the link I provided?

Also, do you need the pertronix coil, or will a standard coil suffice?
 
That is one of the better prices that I have seen. You can run a stock coil. If you run any aftermarket coils they have to be stock power if they are too hot they will burn up the pertronix module this is what pertronix told me after I burned one up using an accel supercoil
 
If all the hard parts are missing in my distributor, will the pertronix replace them all, or are there other parts im going to need. What about the advance?
 
My recommendation regarding dealing with the link provided...make certain they have the part in stock, and will not bill your credit card until it's shipped! I do not like the feedback I get from "customers" of that source!

If your distributor is missing parts, then no, the pertronix "kit" will not have any parts in it to make any repairs. It only replaces the point and condenser (or unipoint if so equipped) items. The distributor must be complete and in good working order to make the conversion. If any part of the mechanical advance unit is missing, then it must be repaired.

You will play hell finding a "rebuilt" delco distributor for an IH app. The distributors from rockauto, napa, etc. Will be Holley only. Best bet if you want that distributor completely reconditioned is send it to:

http://www.forums.IHPartsAmerica.com/I-h-s-t-o/

They can set it up with a pertronix also.

For a four cylinder ignition application, you need a coil with a primary resistance of between 2.8 ohms and no greater than 3.5 ohms. The stock coil will work just fine being triggered from the pertronix. You can run it from either the "ballasted" feed, or eliminate that and run it from b+. For comparison...the primary resistance of a coil used on an sv application should be between 1.4 and 1.8 ohms. See this thread:

http://www.forums.IHPartsAmerica.com/ignition-tech/852-hot-coil.html

And this one:

http://www.forums.IHPartsAmerica.com/ignition-tech/680-hot-wires.html
 
Last edited:
I'm not sure if ihon has bushings for any distributor application.

And installation of distributor bushings involves the use of some dedicated tooling, both to install to the proper depth, and then to finish the id dimension once in position. This is done either with a dedicated ream or a broach that is configured to provide the correct id for shaft clearance.

And end play is a critical setup point also, that's done with selective-fit shims once the drive gear is ready to install, it May have to be r&r a couplea times to get the end play correct and is a semi-press fit on the shaft, the roll pin retains it in proper position once the end play is correct.

These folks do an outstanding job in reconditioning distributors of all types:

the philbin group - philbin manufacturing and philbin rebuilt products

I'll vouch for their work.
 
I have what is needed to complete the job and recurve the dist if needed to match new cam I am just lookin for the bushings instead of having to order and machine bushing material completely instead of just id fitment
 
Could anyone please take a photo of their distributor with the cap and rotor off? I have a wire tab on the vac advnace, but no wire, and I do not know where it goes. I found a detail of the dist, and it looks to be a small/short wire, but doesnt show where it it mounts.

Is it maybe the ground wire?
 
Last edited:
Sorry, its a delco on a 1961 152. You can see the tab just to the right/under the coil lead wire. There is a small solder spot on the dist base plate just to the left of the wire, and above the square hole that I am assuming had another tab. Also included a shot of my points that is apaprently the replacement. Any comments on this style of points micheal?


1961 International Scout 800 distributor pics picture | supermotors.net


distrib.jpg

points.jpg
[/
 
That braided copper wire is the ground or "bond" connection between the upper and lower breaker plates. Since the upper breaker plate rotates onna bushing when actuated by the vacuum can, the plate must have a continuous ground path to the distributor body.

It's very common to find the wire connection either broken, or the entire wire missing. That was the case with the distributor in this pic. So I fabbed a new ground lead that is routed so that it allows plenty of flex/movement without binding the upper breaker plate. Even though the distributor body is painted, the paint is removed from the ground point under the vacuum can mount screw.

Your other pic is a delco "unipoint" set. That was developed in the mid-70's as an "enhancement", combining the separate breaker point and the condenser together as a set to make service a bit more efficient. The unipoint will backfit into any of these delco distributors.

The distributor in my pic has been converted to a pertronix trigger and has had the mechanical advance curve modded. I've not installed it for a test unit yet as I want to put a few more miles on the currently installed Holley before doing so. That one is for an sv application...the only difference between that distributor and the same item for the 152/196 app is the fact that it has an eight lobe breaker cam, instead of a four lobe cam, and the advance curve is somewhat different.

The trigger wheel for this delco pertronix app is selective fit-mounted under the rotor, quite a bit different from a pertronix module used in a Holley distributor. It has to be shimmed to the rotor to achieve proper trigger wheel air gap over the pertronix pickup.
 

Attachments

  • Delco SV Distributor P-tron.jpg
    Delco SV Distributor P-tron.jpg
    53 KB · Views: 951
Here's another shot showing the p-tron module, the air gap between the trigger wheel and the module is critical as that determines the dwell. And it is adjusted and locked in only after the endplay is set for the distributor. Endplay is controlled by shimming the distance between the drive gear and the end of the shaft housing, ya want that around 0.010" for most accurate timing control throughout the rpm range.
 

Attachments

  • Delco SV-Pertronix 2.jpg
    Delco SV-Pertronix 2.jpg
    67.7 KB · Views: 850
Thank you. So I can mount the wire in any fashion that works so long as it mounts tot he dist plate and somewhere on the vac adv? I can reuse the vac adv tab easily, and can just mount the other end to the points screw or drill a new hole? Looks like you used 12 gauge wire, is that right?


One other newb question, but where does the coil lead wire attach? It looks like yours mounts to somehwere up into the points? (or in your case the pertronix?)
 
That's a 14 gauge wire, 16 gauge might be better as it's more flexible. The wire does not have to be insulated...it'sa ground! Radio shack sells small quantities of braided "bonding" cable that would be best to use, I was simply out -of-stock at the time I did this one.

Don't drill any hole! Just use the mounting screw for the breaker point set at one end, and one of the screws for the vacuum can at the other end.

That braided ground wire was originally spot welded on the upper and lower breaker plates to create the ground path.

All you need to insure is...the upper breaker plate to which the points mount must be grounded to the distributor body. Other wise, when the points are closed, no current will flow through the primary circuit.

The wire from the coil negative terminal goes to the insulated connector point on the unipoint set. That wire must be insulated from ground so that the breaker point can act as the "switch" for the primary circuit of the ignition system.
 
So I have instadlled the recurve kit, and re done the ground wire on the dist. Not sure which springs to use for the curve kit?
Installed teh ground from the front screw on the vac advance to the unused screw seen in this pic. The screw all the way to the left on the dist plate

distrib.jpg


Still not sure where on the points the coil lead goes. The only screw on there is spring loaded, and just behind the condensor. Is that the correct location?

points.jpg
 
Depending upon "which" recurve kit ya got, if it contains the limiter bushing, I would not install that at this time. That kit is actually for a v8 chev which needs that bushing to limit travel.

We "might" go back and put the bushing in place, but I need to actually run a 4 popper delco on my engine with the re-curve, and I need to put timing tape on the crank pulley or at least remark it with a grid so I can shoot it with the dialback timing light...that's my poorboy distributor machine!

As for the springs, I'd put a "light spring and a "heavy" spring on it for now. Again...we need to do a buncha playin' with this before we can say it's "better" or "worse" than oem!

Since the mechanical advance is up on top with the delco, it's very easy and quick to jack with the curve later on!

Regarding your unipoint set and its connection to the primary pigtail...your tag end of the wire has a "fork" terminal right?? Simply push the fork down between the white insulator and the insulated breaker point "spring" that touches the insulator. The spring holds the fork connector in place against the insulator making good contact. If you put the fork terminal on the ground side of that insulator (against the frame it snaps into), the primary pigtail will be permanently grounded, no switching action, and no spark at the plug!!
 
One other "tip" regarding the 4popper delco. Proper dwell setting for that unit is 74*....I repeat....74*!!!

A Holley distributor for the same application uses a dwell setting of 52*>54*.

So the dwell spec for each distributor is different!

This little deetale can eat your lunch when you try to tune the motor!

The dwell is set through the window in the cap...use the appropriate hex wrench and simply run the point adjusting screw in and out until the dwell is correct, that is done with the engine running, then once dwell is correct, the base timing can be dialed in.
 
This look about right? There is no white insulator, but black instead. I believe this is the point you are referrring to.

rebuiltdist3.jpg


rebuiltdist.jpg


rebuiltdist2.jpg
 
You got it!!! Nice work!

I said "white" because that is what is shown in that original pic you posted. But I've got several sets of "unipoints" here also that use the black insulator!

Color don't matter as long as the fork of the connector is insulated from ground!!
 
Back
Top