Beer Can Maneefol Guapo

I definently need to get one of those flushing kits!! Living above where I paddle and swim everyday is some good motivation to watch what I dump down the drain!
 
That tate...he's such a joker! He spends too much time on the binder bulletin!

He just wishes he had a beer can unit for knute which May someday be an ultimate rat rod...a 4x4 squarebody t'ette with a service body to serve as "sleeping pods"/condo for his kiddos! Next up he'll be wantin' to slam it and keep the 4x4! And in his part of the world, he can rent them hiphop nba spinner wheels by the weekend to complete the package.

I knew my comment about "proper fashion" would ring yore bell holokai! I wouldn't even think about driving my rig in pacific grove without rigging a diaper on it!

I started a "milage test" yesterday, I'll report the results next week. That will be followed by our first tow of the trailerhouse since blowin' rattlecan on everything.

The beater radiator repair and re-mount has been sidetracked while I rigged up an ebay-sourced radiator shroud for the s80, it's now gotta "hi-tek" cooling system that's fresh!

This deal ain't dun yet!
 
Ok...on to phase II...


The front clip of Scout II and "d" body stuff flexs terribly in offroad sitches. The radiator core support is a really shitty design and poorly done...that allows the radiator shroud (which is also a really scruuball design) to hit the fan, resulting in major damage to a part that is unobtanium (at least ya can buy a new shroud for a sii). It also places mucho stress on the radiator and creates leaks in solder joints throughout.

I was fortunate to obtain a near-virgin shroud that just required a slight amount of fiberglas/body work to make pristine. I sure didn't wanna waste it! I've seen several attempts to "float" the radiator using rubber washers...that won't work and will most likely make the sitch worse since the radiator is free to move around too much, aggravating the sitch. If the washers are drawn up tight, then that's not an "insulating" mount and makes no difference! One dude sent me pics of his re-engineering...he used rubber hose washers robbed outta his garden hoses to try a similar deal!!!! How do ya tell sombody ya never met that they are full of guapo????

Using off-the-shelf polyurethane components from Energy Suspension (hanging on the wall at any autozone or pep boys!), this is what I came up with. No big deal, this same design is used throughout the heavy truck industry for similar situations, and we (my former company, zexel) used it for mounting many forms of heat exchangers on passenger cars and trucks.

The single bushing kit makes two mount sets that can be used on either fullsize IH stuff or Scout II. I cut the bushings in half using a bandsaw with the bushings mounted onna bolt for a mandrel. The spacers were cut from an aftermarket dip stick tube made for a big block chev motor, I used the dip stick itself in my 392 and it's a perfect fit/length! That tubing is absolutely perfect for making the spacers, it slides snugly inside the bushings and the 5/16" bolt is exactly the right fit inside the tubing. The key to this deal is the use of the spacers along with the flange section of the poly bushing to float the radiator frame in relation to the core support. That's imperative! Rubber will never survive being used for this, the sharp edge of the radiator mount flange will eat right through it, only polyurethane will hold up!

Also...the large concave washers included in the es bushing set is perfect for the spacer to slide through the center hole and complete the sandwich package!!!!

The four existing mounting holes on the radiator frame must be opened up to 0.685", I did that with a carbide burr in a dremel handpiece...real ez and fast and as can be seen, the holes don't have to be perfect...just snug enuff to help hold the urethane bushing in place in the "step".

This spaces the radiator back 1/4", still had plenty room for the fan-to-radiator clearance, in fact, it makes the fan-to-shroud "stickout" even better as far as design goes for air sukkage! My rig uses the hd "big nut" fan clutch made by eaton. To prevent any air "spill" around the radiator frame at the core support interface, I used foam weatherstrip, that's also commonly done in the "modern" car bizz for the same purpose...air flow control!

Use the longer mounting bolts to pull the package up snug to the core support, then run the prevailing torque lock nuts onto the tag end of the bolts where they stick through the weld nuts on the core support to prevent the bolts from backing out. The whole deal May need to be "adjusted" once the urethane bushings settle in a little.

The shroud is now retained/supported much more securely, I used off-the-shelf chev valve cover retainer/spreaders from cp products. That package includes eight retainers, enough for two vehicles/systems. The shitball mounting system for the shroud IH used is another reason for shroud breakage...what the hell were they thinking (obviously not thinking!)???? That blingy chrome adds a touch of class and makes the whole dam underhood look like a chev or Ford that's been to pep boys for a vacation. I'm sure it'll rust real quick so it'll look like the rest of the IH crap!

I now have about 600 miles on the fresh radiator package and all is well! Made two pulls of the trailerhouse now, one just this past weekend to the Binder Bee with Jeff and the fambly unit in his grossly overloaded rig bringin' up the rear. Engine temp remains as steady as it it always has, not even a rise on the uphills with the load behind, rig crossed the scales with the trailerhouse at 11,000lbs.

Next installment will be some fuel milage data.
 

Attachments

  • half bushings prepped.jpg
    half bushings prepped.jpg
    70.3 KB · Views: 1,957
  • bushing half set.jpg
    bushing half set.jpg
    89 KB · Views: 5,631
  • bushings cut in half with spacer.jpg
    bushings cut in half with spacer.jpg
    100.2 KB · Views: 2,293
  • mount hole enlarged to 0.825in..jpg
    mount hole enlarged to 0.825in..jpg
    68.3 KB · Views: 1,843
  • isomount installed.jpg
    isomount installed.jpg
    59.7 KB · Views: 1,907
  • weatherstip for rad mount filler.jpg
    weatherstip for rad mount filler.jpg
    119.5 KB · Views: 1,888
  • isomount radiator installed.jpg
    isomount radiator installed.jpg
    58.9 KB · Views: 1,940
  • chev valve cover spreaders for shroud.jpg
    chev valve cover spreaders for shroud.jpg
    90.9 KB · Views: 2,164
Last edited:
Ok...the final milage numbers are confirmed...I'm estatic!

The numbers got skewed a few weeks back when I experienced a first-ever primary fuel system float collapse. That really punked out the milage as obviously the carb was in the death throes for awhile, a quick re-build brought it back to life so I started over on the milage tests.

In two 250+ mile towtrips with the 11,000lb. Gross rolling load (6600lbs. On the weight equalized beater and 4400lbs. On the toad), the milage is consistent at 9.5mpg at an average 60mph.

Several tanks of fuel on the "normal" beater configuration (5600lb. Gross) prove out to 11.5mpg.

The best milage ever noted in the pos in the last 8 years, has been 12mpg unloaded/no toolbox/shell/jerry cans about 5 years ago going downhill on I-5 in messkikalifornikate. And that has never been repeated.

So...is the beer can device responsible for this vast improvement??? Maybe not all of it, but it dam shore helps!

Benefits:

instant cold starts...far superior to any efi system no matter how well dialed in.

Decreased cold engine warmup time, it's possible to drop into "d" and drive away just as soon as the fast idle rpm stabilizes.

Throttle response at any point is vastly improved, not a hint of "throttle lag" as experienced with any efi system in a "drive by wire" scenario.

Hot restarts are improved, though the starting process has changed now due to the intake system improvements, took a while to figger out the best procedure.

Engine temp "cool-down" is greatly enhanced between hot restarts, no doubt a major benefit of the vastly improved heat exchange capability provided by the blocked exhaust crossovers and the beer can maneefol. This is aided by the use of the phenolic heat dam under the carb.

The loss of mass created by dumping the cast iron chunk makes up for the additional weight added to the front end by the optima yellertop auxiliary battery install.

Sukker looks cool and fools all idiots into thinkin' it'sa weirdass Ford motor of some kind.

Downside:

none!

Next up...a major re-do of the exhaust system (naw, no headers for me, the "quality" of the available pieces leaves me cold). That stuff is now 7 years old and rotten again, and it sounds like some riceboytoy hangin' down at the local crackhouse...time to grow up and add the senior citizen touch/discount.
 
Still just looks like a bunch of bling bling to me! I will have to post up some shots of my re-gasketing and painting. I May even have to pull off the radiator mounting that you did. If momma would set me free for the aluminum intake I would be all over that. New cannon 5 pin usb cable is on it's way to the house.
Tate
 
Well about three weeks ago, my adopted bubbaboy skip showed up at el aeropuerto in eujerzzee bummin' a ride back up to la casa.

Soons he jumped in the beater he sez..."what the hail is wrong with yore carb????".

Since I personally am trainin' skip in carfixin'...that realy pissed me off...now he's caught me with a crapball carbamixer on that shiny beercan maneefol! That won't do!

So today I took time off to work on hizownself's stuff. The "lean surge" has gotten worse since we parked the trailerhouse end of October. So now's the time to take care of the final deetale in this story.

When draggin' trailer around, tha carb stays on the power valve nearly all the time (a #65) and that masks overly lean jetting in the primary circuit.

The Holley list 80457s ("s" stands for shinee) comes setup with a pair of #65 in the primary. But when it was dialed in for tha motor several years back, it liked a pair of #62 holes by the seat of my pants.

Now that the crapball breathes a little more ez (due to the maneefol and air cleaner setup), the leaness at cruise was really noticable inna "surge" at 35>50mph. Once the power valve would crack, then that covered the condition and the lean surge went away. The secondaries start kickin' in at about the same point the power valve begins to open (I gotta "quick change" top on this carb that allows real quick secondary tweekin') which further enrichens the overall mix at that point.

So I ran another baseline on the engine analyzer and verified nothin' had changed ignition-wise over the last few months (a p-1 per-tron is down in the distributor). With the #62 main jets, idle a/f was 13.3:1, and co was 2.75%. 2500rpm with no load on the motor showed 13.6:1 a/f ratio, with a co of 2.0%. Overall...considerably lean for an oldskool motor with a very low ve factor.

Then I popped the carb off and re-jetted the primaries to #66 and stuck it back on.

After a full warm up (20 minutes minimum) with tha greater flow volume holes, the numbers showed as a/f of 13.0:1 and a co 3.4% at idle. 2500rpm/no load showed 12.9:1 a/f and a co reading of 4.0%.

Now keep in mind...this izza exhaust gas analyzer from the exact point in time when these rigs were new (late 60's>early 70's)! Not sum dam fancyazz "emissions analyzer" with 5 gas capability! For comparison purposes...the federal emissions numbers for m/y 1975>77 vehicles regarding co% at idle is 7.50%.

Then I took it out on the road for a test spin in tha rain. Immediately I found that tip-in was improved (that's a real ++), and the beech pulled a bit harder than ever before. At cruise rpm, the lean surge (read lean misfire!) was gone and everythang is right with the world.

So that's my story, I ain't gonna scruu with it no more. Leavin' here for about six weeks on dec.15 with the trailerhouse in tow, I'll look at mileage numbers agin since the carb has been richened a tad. I don't expect it to go down, in fact, it might improve a tiny bit since the lean miss is now history and the throttle plate angle/manifold vacuum improvement at "cruise" on the level road with the trailer should give us a few more cents to a mile??

I've had a buncha emails about this whole beercan maneefol dealybob, most especially regarding the carb setup. So here's the dial-in as it exists right now:

Holley list 80457s (electric choke), 600cfm, vacuum secondary carb
a) #66 primary main jets (stock is #65)
b) #39 secondary plate (stock)
c) #65 "picture window" power valve (two stage pv did nuthin' for this setup!)
d) #31 accel pump shooter (stock)
e) orange accel pump cam installed in #2 hole (stock is #1 hole)
f) accel pump lever setting is 0.017" clearance at wot
g) primary and secondary floats set "level".

And for skipster..."it ain't broke no more!!". I'm takin' the analyzer on the road to tejas and we'll see just how much you have lernt when we wire it in on yore fleet!
 
A lotta pusholine has run through the beater since the last time I updated this thread!

The 7500+ mile trailer pull to texas and back gave an average mpg of less than 3! Over 1,000 miles of that was sloggin' through much snow/ice chained up also, and much idling time due to jammed up road conditions. Then another 1800 mile trailer pull down to ihon in April made completing the dial-in imperative due to the huge increase in fuel costs since last fall.

In the interim, the rig has been parked and tagged do not operate due to fuel costs that don't fit my "no income" budget.

But...I've been motivated to keep workin' tha bitch until I can afford to use it occasionally again...so the current sitch is outlined in this thread:

http://www.forums.IHPartsAmerica.com/carb-tech/621-Holley-modular-carb-tuning-info.html

Once the final, final numbers are in, I'll make a final post to this thread to wrap it up.

I've recently built a fresh Holley 0-4412 500cfm model 2300 carb with some "economy" tweeks. That is a 2v carb which is the mainstay "rules" carb used in many forms of roundyround competition. I hate using adapters on manifold/carb combos, but I'm gonna do so with this carb just to see what happens to performance...and to prove (or disprove) a point!
 
Ok, got some final performance/milage data to report, along with what I'm calling the final carb setup:

in normal driving mode with a curb weight of 5600lbs. (superduperpig) nominal, tha bitch is runnin' 12mpg under all conditions (that city/highway gummint crap don't mean shit to me!).

With the trailer on and a full load of momma and dawgs (12,000lb. Gcvwr) we saw 9mpg both directions on the pull to the Binder Bee and back.

That's it, I'm done with carb-scruuin' for now. I'm back to being ecstatic about this setup and drivability is excellent!

For those looking atta similar setup (392 only), here's the final carb stats:

1) Holley 4160, list 80457 (w/electric choke)
2) #31 shooter
3) orange accel pump cam, #2 hole
4) wot accel pump lever clearance set to 0.015"
5) primary/secondary fuel bowl levels set to 1/32" below window
6) #39 secondary metering plate
7) original vacuum secondary spring under a quick-change top
8) #64 main jets
9) #25 two-stage power valve, Holley p/n 125-207, 10.5”hg/5.0”hg setpoint

this setup gives an idle a/f ratio of 13.2:1 with a co reading of 3% federal emissions specs for m/y 1975 allowed a co of 7.5%! I've not run the rig on the highway with the exhaust gas analyzer on it (mine is portable), but the a/f ratio at cruise under load with the power valve cracked will tell the tale!

So now it's back to optimizing the ignition system. Current setup is a fresh Holley points distributor for an egr application that's converted to a standard pertronix. The egr advance curve is nowhere near correct for this motor, under light cruise conditions detonation comes and goes. Holley distributors are a pita to deal with when re-curving if ya don't have a distributor machine to run it on. My poorboy approach involves a dialback timing light, a vernier adjuster for the throttle actuator (an oldskool "throttle prop"), and an accurate shop tach.

I have a fresh delco distributor under construction that is pertonixized to play this game with. The centrifugal advance stuff for that unit is on top so it's easily accessed and springs/weights can be changed on the side of the road. I have several complete sets of oldskool weights and springs to play with, along with a "lockout" for the vacuum advance and an "adjustable" vacuum advance unit (performance item available through either accel, mallory, crane).

And for comparative purposes, I just received a really oldskool mallory dual point unit (mechanical advance only) to play with also, this one is virtually new! These are still available for IH apps, along with both the unilite and the mag-trigger versions. They do not ship with a drive gear, the installer must swap a gear from a dead IH distributor to complete. But we're working on sourcing distributor drive gears now, dorman does not have an aftermarket gear for the IH pattern distributors.

And I picked up two Holley governed distributors last weekend courtesy of Matt g.! Both are pertronix-converted from school bus apps of a 392 and the curves in those look very attractive for a performance-built 392 on paper. Both are Holley cast iron super-duty units, one with a tach drive, one without.

Once the distributor sitch is optimized (this will take some time), then an ignition "box" will be added back into the mix. Which box (msd, mallory, or crane) will depend upon which distributor with which trigger I end up making resident!

My ultimate goal is a ragged edge timing setpoint, with a manually-operated "dial back" control for use when towing in the mountains (most of our use) at altitudes in excessive of 3000ft. The mallory and msd boxes offer that capability.
 
The semi-flex mounting of the radiator package in my rig has held up just fine, I've not touched anything about the cooling system package now since it went back in trailerdrag service about 18k miles ago. And that includes some heavy pounding with the trailer on some real ragged loghaul roads over in the the coast range and in the local mountains.

Also took one hell of a beating in heavily rutted/packed ice and snow (over 1,000 miles with cablechains on) pulling same last January.

This is the first time in nearly 10 years I can say this, radiator leaks in the tube-to-header area (all four corners) have been the norm at least once a year, sometimes more. My radiator has maybe two pounds of added solder all over?

As far as I'm concerned...it's fixed.

The final carb setup has proven perfect for both dd (nominal 6200lb. Gross) and towing at up to 7300ft. And the ignition system described here in the last posts to this thread:

http://www.forums.IHPartsAmerica.com/ignition-tech/644-ignition-system-performance-upgrades.html

Is outstanding in operation and contributes greatly to hot restart and overall drivability. Fully laden towing mileage remains at an average of 7mpg.

The government-subsidized shit called e10 (substitute for real gasoline) is causing some really odd issues that I'm currently investigating, but that has nothing to do with the engine setup at this point. But the e10 shit is creating some unwanted leanness in fuel delivery that I'll continue to work on. This has just become an issue in the last 90 days or so in oregon.

The air cleaner shown in your post was considered...but the cost was exorbitant as compared to what I ended up using. And the dual snorkel setup is doable for inclusion inna cold air intake setup at some point possibly.

A similar single inlet bonnet will be used on the weber carb going on our "built" 4 banger project motor which is now leaning towards a 152 stroker motor with crank trigger ignition rather than building the 196. That bonnet will be sukkin' through a cold air intake that is convertible to a snorkel if needed.
 
Mr. Mayben,

do you have a part number for these lpg intake gaskets?

Edit: disregard! I found them.
 
Last edited:
mr. Mayben,

do you have a part number for these lpg intake gaskets?

Edit: disregard! I found them.

Guess you came up with a fel-pro ms 9801???

I've been trying to locate some more of those gaskets in warehouses around the country with no luck, those have gone out of production as I'm informed. But someone is bound to have some on the shelf somewhere.

Also, that p/n is intended for 196 (in singles), 345, and non-ic 392. I don't believe there ever was an ic 392 on lpg though no doubt many were field-converted.

But running the non-ic intake gaskets on an ic 392 is not an issue at all, that simply means the rear coolant port on each head is not restricted, makes no actual difference at all in engine cooling system performance.
 
guess you came up with a fel-pro ms 9801???

I've been trying to locate some more of those gaskets in warehouses around the country with no luck, those have gone out of production as I'm informed. But someone is bound to have some on the shelf somewhere.

Also, that p/n is intended for 196 (in singles), 345, and non-ic 392. I don't believe there ever was an ic 392 on lpg though no doubt many were field-converted.

But running the non-ic intake gaskets on an ic 392 is not an issue at all, that simply means the rear coolant port on each head is not restricted, makes no actual difference at all in engine cooling system performance.

I'm of the same opinion about the non ic gaskets.

Not sure if Jeff has them in stock or not, but he is showing them on the website. Hopefully I'll be able to start gathering all the parts, I need to finish this rebuild. As soon as some money comes in.
 
Btw,

is the truck still performing great? I have friends who (although they don't understand IH shnizz), are really skeptical about blocking off the exhaust crossovers. They are of the generation of chryfordolette. They just assume IH is for plowing fields.
 
btw,

is the truck still performing great? I have friends who (although they don't understand IH shnizz), are really skeptical about blocking off the exhaust crossovers. They are of the generation of chryfordolette. They just assume IH is for plowing fields.

For any sort of "performance" upgrade on these engines, the exhaust crossover must be blocked. We do everything under the sun when building this stuff to insulate from heat under the hood, that includes carb insulator/spacer/heat dam, and then rig up "cold air intake" systems. But the biggest performance killer as far as the induction system is concerned is the heated intake manifold!!!

Because the rpt aluminum intake literally dumps heat (by far it's greatest asset), why heat the dam thang with exhaust gas???? The heat rejection enhanced by this manifold is nothing short of amazing when compared side-by-side with an oem intake with active crossover heat. My two 392 motors are now set up nearly identical except for the intakes.

The motor in the Travelall is a full-on performance build and it's the one that really could benefit from the rpt intake. And if Mike ever gets the remote thermostat housing/waterneck system finalized for these manifolds, I'll be first in line for another setup. And for comparative purposes, that one would run an electric carb from these folks:

carb-to-efi conversion has never been ezer

The warmup time/routine is not affected whatsoever. My rpt setup now has well over 20k miles on it since it was installed with no additional work other than the completion of the ignition system after the fact.

I have had to rebuild the carb now twice to keep it "sharp" due to this fookin' e10shit we're forced to run. No way around that, even the efi shit is being killed by e10.

So tell yore buddies, they don't know shit about performance motors or IH prime movers!

Ps...last week after a four day cold soak, I cranked the beater truck at 15*f, it fired immediately into fast idle just as always, and I drove off (with a cold slushbox) inside of a two minute warm-up. Nowadays it sits for weeks at a time unstarted but it fires off instantly every time, I walk away and leave it on fast idle while it does it's thing.

Pss...yore buddies pay them big bucks for "hi-rise/dual plane/air gap" intakes for all them chryfordrolets. You know, the ones that take the intake manifold up out of the engine heat from the lifter valley where all that hot oil is??? Well...have 'em take a look at the oem cast iron ihc intake manifold...it's "hi-rise/dual plane, and air gap"....and that is on a dam motor that works really well in aircraft tugs and forklifts, along with combines and school buses.
 
Last edited:
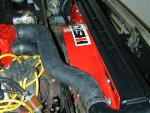
for any sort of "performance" upgrade on these engines, the exhaust crossover must be blocked. We do everything under the sun when building this stuff to insulate from heat under the hood, that includes carb insulator/spacer/heat dam, and then rig up "cold air intake" systems. But the biggest performance killer as far as the induction system is concerned is the heated intake manifold!!!

Because the rpt aluminum intake literally dumps heat (by far it's greatest asset), why heat the dam thang with exhaust gas???? The heat rejection enhanced by this manifold is nothing short of amazing when compared side-by-side with an oem intake with active crossover heat. My two 392 motors are now set up nearly identical except for the intakes.

The motor in the Travelall is a full-on performance build and it's the one that really could benefit from the rpt intake. And if Mike ever gets the remote thermostat housing/waterneck system finalized for these manifolds, I'll be first in line for another setup. And for comparative purposes, that one would run an electric carb from these folks:

carb-to-efi conversion has never been ezer

The warmup time/routine is not affected whatsoever. My rpt setup now has well over 20k miles on it since it was installed with no additional work other than the completion of the ignition system after the fact.

I have had to rebuild the carb now twice to keep it "sharp" due to this fookin' e10shit we're forced to run. No way around that, even the efi shit is being killed by e10.

So tell yore buddies, they don't know shit about performance motors or IH prime movers!

Ps...last week after a four day cold soak, I cranked the beater truck at 15*f, it fired immediately into fast idle just as always, and I drove off (with a cold slushbox) inside of a two minute warm-up. Nowadays it sits for weeks at a time unstarted but it fires off instantly every time, I walk away and leave it on fast idle while it does it's thing.

Pss...yore buddies pay them big bucks for "hi-rise/dual plane/air gap" intakes for all them chryfordrolets. You know, the ones that take the intake manifold up out of the engine heat from the lifter valley where all that hot oil is??? Well...have 'em take a look at the oem cast iron ihc intake manifold...it's "hi-rise/dual plane, and air gap"....and that is on a dam motor that works really well in aircraft tugs and forklifts, along with combines and school buses.

Awesome!!

This confirms my theory on the use of the lpg gaskets. I have always been objective to the (wisdom) International used with the ec. Although, eric v, did bring a sound argument to the subject, I fully believe this is a design flaw to these engines, especially with the 392. These engines are serious heat generators. Most people don't realize that, especially my buddies.

Keep in mind, my "buddies" are true mechanics. They all have many years in rebuilding engines, transmissions, etc. They have taught me a lot, and I hope I have taught them some things. I work in a shop for the kansas national guard rebuilding the mt-654 cr transmission for the national maintenance product. We have to understand what caused a failure to a transmission on a daily basis.
 
Mike, by a chance do have the part number for the poweradder air cleaner? That thing looks cool on a binder engine. Great write up!
 
Back
Top