You are using an out of date browser. It may not display this or other websites correctly.
You should upgrade or use an alternative browser.
You should upgrade or use an alternative browser.
74 Scout II (running) project
- Thread starter DocBon
- Start date
Figured I'd go ahead and mess around with a few videos. I've had to tinker a bit with the Holley 700 double pumper. It's just too much carb for the 318 but, it's getting the job done for now.
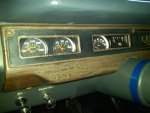
This is the first fresh cold start after getting the new temp and oil gauge installed. You can rag me about my choke cable if you want, lol. It's really not that hard to pull, I was just trying to find the sweet spot.
cold start and new gauges - youtube
This one shows the temp gauge starting to work.
new temp and oil pressure gauges work - youtube
This one is shows how she idles after she warms up and I kill the choke. Might be idling a little on the high side but, I don't have a tach in her yet and I plan to get a smaller carb. You can really hear that flexlite fan turning.
warm idle choked and unchoked - youtube
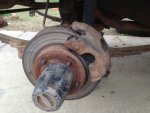
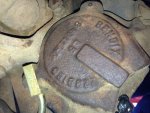
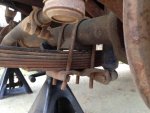
Took a little time today to start digging in to the front suspension a little. Been hearing a little rattling which looks to be the driver caliper. The calipers are the stock bendix 2238163 off a 78-79 "weep" cj-7. I'm assuming that the front axle came with the brakes but I'm not positive yet. At any rate, I posted about it in brake tech because I have no knowledge of these brakes or how to tighten up the calipers to the axle.
If you read this scooter, I'm ready to take those shackles off your hands. Only question I have is, should I build identicle shackles for the rear or longer ones?
It's looking like the lean issue is a couple of things. Loose and flat springs and I need a spacer between the springs and axle plate on the passenger side as a few of you have told me. Guess I'll be ordering a new set of u-bolts from the guys at IHPA.
Here's the driver caliper to has a bit too much wiggle on the axle. It does it's job and is tight on the rotor though.
Attachments


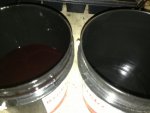
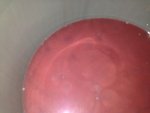
Worked a little pm tonight. Fluids and tightening belts, etc. I should be ashamed of myself for not doing this sooner. I guess I shouldn't have assumed so much after seeing the guy I bought her from driving it to meet us. Turns out the transmission was waaaaay over filled. No wonder I was having some shifting issues. Can't really tell how much fluid this is but, I know it's well over a quart that I siphoned out (no drain plug on the pan ).
).
).Attachments
I guess I'll be doing a full tune up very soon. New plugs, cables, button and cap, oil change and filter, tranny filter and fluid. Now if I'm right about the tranny being a fresh rebuild, that might would explain the over filling. I've heard of people doing that for the break in. It would also explain the heavy metal dust but, if not then this tranny is in trouble.
Attachments
Tahoedonner
Member
hope I don't stir up any bad emotions here. No harm meant. I recognize a few of the rigs from posts on here but, was curious if this is scooter's rolled 74 here on April?
Not to speak out of turn but that looks like mochamikes 80/800? That he rolled on the rubicon?
If you haven't checked out mochamikes build you're missing out.
IHRunner
Member
Tells you how long its been since ive bought from IHPA. My stickers say IH Parts America. Time to break sumthin I guess.
I agree with tahoe. Pretty sure scooter is fixin his beat up rig between beers. Sumthin bout a rollbar being to skinny. I check in on his posts for suspension tips...from the guy who barrel rolled his Scout...maybe not my best idea....I joke scooter. Im just stilll jealous of his man cave
looks like youre doing a good job with her. Glad youre going through her top to bottom buddy
I'll make you one more proud ihr. I'm hunting a 345 or 392. I just won't feel right pulling my buddy's "weeps" or "4doners" out with a mopar strapped in her. I'd really like to mount a stick behind that. This rig used to be a manual as the remains of the cut off clutch pedal are still in place. Only question is, how hard is it to get rebuild parts?
IHRunner
Member
For one of the sticks? Theyre effing everywhere. The borgwarner t-18 t-19 are everywhere. From half ton scouts to 1 ton trucks. Rebuild kits are everywhere. As far as the sv8 rebuild kit. Thats easy. Every light line dealer carries some form of a rebuild setup. Rebuild kits are availiable from a few retailers. Plus the sv8 is everywhere too!
Scooter
Active member
Nope, that's not my roll over. Tahoedonner is correct about it being mocha Mike's little baby Scout 80 roll. I won't hijack your thread with those photos, but here's the link to my roll over.
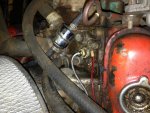
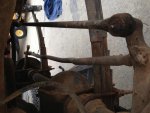
That drag link you posted earlier does look a little bowed in. In stock form it does have two bends in it, but not bowed as can been seen from your photo.
That tranny fluid in the second photo doesn't look right. Kinda milky looking. And to my knowledge, the transmission shouldn't be over full, even after a rebuild. Scoutboy74 would be able to confirm that info. He does have a bit more knowledge of it then I do.
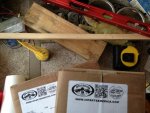
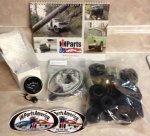
All them boxes makes it feel like Christmas all over again huh
btw - sorry for being such a flake today with shipping those shackle off to ya this morning. Bubble headed beach blonde that I was this morning was trapped under a Scout this morning doing some re-wire work
cheers
That drag link you posted earlier does look a little bowed in. In stock form it does have two bends in it, but not bowed as can been seen from your photo.
That tranny fluid in the second photo doesn't look right. Kinda milky looking. And to my knowledge, the transmission shouldn't be over full, even after a rebuild. Scoutboy74 would be able to confirm that info. He does have a bit more knowledge of it then I do.
All them boxes makes it feel like Christmas all over again huh
btw - sorry for being such a flake today with shipping those shackle off to ya this morning. Bubble headed beach blonde that I was this morning was trapped under a Scout this morning doing some re-wire work
cheers
Scooter
Active member
tells you how long its been since ive bought from IHPA. My stickers say IH Parts America. Time to break sumthin I guess.
I agree with tahoe. Pretty sure scooter is fixin his beat up rig between beers. Sumthin bout a rollbar being to skinny. I check in on his posts for suspension tips...from the guy who barrel rolled his Scout...maybe not my best idea....I joke scooter. Im just stilll jealous of his man cave
My 74 rolled Scout is still tucked away in some corner of my man cave. My roll cage work is being done on my 73 beast, which I purchased soon after I rolled the 74. I have actually been hiding out under ronbgone's little baby Scout, trying to finish up the re-wire work and a few other things.
Btw - suspension had nothing to do with the roll. Other than, maybe, spring me more into the tree. And not to rub it in any further with my man cave, I own 4 scouts which have basically their own corner of the cave. Plus ron's little baby Scout and a 51 studebaker also hiding out in the cave keeping each other company. Ahhh such a bachelor pad.
that drag link you posted earlier does look a little bowed in. In stock form it does have two bends in it, but not bowed as can been seen from your photo.
That tranny fluid in the second photo doesn't look right. Kinda milky looking. And to my knowledge, the transmission shouldn't be over full, even after a rebuild. Scoutboy74 would be able to confirm that info. He does have a bit more knowledge of it then I do.
Cheers
Yeah, I figured the little curves in the draglink were stock but, like you, it looks bowed overall and I didn't think it was supposed to be.
The tranny fluid is pretty milky with metal dust. I didn't say it was supposed to be overfilled for a break in. I've just heard that some people will do that, lol. Think I'll just do a drain and replace filter and fluid a couple of times to get by until I get a stick. Speaking of...... Considering that this rig will see more road travel than off road, at least until my 72 is restored, what do you guys recommend? The t-18 or t-19. I probably wouldn't ever use the 1st gear unless I was off road with either but, the taller gears in the t-19 are appealing for the road milage.
Last edited:
yeah...no rubbin it in there huh. Stupid in tow living
well really. Im glad you guys are kickin on your builds.
Hopefully this website will be full of posts for weeks to come
Gotta give the man credit! I'd be braggin if I had a man cave like that too!!! Lol
as long as you guys can put up with me, I'll be helping to keep things busy here. The more I think about it, the more I cherish the idea of being able to look back at these posts to see what all I've done years later. Helps me keep track too since I'm not getting any younger!
dkminors
Member
I thought about doing something similar but, not really going for the full finished look on this rig. Just going for the quick and dirty so I can get her on the road. She'll end up being a streetable toy. My 72 will get a lot more attention to detail as it's going to be my family oriented daily driver. Any chance you could post up some pics? I'd really like to see how that turned out. What size gauges did you end up using?
I used some cheap 2" gauges. I intend to upgrade to a better set from IHPA over time.