

You are using an out of date browser. It may not display this or other websites correctly.
You should upgrade or use an alternative browser.
You should upgrade or use an alternative browser.
67 1200b (lots of large photos)
- Thread starter Korllach
- Start date
Korllach
Member
I can see a hose running from the master (which is located on the firewall next to the brake cyl and booster) and it runs down to the back of the engine.
This really is the last thing to get henry on the road") .
.
I need to trouble shoot some no blinkers/emergency flashers, and I need to replace a tail light. But other than that, being able to shift this guy is all I have left to do.
Tune up will be in order real soon.
This really is the last thing to get henry on the road
.I need to trouble shoot some no blinkers/emergency flashers, and I need to replace a tail light. But other than that, being able to shift this guy is all I have left to do.
Tune up will be in order real soon.
Michael Mayben
IHPA Tech Moderator - Retired & No Longer Online
The clutch actuation is operated by a slave cylinder mounted on the passenger side of the engine/rear. It will have a bleeding nipple on it, the slave is purged/bled just like bleeding a brake system.
I would not expect the master or slave to actually retain fluid very long, those cylinders are wear items and must be rebuilt periodically or replaced. You can probably get it to bleed and actuate the clutch for a few hours, but once the fluid drools out of the slave again, the clutch actuation will go away.
I would not expect the master or slave to actually retain fluid very long, those cylinders are wear items and must be rebuilt periodically or replaced. You can probably get it to bleed and actuate the clutch for a few hours, but once the fluid drools out of the slave again, the clutch actuation will go away.
Korllach
Member
autozone.com | | clutch master cylinder kit | master cylinder kit
http://www.autozone.com/autozone/ca...12-0&itemid=896-10&store=1187&productid=19018
I found this link over on the other forums for a master rebuild kit for the clutch.
I am still pretty green with all this. But it is pretty awesome learning =d
http://www.autozone.com/autozone/ca...12-0&itemid=896-10&store=1187&productid=19018
I found this link over on the other forums for a master rebuild kit for the clutch.
I am still pretty green with all this. But it is pretty awesome learning =d
Last edited:
Michael Mayben
IHPA Tech Moderator - Retired & No Longer Online
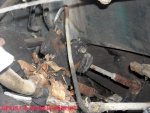
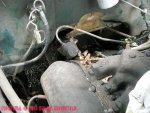
This is a shot of the clutch slave on a '64 1300a with a 304 engine I have on the parking lot right now. Looking across from the driver side fender. The bleeder nipple is at the high point in the loop, along with the liquid feed pipe.
Both the master and the slave are easy rebuilds if the bores are ok and not rotted. Far easier than dealing with brake master and wheel cylinders. So yes...if you can source the proper rebuild kits, doing this yourself is certainly feasible.
Unfortunately, I do not have either the correct parts list or service manual that covers your particular clutch system or I could post the pages, but this is real simple to do and a great learning experience since this rig is not your daily transport device!
Attachments
Michael Mayben
IHPA Tech Moderator - Retired & No Longer Online

Michael Mayben
IHPA Tech Moderator - Retired & No Longer Online
To bleed the clutch hydraulics....
1) fill the master cylinder with dot 3.
2) pump the clutch pedal sloooowly several times all the way to the floor and ease the pedal back up to full release.
3) if the master and slave are functional at all, you will start to feel a slight amount of pedal resistance after several pumps. Or...fluid will start pouring out around the master cylinder pushrod or the slave pushrod, or both. If so, they both must be rebuilt.
4) if no fluid leakage is noted, then attempt to open the bleeder nipple on the slave by turning with the appropriate wrench inna counter-clockwise direction. If you are lucky, it will move...then open one turn and close it again. Some fluid should be expelled from the nipple at that point, that is good!
5) re-fill the master cylinder with dot 3, be sure to keep it full during the rest of the bleeding process.
6) connect a length of vacuum tubing to the nipple and place the other end (about 2ft. Long would be good for this) in a toss-away plastic bottle that has about 1/2" of dot 3 in the bottom, keep the tag end of the hose submerged in the liquid.
7) have a helper pump the clutch pedal slowly, three times and then hold the pedal on the floor. Then crack the nipple open and allow the air/foamy fluid to escape into the catch bottle. Then close the nipple and have the helper slowly release the pedal.
8) repeat this process as many times as it takes to expel the air from the plumbing and have a solid stream of non-aerated dot 3 emerge from the hose tag end. At that point, you should have a firm pedal and the clutch pressure plate will be releasing cleanly.
Korllach
Member
Thanks again mr. Mayben for spelling out the rudementary for me:d.
After beating back the overgrowthin the back yard I grabbed my dot 3, screwdriver, and 3/8ths wrench and go to work!
Filled the master hopped in the cab and started to slowly pump the clutch. After 20 or so pumps and no pressure building on the pedal I got out to check the slave cyl and it was pissin fluid out all over. Probably going to need a new slave.
So I reached in and unhooked the spring removed the 2 bolts bt snce the truck sits so close to the ground ( and I have no jack or jackstands. I know.. Pathetic) I wasn't sure exactly how that push rod that goes into the boot disconnects.
Going to go to vato zone and get about 6 ft of fuel line and replace it all. Having a he'll of a time gettng fuel to the carb. Figure I should replace it all since it looks pretty old and rotten.
Korllach
Member
Bump-
checking to see if anyone has any info on how that push rod detaches so I can get that clutch slave out and replaced.
Also: got all the fuel lines replaced with new stuff, got some new fuel filters put in because I figured the others were full of sediment.
I had an issue the first time I ran henry where it would just stop running after about 5 or 6 mins of idle. I figured it was rotten lines (and they were rotten) so I replaced my lines and was not getting fuel to the carb... Again..
Started pulling the lines at each connection and I noticed that I was getting some fuel all the way up to the pump but not through it and out.
Well it appears that I had the pump too high and it was not wanting to pull fuel from the tank. I relocated it a bit lower and it started pulling fuel fine. Let it idle for about 10mins and it had no hiccups at all.
Once I can figure out how to get the slave off and a new one on henry will be mobile!
Michael Mayben
IHPA Tech Moderator - Retired & No Longer Online
Is the clutch slave mounting pretty much the same as the setup I posted in the pic of the '64 with the 304 motor? If so, I'll make an attempt at removing it and see what it takes. I've never tried to do this on one of these rigs so I don't know the process until I attempt it, then we will both know how to do it!
The truck in the pic I posted is slated to go away sometime this week and become a parts donor sitting on another lot, I'm on a purge and move mission around here this summer!
The truck in the pic I posted is slated to go away sometime this week and become a parts donor sitting on another lot, I'm on a purge and move mission around here this summer!
Korllach
Member
Pretty close it is mounted with 2 bolts on either side of the clutch slave, I will get some pics tonight for you. It looks exactly like this.
autozone.com | | clutchslavecylinder | brakeware
The push rod is tucked up underneath the firewall a little bit and due to the hood placement, my growing non army pting belly, and not a good amount of light, is preventing me from seeing how exactly this thing detatches.
If I were younger I would volunteer to come help clean up binder u as I am sure that would be a summer education for the ages =d.
Korllach
Member
I got the new slave cyl put in, and from the looks of the old one, it probably just needed a rebuild kit. Oh well. The new one is in, all the lines are hooked up and it has been bled.
The next issue is: when pressing down on the clutch, the push rod only moves about 1/2 to 3/4 of an inch. And there is still no resistance on th clutch pedal. I had the wife pumping the pedal while I caught the fluid and we got it so there were no more air bubbles going into the bottle.
Not sure where to go next.
Michael Mayben
IHPA Tech Moderator - Retired & No Longer Online
You will need your wife to help with this....
One of ya push the clutch pedal, while the other watches the slave pushrod actuate the clutch throwout linkage. The slave should move exactly in synchronization with the movement of the master/clutch pedal and of course have "resistance" to being pushed.
The master cylinder/pedal interface should have about 1/4" of "free play" before the master starts to actuate the slave. Make sure that is set as it has to do with total travel of the slave.
Also, the slave pushrod should have an adjustment for travel where it connects to the clutch throwout linkage. There should be about 1/8" of slop or free play at that point also. If too much free play exists at either/both points, then the overall travel is eaten up due to the force multiplication taking place through the hydraulics. The master has to "match" the slave, that was handled when the system was engineered originally.
If the clutch pedal remains "soft" after bleeding, then the master cylinder is by-passing and will need to either be rebuilt or replaced. This would be a perfectly normal expectation since the rig set for so long, the hydraulics simply can't take that and the internal cups/seals are just gone. If the slave was punky, I'd certainly expect the master to also be scruud!
Hold onto that slave! Those are an ez rebuild and someone else May need one in the future if the cylinder bore and piston are usable!
Korllach
Member
Will do.
The new complete slave from napa was 43 bucks.
I thnk the rebuild kit is like 20 bucks.
There was 0 resitance on the pedal at all even after the bleeding had taken all the air bubbles out. I would almost guarantee the master needs to be rebuilt. The clutch slave was the original I bet as it had a big ole IH on the side.
So, I think you are right, I probably need to rebuild that master cyl
Michael Mayben
IHPA Tech Moderator - Retired & No Longer Online
will do.
The new complete slave from napa was 43 bucks.
I thnk the rebuild kit is like 20 bucks.
There was 0 resitance on the pedal at all even after the bleeding had taken all the air bubbles out. I would almost guarantee the master needs to be rebuilt. The clutch slave was the original I bet as it had a big ole IH on the side.
So, I think you are right, I probably need to rebuild that master cyl
Yep...do the master also and be done with it! They always go together, if one is boogered so is the others, they share spit 100% of the time!
Korllach
Member
I am just getting around to checking for parts on this.
Napa does not sell a rebuild kit, and they want 197.89 for a complete new master cyl. Part # 3573.
Part #433 was their reference for a rebuild kit and they said no one has them around here as far as napa goes.
Vato zone said they cant get a master cyl, however they can get the rebuild kit for the 900 series and that runs 18 bucks.
Are those masters the same? I would tend think that they were, but before I go grab anything and get this thing all tore apart, I thought I would check.
Once henry is moving under his own power, a for sale sign will be put in his dash
Michael Mayben
IHPA Tech Moderator - Retired & No Longer Online
In my bucket list of parts houses not to do business with, napa suks donkee cajones. Can't trust crap in their lookups anymore and prices are outrageous for the same dam thing anywhere else!
Try the $18 rebuild kit. If it's for the single chamber "round" clutch master it will work.
Neither Isa nor Mike Ismail/IH only show that particular clutch master in their online stores, but I believe Isa does stock that item so ya might ring his bell if ya don't wanna attempt a mc rebuild. The '64 and earlier roundbodies use the "dual" clutch/brake master cylinder so they are not the same. Those are available from both IH only and Isa's.
Korllach
Member
The autozone rebuild kit for the 900 is in fact the dual chamber model that ole henry does not have. Looks like I will bite the bullet and get the new master. Mike at iho said he can get it and his cost is $150, so I would assume my cost, plus shipping will be the same as through napa. And I would rather not buy at napa.