345 Rebuild

Since I'm taking everything apart at present, I though I'd start looking at the heads. Can anyone comment on the valve seats regarding lead free conversion? I don't see the typical inserts that I would expect on the intake valve seats if this head were modified.

Thanks.

-brett
 

Attachments

  • valve seat.jpg
    valve seat.jpg
    63.4 KB · Views: 1,029
You would normally only need to worry about the exhaust seats and you have inserts in that photo. The IH valve is also stelite faced.
 
Hello Robert,

from what I can gather, new valve seat inserts do not need to be installed. What is recommended here? Just a lap job, or should these be reground?

Thanks,

-brett
 
Sorry I was not clear in my reply. What I wanted to say was that you're set the way it is and won't need anything more to be unleaded fuel safe. Stelite valves and hard seats are good for anything.

Just verify the guides are good and deface the seats and valves. Make sure to top and bottom cut the seats to set the margins and whiths are correct.
 
Pulled the valves out last night and noticed the end of the #7 exhaust valve has unusual wear. Almost looks like the hardened part of the valve chipped off. I'll replace this one. Any idea what causes this?

-brett
 

Attachments

  • valve stem.jpg
    valve stem.jpg
    27.7 KB · Views: 969
Looks like the rockers were not flat and ran on the corner of the valve stem. What do you see on the rockers. That kind of focused loading can fail hardened steel like the laminated end on that valve.
Other than that hammering from exessive lash?
 
This is what I found on the rockers. .013" of wear. I take it these must be replaced? Looks like two or three in this condition.

-brett
 

Attachments

  • worn rocker.jpg
    worn rocker.jpg
    66.1 KB · Views: 964
Called my machine shop and they have done these before. They even have a jig all ready to go, so each will be resurfaced.

What happens when you don't change your oil on an IH? #3 oiler is completely blocked. No lube going to either shaft. Surprisingly, the shaft shows very little wear.

-brett
 

Attachments

  • blocked oil passage.jpg
    blocked oil passage.jpg
    43.7 KB · Views: 906
Are you sure that had a feed hole in the head below it? Many times rocker shaft stands other than the oiler get the passage. Depends on the assebler I suppose...
 
Yes, that's #3.

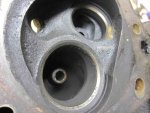
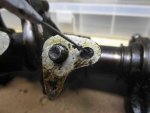
#3, #5 and #7 shaft stands have the holes, but only #3 (drivers side), and #7 (passenger side) have corresponding holes on the head itself. All are clogged.

The po ran the engine for me, but after 30 seconds, I told him to turn it off. Lots of engine noise. As I have been tearing this engine down, and inspecting/measuring everything, it's apparent that all the noise was in the top end. Cam, lifters, rockers etc. I could tell by the existance of a newer head gasket, and the globs of rtv, that someone had there hands on the top end. The good news is that all of the cam bearings are still intact and are not in the pan. Of course all of these components will be replaced.

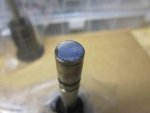
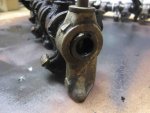
Another interesting note. There are no welch plugs on the end of the shafts. There is no way that these shafts were filling with oil, and pushing their way out the top holes in the rocker shaft. I guess the "builder" thought them unimportant. The shaft itself is caked with burnt oil and carbon deposits.

-brett
 

Attachments

  • rocker shaft.jpg
    rocker shaft.jpg
    57.3 KB · Views: 954
Ok. Deep breath. Been away a long time working in a Cyber Security startup, so I haven't had much toy time.

Heads are now finished, and I'll post pics by the weekend.

I'll be back on the block by the weekend as well. Where I left off was getting proper measurements regarding the depth of the pistons in their bore, and calculating "quench".

Question is.....what happens to the intake manifold as we remove material, (maybe .030-.040") from the block? I take it that the new gaskets put the heads back at the proper height and therefore no mismatch or alignment issues?

-Brett
 

Attachments

  • #1 Cylinder.jpg
    #1 Cylinder.jpg
    63.5 KB · Views: 354
  • #8 Cylinder.jpg
    #8 Cylinder.jpg
    51.8 KB · Views: 365
I did this on my 345 block. IIRC the OEM steel shim head gaskets are .016. The modern FelPro gaskets are .040. Again IIRC there was .035 shaved from deck and the heads were surfaced .010. The intake manifold fits perfect and I think I have about 9:1 CR. Compression tests on the engine show 160 psi with a stock 345 is around 130-140 on the same gauge. The engine runs great on 87 octane fuel.
 
OK. Got it!

So.....IIRC, we need the pistons to be flush or pistons slightly under or deeper, say .005 or so?

I'm about .048 deep in the hole now, (see previous pics). That, plus the .016 original shim type gasket gave me ~.064. New Felpro jacks that up to .088. I'm looking at lopping off well over .050.

What say you folks?

-Brett
 
Optimum quench is considered .035-.040" on a new tight engine. By ~ .055 the quench effect is considered gone.
Zero deck to .005 in the hole would be perfect for a .040 HG. I don't recommend less than .035 on a SV.
 
Last edited:
Correct, that's what Robert me too. My machinist was not comfortable going that far due to intake manifold and push rod issues. While I don't have all of Roberts fancy measurement tools, with the pistons down .010 the manifold fits fine and one of the valves clacks a bit when really cold until it warms up so plenty of clearance there. My engine is running a Comp 252 cam and lifters.
 
Thanks. Can’t wait to get going on this again. Before I have the block decked, I’ll need to make sure I’m going to be using the stock pistons. Those measurements will happen next.

Thanks.
 
You mean 0 - .005 in the hole would be perfect, yes?

Nice to be working with you again Mr. Kenney!

-Brett

Yikes!!!!:frown2: who proof read my post. Nobody. Corrected I hope.

Always check intake manifold alignment in a mock up before committing yourself. Machining the manifold is fairly easy for a shop. Don’t let it cause poor decisions. Set it up right.
 
Back
Top