1966 2WD Travelall Brake Issues and Redo

Beluga

Member
Well, starting another thread. This time.. The brakes.
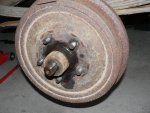
1966 2wd travellall with drums up front and back.

5-lug pattern.

Wheels on it now are l78-15, 4-ply polyester, load range b and at least 18 yrs old.

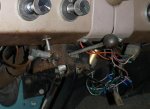
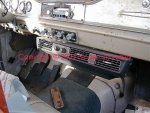
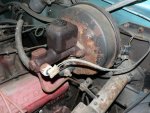
It has the single manifold brakes with brake booster.

Right now, when rpm's are low, I really need to push hard on the brakes. When rpm's are high, it grabs like a mother. I think it has something to do with a vacuum leak someplace.

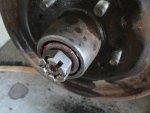
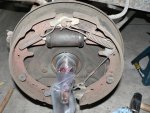
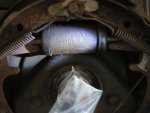
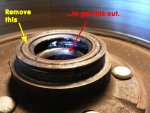
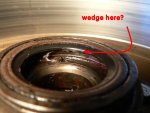
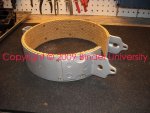
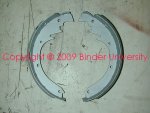
Anyway, I am going thru the drums right now to inspect them. My plan is to use a dual manifold set-up with a new hydroboost. Convert to discs up front, probably keep the drums in back.
 

Attachments

  • rsz_1Brake Boost.jpg
    rsz_1Brake Boost.jpg
    227.2 KB · Views: 1,736
Last edited:
Drum Removal

So, for my Travelall, you have to remove the dust cover and bearings to get the drum off. The lug nuts are left-handed on this driver's side.

6421d1250990209-1966-2wd-Travelall-brake-issues-redo-p1070117_640x480.jpg


6422d1250990209-1966-2wd-Travelall-brake-issues-redo-p1070124_640x480.jpg


6423d1250990224-1966-2wd-Travelall-brake-issues-redo-p1070125_640x480.jpg
 

Attachments

  • P1070117_640x480.JPG
    P1070117_640x480.JPG
    35 KB · Views: 1,543
  • P1070124_640x480.JPG
    P1070124_640x480.JPG
    51.5 KB · Views: 1,825
  • P1070125_640x480.JPG
    P1070125_640x480.JPG
    31.3 KB · Views: 1,414
I thought I had read that having lockheed parts was going to be tough, but bendix easier.
I need to re-read some of the forum posts on this topic, especially when it comes to new parts.

But, with my current plan, I am wondering where I start. It seems over my head right now.
 
First, those tires are way too old. Imo, they should be replaced immediately.

From the looks of the front, it looks like a brake job has been done recently -- unless you did a lot of cleanup. The wheel cylinders look good. How much lining is left until you "hit" rivets?

I would think that the drums are not badly scored -- May have been resurfaced recently.

While the drums are off, you should measure "how much life" is left on the drums. I am not sure where the measurements are -- might be stamped on the drum. Or, maybe michael mayben can supply that info. Legally, the drums can not be "turned down" more than a "set value".
 
Those tires are way too old. I don't drive the t-all right now, so it's not a problem. I haven't changed them yet, because I wasn't sure if with changing to disc brakes, that I would end up changing the rims as well. I am trying to read thru "pri's" thread on binderplanet. It seems his '64 ambulance had the same set-up at mine and he went to discs. But, I haven't reached the end of it yet to know if he had to change rims, etc.

The brakes, at least on this side, do look pretty good. I have about 1/8" until I hit rivets on the shoes.

The drum really looks good. I don't think they've ever been turned as the t-all has only 106k miles on it. I also not sure how you would know if it's been "turned" already. I understand there can be tool marks, but I've never seen them.
 
So I want to repack and grease all this stuff, but how do I get the inner bearing out? I am not even sure of the names. I have the truck service manual and I seriously can't find them covering my axles (fa 02009). Which is frustrating because that's why I spent the $$$ on the manual in the first place.

So anyway, I want to get the bearings out (red arrow) but the seal is holding it in (yellow).

In the second picture the red arrow indicates where I could wedge something in there to get it out, but I bet there is a "pull" made specifically for this purpose and you're not supposed to go banging around with a screwdriver.

6428d1251043224-1966-2wd-Travelall-brake-issues-redo-inner-bearing-1.jpg


6429d1251043224-1966-2wd-Travelall-brake-issues-redo-inner-bearing-2.jpg
 

Attachments

  • inner bearing 1.JPG
    inner bearing 1.JPG
    62.2 KB · Views: 1,422
  • inner bearing 2.JPG
    inner bearing 2.JPG
    51.2 KB · Views: 1,322
The front brake set you have is a "bendix"-pattern. The lockheed system was used on only a few, selected ihc chassis variations so disregard anything that makes reference to "lockheed" regarding your vehicle.

And, don't pay much attention to the "brand name" that you might see on any part. The component suppliers all used parts and designs from each other's shelves! The same wheel cylinder for example, could carry no part number, or any brand/part number. The only thing that matters is that the correct parts interchange and fit correctly. And over the years the various systems/components suppliers have combined, disappeared, formed new partnerships, etc. So that replacement parts will carry names/numbers that were not in existence 30+ years ago! "centric" is the big gun in the brake world right now, they source parts from all over the world, but their parts might be re-boxed under many different "brands".

And that brake set is very capable of stopping that rig just as it was when new! Unless you are going to build the ultimate hd towing rig, that brake set will put you on your nose instantly (if it's freshened properly)! Hydroboost conversion does have advantages when used with a disc/drum or disc/disc combo on rigs with much larger tires (rolling diameter). But the oem drum system used on these vehicles was very capable (and still is) of providing exceptional braking performance if serviced properly. These rigs are heavy, they were engineered as trucks, the brakes/suspension is truck-spec for vehicle weight and rated gvw!

Since I can see riveted linings on the shoes, that sez someone has done brake work in the past correctly! I use only riveted shoes in my work, all done locally by a friction materials supplier. And a real brake pro will do the primary and secondary linings in two different compounds of friction material normally. The "primary" shoe is the one that is in front on each side, the secondary shoe is the rear. And normally (but not always), the primary shoe has a lining that is shorter by an inch or so as compared to the secondary.

Installing a dual diaphragm booster with a dual channel master cylinder will be very simple! At least your rig has a "conventional" booster and not a hydrovac unit. A remanned booster/master set is very "obtainable" for say a '73 1110 and will bolt right on.

In addition, you would need a combination valve for the same vehicle (it would provide a brake "warning" light), or simply plumb the front and rear brake systems separately using no combo valve by using unions. This valve serves the function of a "junction" for connecting/splitting the front brake system from the rear and is a junction only, it provides no "proportioning" which is not needed on your drum/drum set. The proportioning is provided by the engineered choice of wheel cylinder diameters, the front cylinders are slightly larger in diameter than the rears. If the replacement master cylinder did not incorporate residual check valves, then simply add an inline residual check valve to each circuit right at the union or use the check valve itself as the union.

You can re-use your existing pressure switch for activating stop lights by using a "tee" fitting installed in either front or rear channel of the plumbing, doesn't matter where. Iirc, the pressure setpoint for that switch is 30psi but that is not real critical and is a "standard" also!

Regarding the wheel bearing/hub service, use a pry bar or screwdriver to pop the seal put and discard. Then the inner hub bearing will lift out for cleaning/inspection. Basic operations like that are never covered in a service manual as manuals were for providing definitive information for trained mechanics! Never were intended to be a "how-to"!

For doing seal removal such as you see on a repetitive basis, I use a small slide hammer with a bearing/seal "hook" attachment. The small slide hammer set from harbor freight works great for that and is very inexpensive!

To determine size/condition of the drums themselves, they need to be measured with a drum micrometer. You won't see tool marks on the friction surface. A brake pro "knows" the allowable wear tolerance for various drums, if they don't they have a set of standard tables they can use for lookup. This stuff is not vehicle/model specific, allowable wear/service limits for drum brakes systems are common across all oem platforms. Max allowable diameter is normally cast or stamped on each drum exterior also, no brake service pro will turn or surface drums beyond that limit as that is a huge liability issue.

You can "make" the drums removable from the hubs, but in the case of the 2x4 brake set/hubs you have there is no real advantage to doing that! You are going to do the brakes on this rig now, then ya won't go back inside prolly for another 30k miles! If this were a 4x4 axle, there would be advantage however, since doing so makes the periodic maintenance onna 4x4 hub set much easier.
 
Last edited:
Drums turned -- non-scientific method

you are correct, the drums May not have been turned at 106k.

If they have not been turned, then, (at this mileage) I think you should "feel" a "ridge" (running your finger tips across the surface) at the "edges" of the brake shoes - where the shoe meets the drum surface.

Another "indicator" -- the surface of the drum is "shiny" -- and / or there is a small "ridge" near the inside face of the drum where the material was removed - limit of the machine that cut / "refinshed" the surface of the drum.
 
I like posting here better than binder planet because of the common sense approach, the voice of reason, and that there aren't 30 expert opinions to weed thru.

Robertc - I was surprised to find that yes, when I do run my finger across the brake shoe, there is ridge at the lateral edge.

Michael - I also think this set-up (albeit with a dual master cylinder) should be fine for my application. I am planning on towing a 24 ft airstream. They used a lot of stock travelalls for airstream caravans in the 50's and 60's.
 

Attachments

  • Airstream Caravan.jpg
    Airstream Caravan.jpg
    92.3 KB · Views: 1,803
So, I think I will get this set-up working right, then see how it feels and performs. I can always upgrade later.

Popping out the seal and discard, so that means I need a new seal even if the bearings look great and only need to be repacked?

Right now the shoes look great, but you're saying I should ask around for a good independent brake shop that relines shoes and knows what they are doing?

Also start fishing around for dual master cylinder set-up from a later model IH?

Ok, let me get to work getting that seal out! I know that manuals were made for trained mechanics, but I am beginning to think I might qualify as an amateur one in a few years after I finish this project, just from the experience alone!
 
Last edited:
robertc - I was surprised to find that yes, when I do run my finger across the brake shoe, there is ridge at the lateral edge.

Sorry, I think confused you -- as well as myself when I reread my post.

If the drum has not been turned, I believe you will feel a "ridge" in the metal surface of the drum where the shoes contact the drum; not the brake shoes / lining.

If you feel a "ridge" on the lining of the shoes, it is from an "imperfection" (wear) on the metal surface of the drum.

When drums are turned the metal surface is cut down until it is smooth -- you can probably see a ridge just before the metal "front" of the drum (looking "inside") (part that contacts the hub).

Vintage airstreams are neat. I think there is (May still be?) a company in richmond, CA that restores old airstreams from the 50's, 60's, 70's... I "stumbled" across it when I got "lost" in a "warehouse" area of richmond.

Re michael's comment about getting brake shoes relined (applies to clutch discs, also).

There are small companies that do this (should be a couple in the denver area)-- you take your "old" brake shoes to them and they strip off the old lining and put new lining on.

A possiblility for all of us (IH), if there is not enough demand / volume for the aftermarket to want to keep brake shoes available.

Obviously, with the right shop, you will get better quality materials than the supplied at the parts stores. Though, I have never had any problems with brake shoes for my corvairs, but I do not buy the $3. Shoes, either. (I let a mechanic do the brakes on my t/a.)

I forgot, you do need new seals for your hubs -- they are not that "strong".
 
Hub seals are always replaced when removed, sop!

If your existing shoe linings and drums are within spec...and the shoes have at least 50% of their original "consumable" thickness, then I see no reason to replace 'em! Same for the drums...drums are much more "durable" in the long term than a disc/rotor and not nearly as susceptible to warping due to heat or ham-fisted wheel mounting techniques!

However, I would rebuild or replace all four wheel cylinders if ya go with the fresh master cylinder setup. And definitely replace all soft hoses as your originals are now rotten from the inside. If the steel lines don't show obvious corrosion inside the flare nuts, then they May be ok, but any visible corrosion on the exterior is a sure sign a line May be partially eaten and should also be replaced.

Typical riveted lining material for these shoes is 0.200" thick, comes off a pre-molded "roll" and is priced by the square inch. That allows about 0.100" of consumable material before the head of the rivet is exposed.

I never pull down brake systems with bonded linings that aren't badly cracked/checked from heat...typical over-the-counter remanned shoes.

The pic attached is a parking brake band commonly found on earlier IH rigs and later 4x4 trucks including some t'alls. I have these done locally also, this is for a '51 l-112 resto owned by member here michael golick. This type lining material is "woven" and brass-embedded and is used primarily on mechanically-actuated brakes as it's very soft and allows a fairly light pedal pressure when used with mechanical actuation, it will not be suitable for hydraulic brake applications.

As you mentioned, the t'all was a prime mover for the airstream trade, still is for the resto folks! A tow-equipped t'all was one of the few "factory" rigs available back in the day, even came with a kelsey-hayes brake control already mounted under the steering column.
 

Attachments

  • L112 Parking Brake.jpg
    L112 Parking Brake.jpg
    114.5 KB · Views: 1,566
This pic is a pair of lockheed-pattern, 11" x 3" shoes I recently had done for an ihon member/customer down in oceanside. These are the shoes which are unobtanium but we generally have an axle set available most of the time. Cores for these shoes are impossible to obtain though we are continuously looking for 'em.

This gives you an idea of what a properly remanned set of shoes would look like with riveted premium lining material.

The 11 x 3 lockheed is a tremendously powerful brake set when combined with the same bendix 12" stoppers you have on the rear of your rig (and I have on mine). The typical service life on these shoes on the front of my tow rig (with a gross load of an average 12k lbs.) is 15k>18k miles...but I use the transmission (slushbox) for braking constantly when towing.
 

Attachments

  • Lockheed 11x3.jpg
    Lockheed 11x3.jpg
    115.4 KB · Views: 1,473
...would that kelsey-hayes brake control be this?
 

Attachments

  • rsz_brake_controller.jpg
    rsz_brake_controller.jpg
    57.6 KB · Views: 1,816
Last edited:
...would that kelsey-hayes brake control be this?

That's the brake control!

However, that mount is about the most butchered pos I've seen yet! Nastee!

The roundbody t'alls with the factory full tow option package had the brake control mounted under the steering column, with that plastic column surround cut away at the bottom where the two halves meet in the middle.

On the inner fender or firewall was a large resistive element with an adjustable wiper for setting the brake balance (amperage control). Modern brake controllers don't need that type device.

Today, I had in the shop for an a/c service, a virgin '71 Ford econoline chateau van that was set up as an ultimate trailer dragger weapon back in the day. It has one of those controllers with resistor block on it that is immaculate!

I collect up these old k-h controls and give 'em to folks that wanna do a resto of t'alls using old skool stuff. But for "looks" only, I personally would never actually use one on my tow rigs for personal use!

This pic shows a '68 t'all 1000 that was bought new along with a companion airstream by an ex-employee's father in ohio. It was used only for hauling around a bunch of boy scouts for many years! It was equipped with the full ihc tow "package"...notice the trailer brake control lever sticking out under the steering column.

I drove this one for several years and used it mainly for pulling a few different boats and also as an "airport parker" (sometimes for weeks at a time). Then I gave it to my son for his first truck...it's sitting in his mother's special interest boneyard in texas now, rotting away!
 

Attachments

  • '68 T'all Interior.jpg
    '68 T'all Interior.jpg
    99.8 KB · Views: 4,107
Rear Drum Removal

So, I have seen some posts on rear drum removal, most of them have input from michael, but maybe mine is different. I pulled the cotter pin, the nut, and a washer. The drum only turns about 1 in either way. I have backed the brake shoes off. That's liquid wrench on the hub.

I don't know what axle I have, my line setting says:

xx001 | 0029 | ch | rax sgl rear axle 3.73

the first 2 numbers are unreadable and I am not sure if that rax is supposed to be "rad" or "rae", but it's difficult to discern. Maybe I can scan it.

Btw - which is the IH-model and which is the IH code?

....and why do I have that cut at 11 0'clock? It extends all the way into the drum.
 

Attachments

  • rsz_p1070133.jpg
    rsz_p1070133.jpg
    197.2 KB · Views: 756
Last edited:
Based on the info you can read on the lineset...I'm speculating that your axle is a "model ra-1, code 14001". That makes it a plain old open differential spicer/Dana 44 with tapered axle/flanges. Same axle discussed in the thread started by mastiff:


http://www.forums.IHPartsAmerica.com/axle-tech-questions/2404-mystery-axle-noise.html

Your version is wider than the version used under the Scout 80 and Scout 800 and is also a "centered" differential meaning both axle tubes are the same length.

That means... In order to remove the drums, the tapered hubs must be "pulled" with the special puller.

That "slice" taken out of the drum is for correction of the "balance" of the drum when it was cast/machined. That is quite commonly seen, other drums May have balance weight taps welded in place. I have two/three of those same drums with ground sections just like yours, that is not a fault!
 
Line Setting Ticket

Well, since I am waiting to get a hub puller, I thought I'd scan my line setting ticket.
I thought it was interesting that it came with "increased cooling" and "hd prog rear spring". I suppose this is part of a factory towing package, which is nice, since I bought it with the intention of towing. The hitch certainly appears vintage if not original. I'll get a pic of that later.
 

Attachments

  • scan0002_575x768.jpg
    scan0002_575x768.jpg
    100.3 KB · Views: 689
Last edited:
Do not think your t/a had the towing package (the trailer brake controller in your vehicle versus the picture of mm's similiar vintage).

For a towing package, you are "missing" 2 items I would expect --

a 61/ 63 amp altenator instead of the 37 amp altenator listed on your LST.

And, a line item for a hitch...

But, I am sure many trailer hitches were put on by the IH dealer per the customer's request.

Also, I would expect a line item for the trailer wiring harness if it was installed at the factory.

Still a well-equipped t/a...
 
I wonder if he liked the hitch and other items that the dealer offered, rather than what the factory had. But it's all good, certainly with the increased cooling and stiffer rear, he intended to pull and it was an unexpected bonus for me.

Well, the tool I borrowed from checkers doesn't fit the hub. So I ordered a hub puller from ebay. So it'll be another few days.
Now I guess I can look for a dual manifold and do some research on how to service the brake booster.

One day at a time.
 
Back
Top