DUI install on 345 stock 2bbl

GK_Slick

Member
Hello all, my first post here! I have finally installed a dui into my 1977 scout2. I am having an issue with the clearances though. With the wire connect points sticking out toward the opposite direction as the vacuum advance has made it a really tight fit. So tight I cannot use my stock air box. So my questions are: has anyone else run into this and what was your remedy? And, do perfdist make caps with the locating peg 180` from where mine is?
Thanks
 
Welcome to tha family gk! Yore in the right place!

First off...review this thread:

http://www.forums.IHPartsAmerica.com/IH-only-product-questions/721-dui-install-266-a.html

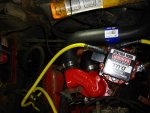
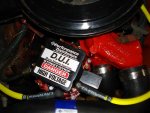
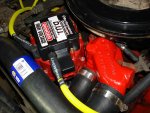
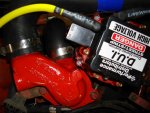
What you are seeing is very common! The dui system overfills the available hole in the original IH layout by quite a bit!

I've been helpin' two other friends who don't hang out here with this exact same issue, and they both had already cut away the distributor cap on the dui setup, davis actually advised one of 'em to do that! Now that is bogus to spend $400+ for the unit and then take a hacksaw to it!

They each corrected the issue by using the same water neck that tren is now using, referred to in the linked thread. And they also replaced the hacked caps with new ones!

Which carb are you running??? We need all your vehicle/engine details posted. If you are running the oem Holley 2210/2245, it uses a weirdazz air cleaner inlet diameter and no aftermarket air cleaners are available for those that I know off.

If you are running any 4v carb, or a Holley 2300 series 2v modular carb, those use a 5-1/8" air horn, there are many options available for air cleaner assemblies that will work for ya, most likely one with an "offset" base.

Give us your details, and we can be much more specific, also a full set of pics can help us out and help other folks with this same issue! Unfortunately, right now I don't have any rigs in the shop that have a hei/dui distributor installed.
 
Thanks for the reply. My 345 does have the holly 2210. I have tried other air boxes without a fix. If they could just manufacture that cap with the location key on the other side it would be so much easier. Being the weekend I haven't had the time to call them and inquire from them if they have such caps. I have also thought about picking up a used IH airbox and hammering it in on the side but that wouldn't be right nor would it allow me the adjustment room I would like. I bought this dui unit over a year ago and just got to putting it in because of first child and now it sits once again but in the Scout. Other specs are a/c, ps, pb, 727, Dana 20, Skyjacker 4", 31x10.5 BFG at, 2"extended shackles, strait steer, k-line fasttrack, show bar, bikini, alpine cd deck w/ 12 disc changer, k&n 10" air filter, factory tire carrier, roof rack, tank skid, push bumpers, sliding rear windows, and maybe more I cannot remember. Thanks again for the reply.
 
The delco hei distributor upon which all aftermarket versions (msd, mallory, dui, crane, accel, etc.) are based use the same locating points for the cap. It's only the IH application which is a totally custom lower body that has an interference issue. No aftermarket manufacture is gonna setup production for only an IH application, there is no market for that!

But that only deals with the interference issue for the cap/body/water neck/thermostat housing.

Ya might wanna boneyard for some chrysler app air cleaner system with more offset to the base. Many chrysler 318/340/360 smog motors from the '70's used a 2210 with that weirdazz air horn dimension. And some of 'em had a kind of "snorkle" air intake that provided a rudimentary "cold air" induction deal for the point after the heated air diverter in the intake was turned "off" by engine temp.

I "think" there were some rochester carbs that had the same air horn diameter also, just take some measurements with ya to the boneyard and a tape! Earlier sii used a Holley oem 2300 carb which has the common 5-1/8" air horn, those went away with the kick-in of tier II smog in m/y1973.

I have a whole stack of useless, butchered 2210 air cleaner bases for Scout II! I've seen about every workaround for that, including duk tape and jb weld.

Thanks for posting your details, that helps alot!
 
Thanks micheal, yeah the 4 7/32" is one hard dimension to find then how far it sits down around the carb is another. I will work on this and post what I have found out. I did try getting an edelbrock 10" housing with the adapter but that just stood too far up. There is a manufacturer called proform that makes a 10" round with the 4&7/32" but I made the mistake and went with the edelbrock first. So I want to reseach this more and get it right on the next attempt because of the waste of money on that last brain gas. Thanks again for the help nand I will re-read that other thread.
 
Yeah gk...I figgrd you had already encountered the "hood clearance" issue for the sii app! Sorry I didn't mention that!

Those adapters for the air horns you describe are really squirrelee too. Being plastic (and not a good plastic), they crack real soon and allow dirty air entry.

One of my binder u. Bubbas here, Matt g., bought a rig that had already been converted and someone made a real nice sheetmetal transition piece to use the oem air cleaner...but he cut a big hole in it for choke lever clearance and of course, that allowed dirty air entry also!

Put a big dollop of playdough on toppa the air cleaner and slam the hood. Don't forget to return the playdough to it's rightful owner. Then measure the clearance ya got. If the body mounts are in good shape and oem thickness, you should see about 3/4" clearnace at rest. That's what ya got to play with!

Doin' a body lift helps the hood clearance, but then the steering column and radiator/fan/shroud gets all outta whack so here we go again!
 
Well, I think changing the water outlet to one like in the pictures should give me the orientation of the dui that will work. Or it might. It looked like it would in one of lonchair's picks in that other thread. If I could get those electrical connects toward the front like in his pick I think I will get more adjust ability than with the vacuum advance device pinched up front between bypass hose and housing as well as solve the air box clearance problem.
Do you have a guess where I might be able to find one of those outlets? My local yard (oly4x4) only has 2 well picked Scout carcasses left.
 
I guess a few of you guys posted picks of that config I think will work. Unless I am missing something else.
 
Ihon has some of the necks we referenced a few weeks ago in stock...used of course but will clean up really nice and look like new.

And we're always looking for more stuff like that before it gets sent to china for new sheetiron false fronts for their "markets".
 
Michael, thanks for all the help. I will call/email that place on tues and see if they can help me out as well. I hope this all is worth what I have imagined.
Thanks again,
me
 
Ok, so here is some progress. I hope I will be able to post these pics in here. I put the different neck on so I was able to point the elec hookups forward and make clearance for the air box. Now I am still only getting a half inch or so of adjust ability. Now I guess I am hoping it will be close enough to time and if not, what can I do? Can I move the dis. A tooth?
If I point the power/tach hookups forward I run into the hose. I wish I was better at this work around stuff and had more mechanical experience but I think I can do alright. Of course I could maybe get a different hose so I could point it forward and get that hold down out from in that nook between the housing and bypass hose.
 

Attachments

  • DSC07062.jpg
    DSC07062.jpg
    68.7 KB · Views: 1,720
  • DSC07063.jpg
    DSC07063.jpg
    66.7 KB · Views: 1,092
  • DSC07067.jpg
    DSC07067.jpg
    68.8 KB · Views: 1,262
  • DSC07069.jpg
    DSC07069.jpg
    82.2 KB · Views: 1,116
Last edited:
Looks great dude! We May need to put that casting back into production, they are gittin' short now!

You can install the distributor body any way ya want to and make any cap position #1! Put it where you can achieve max rotation of the body for timing purposes, though it May be ok right where it is. Shoot it with the timing light and see what ya kin come up with. If it won't time out, then ya need to rotate it one tooth or so then re-wire the cap.

Yawl git out there and start findin' them water necks anywhere ya can, I'll pay a $1 bounty for ever one ya send me, but both ears need to be still in place, don't need no varmint water necks with one ear ya turned into tha county for their bounty!

Yore doin' real guud fer a rookie, stay with us and we'll make ya a mekanik that kin spel spark!
 
Hey michael or anyone else, do you think I can get away with using the existing + coil wire for power? My stock setup was with the damn gold box. I was thinking I would disconnect that box, connect the two wires from the neg side of previous coil and tape them up, and then use the positive one for the new dui? I sure would hate to fry the loom because someone May want to take this thing back to stock someday. I did read some where on this forum about using a relay but I think they had a different setup. Any help on this would be greatly appreciated.
 
The dui requires only a single b+ feed (b+ means...a circuit which is carrying full battery voltage, whatever the battery voltage might be at any point in time) controlled by the ignition switch.

So...if that condition describes your wiring harness, then what you propose is fine!

Again, I never like to make statements like "yes" or "no" regarding any IH wiring system! Po virus is present in nearly all these old rigs! And ya never know what "might" be found if ya don't test for proper current where current is supposed to be present! And many changes/variations were made in the harnesses over the years, many of which were not documented in any form of "updated" schematic in the various issues of service manuals. Corrections were made through the publication and distribution of "bulletins" or service letters in the case of ihc. The bulletins have never been incorporated in the actual manual publication back in the day. And the repop manuals we have nowadays will never be corrected, they are reprints from masters that May have been somewhat lacking 30 years ago, so no one will correct 'em now, those folks are all dead or inna rest home!

Once this is wired, and you find that the engine will start, but not continue running when the key switch is released, that indicates the "bridge" section of the ignition switch itself (internal connection point in the switch) is punky. I have that same problem with my ignition switch now! It's just worn out and is intermittent. The new switch is laying in the console, I just need ta git off my azz and swap it out! And a new spare ignition switch is always in my truck box!

And I always retain any oem ignition system wiring setup (after repairing if needed) and secure it inside the loom for future use if need be.

If adding an external ballast resistor to any project or vehicle repair, I always provide a "jumper" tie-wrapped to the harness also. That is used for troubleshooting or for emergency use if the ballast resistor should fail. It can be eliminated for a short period of time for a "get home" mode if need be, but ultimately the breaker points (if used) or the coil May give up fairly soon.

We have/use so many different ignition systems on these rigs, there is no way to say positively that a resistive feed circuit must be used, or "can" be used, or cannot be used as a blanket statement! Each setup is different depending upon the actual components selected and combined. Some pieces are not compatible with each other!
 
Well then I will re-power the system and test for v with the key on. Then I will fire it, time, test v again and temp of feed. I just want to be careful and safe.

Thanks for the help, again.
 
So, after I tried the key on test I found I had the wrong wire.... What gives?.... Well, I think this May lead back to why I was loosing gold boxes or maybe not, but I think there was a mis-connect on the original coil running things backwards and or other stuff. In the past when I would turn the key to start there would be a significant draw for the starter which lead me through a rebuild of the starter. Then as it continued I purchased a mg starter, very nice but still massive draw. So now as I have gone to the dui to replace the weak gold box system I find what May be the root of all the evils, a miswire at the coil. Now it ran very good this way but out of nowhere it would die being the gold box dying. So I had to carry an extra gb with me all the time. Napa started fighting with me about whether the lifetime warranty on their parts meant consecutive parts which lead me to the new dizzy. So as it stands I am going out into the carport to hook it all up and fire it off.

Never underestimate the power of the pov, as hidden as it May be!!
 
Typical starter current draw onna 304/345/392 with average compression and all associated wiring (including battery cables in good condition and a well-grounded battery/starter/engine block, would be in the range of 95amps>150amps give or take a few! That would be for about a 10 second "burst" of crankover, then get off the starter and let it cool down!

The "typical" failure mode of the gold box system is due to heat buildup in the firewall-mounted module. The worst place on the entire vehicle IH coulda put it! In some cases, these can last forever...in others, they will start droolin' potting compound out the back and down the firewall immediately upon replacement! Cure for that is mount the box onna heat sink, then mount the heat sink on the inner fender or radiator core support in the airstream.

The actual trigger unit inside the distributor is very robust, but what takes those out is hamfisted attempts at diagnosis, and "hot wiring" the coil as if it was a breaker point system!

As you have noted, the gold box system is powered up from the ignition switch at the box, which in turns supplies a minute amount of current to the trigger as the engine cranks over.

Between the box connector and the ignition switch itself, there is no juju-electronics involved other than the nss and it's relay if the rig is an autotrans.

For the dui system however, in a diagnostic mode, you can simply run a "hot wire from the battery + terminal to the batt terminal on the dui, when the starter cranks the engine over, it will fire! But do not leave the jumper "hot" wire connected without the engine cranking over or actually running! That is a no-no on any ignition, basic rule of thumb that covers all bases and types of systems!!!
 
Well, I hooked the + wire up to the dui and it runs. Sounds good and better, but the lowest timing I can get to is about 15` btdc. I May be able to trim the hose on the bypass to see if I can get another degree or two. Took it out for a spin around the block and I was getting some ping when putting it down a little. I cant remember which way I need to push this thing to get rid of that but in the past, it was a fine line between knock and ping for this Scout. Maybe a degree or two depending on octane. I had it timed for 89oct on the last system and I May try for the same this time. I think I have the same oct in it so I believe I need to retard it some more. Fun, fun, fun. Performance wise it seems to get up when I want it to but I have only taken it around the block. Didn't spin the tires but... I will see what I can do to get rid of the ping and then post updated info.
Thanks michael, the force is strong with you. I had to look at the manual to find the electrical problem I had earlier and then put all the pieces together and it worked so far. I could attach more pics if anyone is interested.
Meanwhile I will trim the hose extra off and see if I can get rid of the ping.. Will post l8r
 
Great! Ain't it fun when shit works right! And dumazz po's spend much more time and effort in scruuin' stuff up, than if they had just fixxed it right to begin with! I hate them busturds!

15*btdc is way more base timing than these motors can take! In fact, it should be crankin' over kinda "hard" like it's trying to "kick back" or the battery is dyin'! And starter current draw will momentarily go way up.

Power timing means let it ping under load, then back off timing (retard) until it goes away, then retard just a touch more for insurance with the varying octane rating for this trashy shit we burn today called gasoline.

Being as how the dui is all new inside, the timing is now much more accurate than whatever your previous distributor could hold at any one rpm point.

And ya lernt how to wire this schnizz correctly!

No doubt ya May need to re-stab the distributor to get the timing to come in, and "re-adjust" the plug cables on the cap to reflect what ya end up doing. But now ya know what to do!

For the knowledge base here...if you do remove the distributor again, could you use a feeler gauge and measure and post the "space" (endplay) between the distributor bottom shaft housing and the top of the drive gear? I'd really like to know how dui sets those up. Don't care what they "spec"...what matters is what they do!

That has much to do with overall ignition timing accuracy throughout the rpm range.

Great work!
 
I am going to try and visualize this before I pull the thing and move it a tooth. I am seeing turning the rotor/gear clockwise a tooth and re-stab, then turn housing counter to get it closer to desired timing? Does that sound right? So retard a tooth and then advance housing.
To do this I would probably have to turn the o pump drive a little first too right?
Maybe I should take a nap.
Or can I just move the wires over one peg? Na that isn't right. Hmmmm
of course I could cut that inside hold down off..... Little drastic.
I should make sure I am not already a tooth off. It looked ok but I should triple check it I guess.
 

Attachments

  • DSC07062.jpg
    DSC07062.jpg
    68.7 KB · Views: 1,137
Last edited:
Back
Top