Read every transgo TF-2 kit install thread i could find..few questions

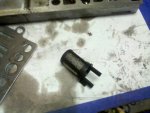
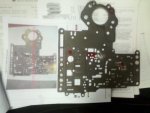
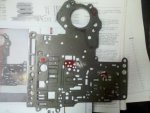
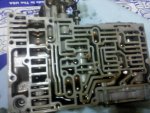
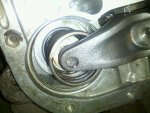
I printed the transgo install sticky (all 17 pages of it! :icon_rolleyes:) I have the install instructions read over 5 times, and I have the shop manual open. I'm building a daily driver/weekend cruiser of my '74 Scout II with a FI'ed 392, waiting for the machine shop on the motor, got to gather some FI parts. While the motor is out I plan on installing the tf-2 kit, but reading some of the threads I'm a little scared :yikes:. The transmission was rebuilt at a local trans shop about 6 years ago and was in my friends daily driven 304 powered Scout II for 2 years, we cut up that truck, the trans sat for a year than when my friend owned my '74 he installed it behind the 345 it had. Another friend obtained (and abused :sad:
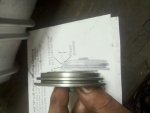
) the Scout for a year, than I traded him a '92 diesel f250 for it after he wiped out the cam. I dropped the pan and the fluid is dark red, does not smell burnt, but it is dark. There was some fine metal in the bottom and a bit on the magnet. It always shifted great, and downshifted better than any Scout I've owned, but it did have the issue when it'd sit overnight it'd drain down. I'd let it run in neutral for 5-10 seconds, put it in drive and it'd pull away with no trouble. I also added the biggest transmission cooler autozone sells and completely bypassed the radiator. Could I install the kit with your instructions, the supplied instructions, and the shop manual without messing up anything? :confused5: I'd also like the shift command installed. I also bought a B&M +4qt aluminum pan to help keep it cool. Also I was recommened to run type f atf from several sources, what's your recommendation on that?

Thanks!!
-jon :icon_confused:
 
I see no reason at all ya can't install the tf-2 kit yourself! You have already started this thread, so let's use it to walk your valve body through the process. If ya run into issues, just ask!

But...I'd highly recommend that ya snake a copy of the munroe book "torqueflite a-727 transmission handbook" (isbn: 1-55788-413-7). That book goes through a tf-2 kit install also and has some insight that is not in the transgo instructions. The two docs together will be used for this install.

All my copies of the various transgo instructions have all kinds of cryptic warnings and additions/corrections I've added over the years.

The main thing to observe here is cleanliness! Solvent wash the valve body before tearing into it, wash it after making the mods, and wash it one last time just before re-installation! You will find all kinds of mung inside the castings that is sluff-off from the friction materials/oil.

Here's an establishing shot of the valve body in full disassembly. Do not be intimidated...it looks daunting but you can do it if ya have a nice place to work and are not rushed to get it done. Take your time and triple-check everything. Anytime you walk away from the table/bench, be sure to cover everything (I use old sheets) so bugs, pet hair, kid's fingers, etc. Are kept out of the parts pile.

Installing the tf-2 kit will take care of converter drain-back. Not every 727 has that issue, it's a random occurrence and is far less prevalent than folks talk about (urban myth kinda deal). But the tf-2 system will charge the converter in both park and nuetral as soon as the engine is running.

As for using type "f" tranny oil...I see no reason/benefit to do so on a used transmission. I'd not mix the oil as the frictions have saturated with whatever was in it berfore. If that was dexron, then put dexron back in.

If you are building a fresh trans with new frictions, then using type "f" would certainly be viable, I have no preference for one over the other. And when doing a fresh tranny, ya normally install a fresh torque converter so it can be be pre-oiled also with whatever you chose to put in the pan. Before beginning a transmission assembly, all frictions are submerged in whatever oil is going to be installed for "pre-soak". Then ya use the same oil for the assembly lube where appropriate along with the transemble assembly grease/aid.

Type "f" can be a bit more aggressive in friction material "bite" than dexron, but I seriously doubt that is anything you can feel seat-of-the-pants, especially after installing the tf-2 kit which can shift very aggressively (which is a good thing!).

I'll be assembling yet another valve body using a B&M kit (virtually identical to the transgo stuff) in the next few days, if you have other questions that are best illustrated with pics, let me know, I have an extensive selection of tf-727 pics but always take additional shots for each transmission I work with, every one can be a unique case when you are dealing with stuff that has been previously butchered!
 
All your info and pictures have been a huge help. I dove into it already, got it apart and got about halfway through. Can I clean the tiny filter that's inside the valve body? It has some metal stuck to it, I think I can blow it out and clean it with solvent. I drilled the plate that's sandwiched in there, it was different than the one you posted pictures up of in the reprogramming install thread, and a little different than on the sheet. I attached a pic of it I drilled the same holes you did with the 3/16 bit in the kit, some were bigger than the bit. The truck it came out of was a 1979, but after 20+ years who knows what it could be...:confused5: I drilled the "bridge" out of the upper valvebody with the adapter, drillbit, and stop included in the kit. There was nothing in my bypass chamber so I left it alone. I ground down the throttle pressure valve stem also and reinstalled that. I used a flat file to grind a groove in the body for the manual valve. I stopped at the "shift command" section, I'm on the fence about it. It seems it can come in handy, I'll only be doing light wheeling with this truck and hot rodding around town. Should I go through with it, or can I mess it up if I'm not careful?

Thanks again for the help! :yesnod:
-jon

p.s. I added a pic of my valvebody just for a reference to where my balls are....:rolleyes5: ckeckballs! Haha
 

Attachments

  • filter.jpg
    filter.jpg
    55.1 KB · Views: 612
  • plate.jpg
    plate.jpg
    44.5 KB · Views: 750
  • plate2.jpg
    plate2.jpg
    53.8 KB · Views: 601
  • valvebody.jpg
    valvebody.jpg
    60 KB · Views: 1,227
Also ground down the piece for the shift command, looks like yours and the photo they listed! I chucked it in the drill and let it spin while a little finesse with the carbide bit on the air grinder then some polishing with some fine grit sadpaper till it was all shiny and smooth! Also Mike, I noticed in the pic in your tf-2 install thread you installed the plate "sideways" compared to what the instructions showed, is there any reason for that?? I installed mine as the instructions listed.

-jon
 

Attachments

  • grind job.jpg
    grind job.jpg
    44.2 KB · Views: 609
  • grind 2.jpg
    grind 2.jpg
    54.1 KB · Views: 783
Last edited:
I was out of pocket most of yesterday and overlooked responding to this thread last nite.

Comments....

Regarding the position of the shift command blocker plate shown in my pic, the actual position doesn't matter as long as the hole is in the proper location. But you are correct, my positioning doesn't match the instructions.

Grind job on the governor valve looks just fine.

That small nylon filter is for the pressure regulator system. A new replacement filter comes in any master overhaul kit as part of the package. But it certainly can be carefully cleaned and re-used. Having that filter in your valve body tells me that transmission is late '77 and later production unit and also is a "part throttle kickdown" unit. I can see the module attached to the valve body in your long shot.

As for removing the low/reverse servo piston...it's tricky. When installing a shift reprogramming kit in a fresh transmission build on the bench, it's much easier to do the case-related mods as it goes together of course!

Back out the band adjusting screw nearly all the way. Then use a long piece of wire to pull it fully to the position where the band is "tight" on the drum, do this carefully so that the band apply strut doesn't jump out of position which is a bitch to re-install! Tie the tag end of the wire off on the opposite side of the trans to some anchor point to hold it in position.

Then use an appropriate "c" clamp to compresses the piston spring cover and remove the retaining ring. The "c" clamp is also used to compress the piston assembly when it goes back in after the modification.

Once the piston has been modded and the land diameter reduced by grinding down the lower lip, the piston is now pretty much immune to the "servo flop" issue that can be somewhat common on these units when the bands are not adjusted or it's shifted into reverse with high engine rpm. Do that and there is no need for the common aftermarket servo piston replacement using a steel or aluminum piston with teflon rings unless there is evidence that the piston has previously flopped which means it should be replaced with the aftermarket piston that offers additional support.

From now on, use the band adjustment specs for the transgo install, not the data I previously supplied in the sticky thread.
 
Cool! I'll try it tomorrow, thanks for the reply! :icon_up: so just snug up the band bolts and back it off x amount? No torquing required?

-jon
 
cool! I'll try it tomorrow, thanks for the reply! :icon_up: so just snug up the band bolts and back it off x amount? No torquing required?

-jon

I don't agree with the transgo statement "snug with a short wrench" but I guess that works for them! I always torque the screw to 72in./lbs. And then back off the recommended number of turns.
 
I pulled the arm back as far as it'd go, got a c clamp in there to take the tension off, got the c clip out, and the round spring retainer out. I cannot see how I'm gonna get the spring and servo piston past that arm. Ill post pics when I get home later....:icon_confused:

-jon
 
The picture with my fingers is as far as I can pull it down, then from the bottom I can't see any way the spring would fit around it.... :icon_confused:

-jon
 

Attachments

  • spring.jpg
    spring.jpg
    46.5 KB · Views: 545
  • arm.jpg
    arm.jpg
    41 KB · Views: 548
  • bottom.jpg
    bottom.jpg
    74.2 KB · Views: 519
the picture with my fingers is as far as I can pull it down, then from the bottom I can't see any way the spring would fit around it.... :icon_confused:

-jon

I have not experienced this issue in the past. Granted, it's a tight fit and much easier when the trans is on the bench. I r&r the servo with all the linkage out of the case (the pivot pin removes after removing the tailhousing) but this is not the thing to do in your situation) before installing the rar band and apply links.

Have you backed the band adjust screw all the way out so that it does not touch the intermediate lever?

If ya still can't get the space needed, then you need to carefully remove the apply link using forceps. It's real tricky but can be done, and the re-install of the link is even more tricky!

Once the apply link is removed, then the arm will drop completely out of the way.
 
This a pic of the link (sometimes called the "strut"). It fits between the intermediate lever that the screw pushes on and the pocket made into the end of the rear band, that is what transfers the action of the servo piston to the band to make it "clamp" or release.

It is a piece of tool steel 1" x 1-1/4" in size.

If you have the munroe book, look at the bottom of page 120.
 

Attachments

  • 002.jpg
    002.jpg
    69.8 KB · Views: 1,656
I have the IH shop manual. But now that I know what I'm lookin for ill see what I could do, should I be able to pop it out without much fuss??

Thanks!
-jon
 
I have the IH shop manual. But now that I know what I'm lookin for ill see what I could do, should I be able to pop it out without much fuss??

Thanks!
-jon

Taking it out with forceps is no problem...getting it back in will try your patience, it's like doing micro-surgery with all the oil dripping in your face!
 
I understand what you mean about using forceps.... I tried curved pliers but they were too thick, I manged to somehow pop it out with a right angle pick.:icon_rolleyes: when I put it back, it should "drop" back in right? And it goes with the longer part to press on the band correct? It just kind of jumped out so I didn't see what way it went. And with the lr piston out, it says to grind ths lip correct? Just take a little off? :icon_confused:

thanks!
-jon
 

Attachments

  • LR piston.jpg
    LR piston.jpg
    42.8 KB · Views: 563
I understand what you mean about using forceps.... I tried curved pliers but they were too thick, I manged to somehow pop it out with a right angle pick.:icon_rolleyes: when I put it back, it should "drop" back in right? And it goes with the longer part to press on the band correct? It just kind of jumped out so I didn't see what way it went. And with the lr piston out, it says to grind ths lip correct? Just take a little off? :icon_confused:

thanks!
-jon

Yes...and yes!

Notice that the strut has two "rounded" or radiused ends (length-wise). Those radiused ends engage the band and the intermediate link.

The exact amount of the piston lip to be removed through grinding is not real critical, idea is to simply open the space under the lip seal to allow a more even distribution of oil pressure to help stabilize the seal, therefore stabilizing the piston. If you do not grind down the piston however, you will never know the difference since this transmission ash not failed previously through a "servo-flop".
 
Well let the reassembly begin!! :icon_up: I ground it down till there was some clearance between the lip of the seal. When I put the supplied collar on I couldn't get the c clip to seat, I had to grind 1/16th off it so it'd seat the clip, I hope that doesn't matter!! :yikes: then there's not much resistance to get that piston back in there is there? I make myself nervous with stuff like that it seemed too easy to put in. I put the supplied spring in and put the spring retainer and c clip in, that was interesting, I couldn't make the c clamp I had work so I squeezed it with my hand, and put the clip in with the other, it took about 25 minutes and some choice words! Then it only took 2 attempts to get the strut in, it was alot easier than taking it out. I adjusted that band and the other band as per the instructions (but I torqued it to 72 ft lbs.), then I put the valvebody in and torqued the bolts to 100 ft lbs, and got the e clip on the park pawl linkage. I need to get a neutral switch though because the seal looks brittle and is flaking off. :icon_confused: I'm going to have to cut my exhaust to clear my deep pan before I do anything else.

Thank you soooo much for all the information you gave me, I could have never done it without your assistance, I'd buy you a case of beer if you weren't soo far away! :icon_up::icon_up::yesnod: once I get the engine in we'll see if I got it right or messed it up... :icon_rolleyes:

-jon
 
Oh and I have a big trans cooler installed and the rad bypassed, is that ok, or should I go trans-rad-aftermarket cooler-trans??:icon_confused:

-jon
 
Back
Top