Cooling System 101

Climb On!

Member
Mike,

I'm back. A few months back you walked me through my carburator rebuild on my 1970 Scout 800 (304) and she's still running like a champ! Now I'm having some cooling system problems...not reading on the gauge, pinhole leak at front of radiator, etc... I want to go through my whole cooling system but I'm not sure where to start and I can't tear down the motor. The coolant is occaisionally low, but looks clean (I only drive 2-3 miles to work and back each day, but in hawaii somedays its warm).

I'm getting ready to sink hours into the forum here, but hoped you could point me in the right direction to help focus my effort in researching what to investigate (incorrect thermostat or rad cap, need to flush, pump, fan clutch, etc).

Chuck
 
So chuck...you haven't given up afterall!

Most likely, all ya really need to do is a fairly simple refresh of the engine cooling system. Typical periodic maintenance deal but no doubt it's been awhile!

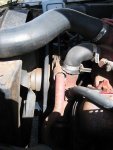
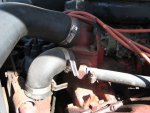
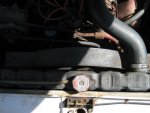
I'd start off by lining up all the parts needed...and plan to replace everything that is rubber. All three molded hoses ya need are easily sourced from us, the heater hose is plain old 5/8" stuff you can pick up locally.

While snaking the heater hose (and new clamps), see if ya can find some of the stuff we discussed in this thread:

http://www.forums.IHPartsAmerica.co...tech/824-prestone-super-radiator-cleaner.html

I think that is the best ya can get in a consumer package these days. And also install (and use) one of these "flush kits" to make the work much simpler:

prestone :: products : prestone®flush n fill kit

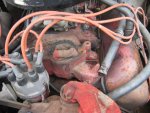
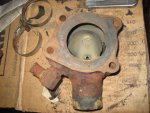
If...the thermostat that is currently installed is the correct pattern rs370 series, those are very durable over the longhaul!! But since you are going to do this on an unknown cooling system, I'd order up a replacement also. For the conventional "vertical flow" radiator in a Scout 800 I'd use the 180f setpoint, those units are not quite as efficient as the crossflow radiator used in the Scout II and "d" model fullsize stuff.

Install the flush kit and flush the system before opening it up...even if you are going to have the radiator repaired. Idea is to get it clean as ya can before having the radiator serviced.

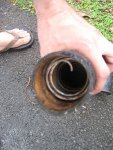
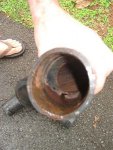
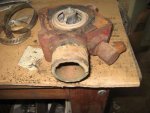
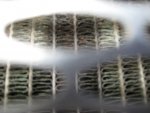
Hopefully you can find an old-time radiator shop there on the island. Have them look at the radiator and determine if the leak point(s) are repairable. No doubt they will be, though the top and bottom tanks will need to be removed to resolder (after cleaning) the tubes to the headers (90% of the time those are the leak points you described).

While the radiator is gone, then use the garden hose to continue to flush the stuff in the block as much as ya can, of course observing local environmental restrictions for doing so.

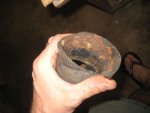
The engines do have a tendency to build alotta sediment in the rear corners of the water jackets on each side. But ya can't access those points for cleaning without removing the core plugs . So the trickledown on a cleanout like this can be pretty big! On the other hand, I've found some of these engines to be near spotless inside before servicing...ya just never know until ya look!

For a pressure cap on these radiators I'd not exceed a 10 lb. Rating, that is more than sufficient for a vertical flow radiator of that era. A 13lb. Cap would prolly be ok...but not a 16lb.!!!

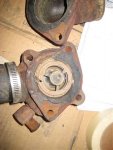
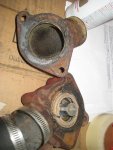
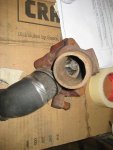
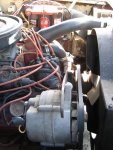
If the waterpump is not leaking now, it most likely won't leak after flushing...but just be aware. There is no need to just change a water pump as a maintenance point, these water pumps are very durable.

If the temp gauge won't read, it "could" be because the nose of the sensor installed in the water jacket is crudded. Or the wire connection is punky. Do all the other gauges seem to work correctly?? If so, that means the cvr (constant voltage regulator) is operational,,,so it's possible the gauge itself has gone away but that would be very unusual.

The best tool you can invest in for doing this work is an infrared thermometer that will allow you to "see" the temps around the cooling loop.

Attached is a little doc I did years ago regarding thermostat and cooling system service that is not found in any service manual...print it out and take a trip through the IH sv engine cooling scenario!

P.s., once it's ready to all be buttoned up, I'd install only straight water, burp the system, and run it that way for a few days to make sure ya have all the leakpoints handled (if any). Then simply dump the radiator contents only and install straight antifreeze only (not that glycol 50/50 ripoff shit and most certainly not anything that has the word "dex-cool" associated with it, that stuff is a total fraud brought into the motor vehicle industry by GM). A gallon dumped right in the radiator will give ya a perfect solution if the block is still full of water.
 

Attachments

  • I4 Supplemental Instructions v1.0.pdf
    871.7 KB · Views: 837
  • Robertshaw 370 SV Install v1.2.pdf
    3.4 MB · Views: 1,896
Last edited:
All guud stuff.
10 lb. Cap range is kinda push'in it for a vertical rad like the 800 uses; a 7lb is better.
Though a rig in the islands wouldn't need antifreeze, a 50/50 mix has the right balance of chems for anti-corrosion and metal protection, plus a little "lube" for the pump. No, I don't buy the pre-mix either. It ain't absolutely necessary, a supplemental additive could be used in addition to the gallon anti-freeze.
 
all guud stuff.
10 lb. Cap range is kinda push'in it for a vertical rad like the 800 uses; a 7lb is better.
Though a rig in the islands wouldn't need antifreeze, a 50/50 mix has the right balance of chems for anti-corrosion and metal protection, plus a little "lube" for the pump. No, I don't buy the pre-mix either. It ain't absolutely necessary, a supplemental additive could be used in addition to the gallon anti-freeze.

"premix" antifreeze is a dumazz marketing stunt aimed at folks who simply can't measure liquids and got more cash on hand than brains! And it ain't exactly exact chemistry/science to come up witha 50/50 mix! Ya end up paying about $10 a gallon for water (when ya do the math which even I can do)!!!

Ya make up your own 50/50 and keep it separate from the straight goods, in a sealed container such as a fuel can that has been fully labeled as to the contents...and ya use it for maintenance between cooling system service intervals.

Never, ever run straight water in any engine cooling system except for testing purposes. The "anti-freeze" property is only one small part of the function that correct coolant provides inside the motor!

The sv-powered s800 can run a 10lb. Cap just fine on a vertical-flow radiator, most especially one that has been serviced and pressure-tested by a commercial shop. A 7lb. Cap is what I use on unknown radiators on s80/s800, and any unknown quality, ihc-app radiator of the vertical flow design, including the fullsize stuff. And a functional coolant recovery (burp) system must be installed also...and that item should be added to any vehicle which did not include one as oem equipment as long as the radiator neck will support a modern "recovery"-type pressure cap.

Chuck...when ya can, please post a nice "long" shot of your current engine cooling package showing the pump/fan/shroud/radiator area clearly. Without knowing in advance what is under the hood, we can't effectively advise. Ya remember all that back and forth about "po virus" stuff! Hell man...you could have a radiator in there that came outta some studebaker pickup from 1951!

Right now...since you already know you have a coolant leak that is visible, your cooling system will not hold normal pressure. Any liquid leak...is also a pressure leak! So ya might as well not even have a cap on the radiator except to keep the bugs out!
 
Mike,

thanks! As usual you are right on the Mark. I'll go through your post for the 3d or 4th time and put together my shopping list and plan of attack. This weekend I'll be re-installing my extra gas tank (I took it out to replace my springs and shackles) and will snap several photos of the cooling system. I'll also start researching radiator shops out here.

Chuck
 
mayben
tech moderator


join date: jan 2007
member number: 10
location: leaburg, orygone
age: 62
posts: 3,642 re: top 10 things to check for overheating

--------------------------------------------------------------------------------


regarding your s80, there are many nuances regarding the cooling system that need to be considered.

First off, use only a 7lb. Pressure cap, no higher setpoint on that vertical flow radiator, those cannot handle any higher pressure, never were designed for that!

Woodburn radiator, doug who's been putt'in food on table with this biz sez pretty much the same.
 
Mike,

here's some initial photos.
 

Attachments

  • IMG_5193.jpg
    IMG_5193.jpg
    34 KB · Views: 798
  • IMG_5195.jpg
    IMG_5195.jpg
    41.8 KB · Views: 729
  • IMG_5197.jpg
    IMG_5197.jpg
    38.5 KB · Views: 702
  • IMG_5198.jpg
    IMG_5198.jpg
    55.7 KB · Views: 904
  • IMG_5200.jpg
    IMG_5200.jpg
    51.6 KB · Views: 749
  • IMG_5204.jpg
    IMG_5204.jpg
    46.1 KB · Views: 739
Great description chuck!

Looks pretty original with the exception of that aftermarket burp bottle. I run the same ones in my stuff, plumbed a bit different than most folks however.

I bet when ya remove that cap, the inside of it is rotten! Have your radiator dude pressure test it just for grins, bet it's dead!

And the best part...you do have the radiator shroud and it appears to be near-virgin! And no fan clutch so that eliminates that issue.

You are already ahead of the game man! Jump on it!
 
Mike,

thanks again for the guidance. Here's my shopping list:

3 rad hoses with 6 clamps
5/8" heater hose to lengths with clamps
1 22oz prestone super rad cleaner
1 prestone flush and fill kit (remnants of an old one is still installed)
1 rs370 180f thermostat with gaskets
1 10lb rad cap

do you recommend I just flush before pulling the rad, or flush and replace hoses and t-stat? There will likely be some time between me flushing and getting around to pulling the rad to take to a shop. Or should I just wait and do it all at once?

Once I pull the rad, can you give me more details on how to, "use the garden hose to continue to flush the stuff in the block as much as ya can." should I pull/replace the core plugs? Have new ones on hand?

I'll jimmy with the sender wiring this weekend.

Chuck
 
In this case chuck, I'd go ahead and do the entire cooling system flush treatment when you are in the place to go ahead and want a project to do...now! That way, downtime is minimal, you can still drive the rig as needed even though the radiator leak is annoying.

With any cooling system leakage, (no matter how small or seemingly insignificant) the system will not hold pressure as intended. But then you haven't indicated you are experiencing an engine cooling issue anyway which might warrant concern.

On occasion (and I keep a tube in my truck box for emergencies), I do use a cooling system "sealant" product. Most especially for use when the crossflow radiators on Scout II and squarebody fullsize stuff develop stress leaks due to the racking of the radiator core support. Most of the time those leaks can only be repaired by a radiator pro by removing the tanks and doing a re-solder inside the headers. That's not something I can do myself.

I use only the cooling system sealer of the "powder" type in a tube for that purpose. When the time comes to have the radiator repaired correctly, that stuff is easily flushed away using conventional techniques and does not impact the ability of the radiator pro to make the repair. It also will not impede the action of the radiator pressure cap in allowing the burp system to function. This type sealer can work for a very long time if needed!

The "ceramic"-design sealants are used for a very different issue by some engine rebuilders, those are a major pita to install and "cure" and May create an issue for the radiator guy down the line.

Pulling the core plugs out of the block (three on each side) is much more time-consuming and a real pita! What I would do is...pull only the rear plug on the driver-side as that is a fairly easy one to access. If when ya look inside it looks like the gates of hell, then that will tell the story regarding popping all the others out! If it looks pretty decent with no sludging accumulation of what looks like beach sand, then there is no reason to pop the other plugs out unless there appears to be evidence of leakage below any of the plugs. That is the core plug that is adjacent to your oil pressure sending unit which is easily removed.
 
Mike,

without my gauge working, I can't confirm, but she is running warmer than I would expect driving only a couple miles at a time. I'll see if I can get the gauge to work today to confirm or not.

The leak, at least the one I can see, is at the cooling fins and inside doesn't look rotten...though maybe at the time I was over impressed by the neon green color of the coolant vice rust brown.

So you'd recommend I replace the hoses and stat when I flush the system? I'm gonna call Monday to order the set of hoses and stat regardless.

Sorry, also should I use the powder sealer after I flush? No issues with that in the newly cleaned system?

Thanks for hanging in with me again!!!

Chuck
 
I'd do whatcha need to do now in this order, leave all the "old" parts and stuff intact at this point:

1) drain whatever is in the system now and dispose of the stuff in accordance with your local practices. Install the flush and fill "tee".

2) install the cleaning solution, then add straight water and drive for a couplea days to get it good and hot and some circulation time on it (I know what the instructions on the package say, disregard the time frame they advise!!!).

3) drain the flushing treatment and dispose of it as you did the original coolant.

4) follow the instructions for the flush and fill and do it until all the water coming out is clean. May take an hour or so of scruuin' with it.

5) next remove and discard all the old rubber goods. Then use the garden hose and flush each component/system both directions also (including radiator).

6) if you are gonna have the radiator repaired now, then remove, it and deliver to the shop, replace the rubber while waiting for the radiator to come home. If not, then simply install all the new rubber.

7) if ya think ya need to, remove that single core plug and take a look inside the water jacket.

8) replace all the block core plugs if you are going to...major pita!!, but that's why these rigs are projects and not life!

9) once it's all buttoned up, then refill and burp using straight water (no coolant). That way, if ya find some additional leaks, it's simple to repair and test again. If you did not repair the radiator, then you will still have that leak(s), but ya ain't done!

10) if it passes the leak test, then drain one last time, install the stopleak stuff, and fill with your 50/50 coolant mix. It will take about 20>30 minutes of run time at full temp for the stopleak to do it's thang!
 
Mike,

I cleaned up my contacts on the temperature sensor and now my temp gauge has a reading. Does this mean the sensor is good or can it contribute to an inaccurate reading? I'm gonna let it run more than the 5 minutes it takes me to drive to/from work to see if it reads hot...so far it just stays in the cool region.

For the core plugs, I haven't crawled under her to look specifically for them...I'm assuming I can pick these up at the local parts store. Anything/type specific to look for in replacing the plug(s) I have to replace?

Just put an order in for the hose kit and what-not. More holiday projects!!
 
I'm assuming ya got an ok place to work on this rig??? When ya install the flush chemical, I just set the fast idle up to around 1500 and let her rip for at least 30 minutes. That will get the temp on up there but not anywhere near the "too high" point. I'd expect to see 200f>205f though, that makes the flush stuff work good!

Just watch your gauge during that period and monitor. Can ya borrow or steal an infrared thermometer?? That way ya can "read" the temps throughout the plumbing loop and you will see heat exchange taking place at various points. And that is an excellent way to calibrate your temperature gauge in your head!

When you have the cooling system drained, remove the temperature sender/sensor also and clean off the nose real well, you will find much oxidation there that inhibits it's sensitivity. That is a 1/8" npt (tapered) thread, do not put any teflon tape or pipe dope on it as that inhibits it's action also, I use anti-seize on those threads.

The core plugs are nothing special, there are three on each side of the block, the brass ones are much easier to install if ya have to but steel is just fine. The size is very common, 1-5/8" diameter by 1/4" depth.
 
Ok Mike,

I will eventually get this done. Between work, kids, holidays, its hard to get to a lot of things that need to get done.

Anyway, this week I should be getting to the cooling system. I already ordered and received the hoses, t-stat, and temp sensor from ihon. They though in a rad cap (7#) as they didn't have any on island!

I've got one last trip to the autoparts store and had a couple questions before I tackled the job. I'd like to replace the bolts, do you know the size and thread? Also, your t-stat installation instructions mentioned to torque the "lubricated bolts" to 25-30 ftlb. Is that with anti-sieze? Also, burping...how do I manually do that? I've got an inclined portion of driveway if needed.

Lastly, I'm going to call around to the two rad shops on island. They seem to have been in service for a while, but what questions should I ask to ensure they're the right shop? What should I expect on the price range?
 
ok Mike,

I will eventually get this done. Between work, kids, holidays, its hard to get to a lot of things that need to get done.

Anyway, this week I should be getting to the cooling system. I already ordered and received the hoses, t-stat, and temp sensor from ihon. They though in a rad cap (7#) as they didn't have any on island!

I've got one last trip to the autoparts store and had a couple questions before I tackled the job. I'd like to replace the bolts, do you know the size and thread? Also, your t-stat installation instructions mentioned to torque the "lubricated bolts" to 25-30 ftlb. Is that with anti-sieze? Also, burping...how do I manually do that? I've got an inclined portion of driveway if needed.

Lastly, I'm going to call around to the two rad shops on island. They seem to have been in service for a while, but what questions should I ask to ensure they're the right shop? What should I expect on the price range?

The thermostat housing bolts which I used to include in the tstat kits I assembled were 3/8"x 16tpi (coarse or uss) x 3", grade 8. Since they thread into a water jacket, I always use a sealant on the threads which also serves as an anti-seize...something like hylomar, permatex #2, etc.

Burping a vertical flow radiator like yours should be real straightforward, it sometimes does help to raise the nose of the rig so that the filler neck is the highest point...an incline should do the trick also.

Also...after you have filled the radiator and the motor is running and getting up to temp...squeeze the top radiator slooooowly and gently while the cap is off, that will help expel air.

If ya walk into a radiator shop and it's filthy with all kinds of mung droolin' on the floor that hasn't been cleaned up in the last year...and ya see a torch hanging onna "holder" with a pilot light blazing,...and there are radiators that can't be identified that look about three/four times the size of yours...then that is the shop ya wanna use! The grubbier the better!!! If they still use good old 50/50 solder and acid flux and not this "green" solder shit, that is outstanding and means they know the score! If the operator's welder's cap is installed on his haid permanently backwards and his face is burned to hell, then he's highly experienced and fearless!
 
oh, and what about pulling the block drains? I believe there are two pipe plugs, right?

Look at the location of those pipe plugs very carefully!!! They are also used to blank off access to the oil galleries on either side of the engine. One set is installed higher on the side of the block, those are the water jacket ports...about in the same line as the core plugs.

Those can be a real bitch to remove if they have never been out before, so be prepared with replacements. Attack 'em with big, strong good vise-grips, don't risk a scruup by simply attempting to use a open end wrench or a socket.
 
Maybe I'll forgo the block pipe plugs...the rad drain was a pipe plug that wouldn't budge, guess I assumed it would be one of those wing nut drain cocks. I wound up loosening up the lower rad hose to drain it. Anyway, phase one complete...drained, flush 'n fill installed, flush and straight water added. I'll drive it a couple of days and move on to phase two.
 
Ok, phase two complete. Drained flush and installed all new rubber, new t-stat, new temp sensor, and new rad cap. Attached are some photos of what I was dealing with. I thought it was a clean system, but boy there was a lot of rusty water to come out. Installation went well and had to trim the bypass hose and lower hose. The upper hose seemed a tad short. And I forgot to lubricate the threads on the t-stat housing.

Have run it with straight water for a couple days now with no leaks :cornut: so phase three is to drain the rad and fill with the leak stop and straight antifreeze and I think its done!

Replacing the temp sensor fixed my gauge problem, so I now enjoy know how my engine is running.

I did find that I have a loose exhaust header bolt and still have to see if I can tighten it up
 

Attachments

  • IMG_5292.jpg
    IMG_5292.jpg
    69.9 KB · Views: 642
  • IMG_5301.jpg
    IMG_5301.jpg
    67 KB · Views: 511
  • IMG_5299.jpg
    IMG_5299.jpg
    37.1 KB · Views: 478
  • IMG_5298.jpg
    IMG_5298.jpg
    40.9 KB · Views: 525
  • IMG_5296.jpg
    IMG_5296.jpg
    42.4 KB · Views: 493
  • IMG_5295.jpg
    IMG_5295.jpg
    37.7 KB · Views: 466
  • IMG_5294.jpg
    IMG_5294.jpg
    59.9 KB · Views: 464
  • IMG_5293.jpg
    IMG_5293.jpg
    56.2 KB · Views: 489
  • IMG_5300.jpg
    IMG_5300.jpg
    59.5 KB · Views: 502
Back
Top