Whaddaya think I fried?

WagnMastr

Member
I exchanged a new alternator off my '73 wagonmaster to swap with my other '73 1110 t/all, and when I was farting around under the hood adjusting the belt in the wm, I forgot that I had my battery connected (I know!) and the battery post hit the bracket, snapped, crackled and popped, then sizzled and produced about a 1" flame for a couple seconds back on the wiring harness about 8" or so from the firewall.
Now, I get no lights, no sound whatsoever when I turn the key/
since the battery cable connected to the alt goes to the ammeter, then to the ignition switch, what's the most likely culprit here causing my problem (other than me!).
 
This episode popped the fusible link . That's what it is supposed to do when ya screw up!

Look at the master bulkhead connector as shown in this pic. The fusible link in this pic is the yellow conductor on the right hand side of the exposed terminal. It looks like a piece of 10 gauge wire but in reality it's a 14 gauge fusible segment, you can see the splice point if you follow the wire down and see that black "hump".

I keep pre-cut and terminated segments of fusible link here in the shop, those are normally labeled as "Ford" parts at the parts house. So get a piece of 14 gauge (some call it "number 14") fusible repair segment and fix it!

That segment of fusible link is equivalent to a 50amp maxifuse or cartridge-type fusible link on a later era vehicle.

Look at this thread for examples of repair segments I've posted:

http://www.forums.IHPartsAmerica.com/electrical-tech/2763-no-power-anywhere.html
 

Attachments

  • Pickall Fusible Link.jpg
    Pickall Fusible Link.jpg
    66.3 KB · Views: 463
I replaced the fusible link on circuit 2-10, which went from driver side top right terminal on the bulkhead connector to the alternator (see attached diagram cts-2587-k). It shows 14-10 should have a fusible link, which to me is the passenger top left connection on the bulkhead, not the 2-10 driver side one. But, your posted photo and my t/all looked to be the 2-10.

Still no power anywhere. I did read through your other posts.
One note - the clock started ticking for a few minutes and the fuses seem to be intact.
 

Attachments

  • 96mgis.jpg
    96mgis.jpg
    70.5 KB · Views: 498
Did you actually remove the bulkhead connector and inspect it's guts? I'm certain you will find a mess of corrosion and arcing-induced carbon tracks on the 10 gauge terminations.

I also think that the po-workaround to the ignition switch and the added "pushbutton" starter switch point up to previous problems in this same area. The fullsize stuff doesn't have the same problem with the bulkhead connectors that are inherent in the Scout II since they are somewhat more robust, but on occasion we do see issues with the connector itself.

I'd remove anything that does not appear to be oem from the entire electrical apparatus (except for the Ford tank selector switch for now) and simply place it all back in oem condition. That one was remarkably unmolested except for the workaround ignition switch/starter switch so this is not going to be a major deal to work through.

Use your test light or voltmeter to determine circuit integrity beginning at the battery and going all the way back to the bulkhead connector side in the engine bay, check the current in and the current out.

Also. You May need to pull the instrument panel back and verify the wire run in and out of the ammeter, since it ate the fusible link, those don't go "open" instantly like a fuse, there May be some additional heat-related damage behind the instrument panel.

Do the headlights now work but just no power to the fuse panel??
 
Hi michael,
hope you had a good Christmas.
I bet you're talking about the 1110 Travelall here. What I am working on is the wm with the olds rocket 455. I was swappinging the new delcotron to put it into the the 1110 when I zapped things. The wm was wired up by me, using a new ignition switch (which, coincidentally also had the push button switch rig done) and not too many of the oem wiring from an ignition standpoint. However, on the 2-10 circuit I did use the oem wiring from the alt to the ammeter through the bulkhead connector.

Oh, not power to headlights, either.

The 1110 is currently fine, and charging, too. Just trying to get out and adjust the tranny. I put about 8oz of dexron into the tranny and now it really doesn't want to move well. So, gonna do the band adjustments and keep plugging. Still need to take off the choke stove off the 392, but those hex bolts are really something to get out. I feel like I am going to strip them before they actually turn!
 
Funny - I just ran downstairs, hooked back up the battery, opened up the front door, and the courtesy light came on. Turned on the headlights, they came on, too. Turned on the ignition and the wm cranked up!
Go figure.
 
You are right bubba, I got confused!

But the same kinda stuff will/has occured on both/all rigs of this genre!!!!

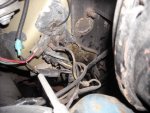
On the wagonmaster....pull the dash and check the wiring to the ammeter, that is the "feed" to everything else. Could be a simple loose retaining nut on the terminal stud and when ya slammed the door, the vibration brought it to life, happens to me quite often! Intermittent shit drives us all krazee, no matter how much ya think ya know about electrons, "intermittent" always kickz azz!

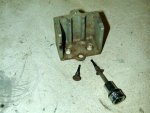
You will never get those two special screws out of the divorced choke heat sink on the 392!!! Do not even attempt! Since eventually you will reuse that intake don't rob the parts!

So I'm assuming that the Scout II 345 intake did not have the choke stove mounted when ya got it??

I removed a 2v intake from a rotten 345 on xmas day, it has the choke stove still mounted, the bimetal spring is still there but the cover and the rod are missing. This one I'll have to remove by drilling out the screw heads. I'll recover and send to ya if you need it, then use the link rod from the 392 setup and "bend" it as necessary.

The one I can send you is a "non-electrically heated" choke stove as used with 49-state intake manifolds, not the kalifornikate version, so it is a match for your donor 345 intake. The heat sink in this picture is for a "electrically heated" version on a 392 that was a kali-emissions rig originally, so it had the auxiliary thermostat mounted also. So...that is why there is not direct interchange on all this divorced choke stuff, no matter if a a fullsize rig or a Scout II version, they are not "the same".

Those two flathead screws that retain the heat stove are "specials" that are a component of the choke calibration/actuation if you can believe that!!! But installing the choke stove with regular screws works just fine, the thread is 1/4-20, nothing special. What is unique...the shank of the screw extends down into the exhaust crossover passage, that portion is not threaded but acts as a simple heat sink itself to help transfer heat to the entire choke stove assembly.

I'm going into town for a visit to my fastener supply house this afternoon, I'll pick up a supply of those flathead screws, but they May or May not have the internal wrenching version on hand today. They won't be the "specials" but they will serve the purpose just fine of mounting the choke stove!
 

Attachments

  • Choke stove screws.jpg
    Choke stove screws.jpg
    76.4 KB · Views: 385
Last edited:
This is how ya remove the choke stove screws if you are very fortunate! A snap-on hand impact with a matching high-dollar hex bit rated for "impact" use!

Clean the internal slot of the screw very well so the bit engages fully, ya have one opportunity to break it loose, so be careful! If this doesn't work, then drill the head off.

Update!!!!

I just removed that choke stove I have for ya...guess what, I got both the screws out in one piece using some finesse and they are both reusable! First time I've ever got 'em out so easily! Now I can also see that these screws are the copper or bronze plated items like the oem exhaust manifold bolts. Idea for that is corrosion resistance to the hot/acidic exhaust gases. Since this choke stove is a 49-state Scout II item, it's the "adjustable" version, the one I show in this pic is a non-adjustable since it's a kali-version.
 

Attachments

  • Choke stove remove.jpg
    Choke stove remove.jpg
    73.9 KB · Views: 371
Last edited:
That looks like the right setup - it's all in the tools.

What size hex is that? I have a set down to 64ths, but not impact rated. I do have an impact tool so I must just give it a whack anyway.

Yes, please send what you got off off that 345. I can use the rod and cover off the 392.

My 345 did not have any parts attached to the intake for the choke. Except for those two darn hex bolts, that is! So, I will still have to get those 2 out.

And, I will go ahead and send you over that fuel switch that was taken off the 'green weenie' a couple years ago.
 
that looks like the right setup - it's all in the tools.

What size hex is that? I have a set down to 64ths, but not impact rated. I do have an impact tool so I must just give it a whack anyway.

Yes, please send what you got off off that 345. I can use the rod and cover off the 392.

My 345 did not have any parts attached to the intake for the choke. Except for those two darn hex bolts, that is! So, I will still have to get those 2 out.

And, I will go ahead and send you over that fuel switch that was taken off the 'green weenie' a couple years ago.

For removing those screws, I use a metric 4mm hex key socket. If the recess is cleaned really well, that bit is a "light" tap-in fit that is much more solid than the "correct" size bit (which is 5/32" and I promise it will strip!)!

The fastener dude told me today he can actually get some copper-plated versions of these screws (without the reduced shank of course). They would be a "special run" though and extremely costly unless we wanted somewhere in the neighborhood of 10k!

So I have on hand now a significant supply of black oxide screws that are conventional shank, those will work just fine, install 'em with anti-seize. I did not want to use a stainless screw since that would set up an electrolytic action between the screw, the aluminum heat sink, and the cast iron manifold.

I have just thought where I "might" have one more of the choke stoves hidden out in a shed along with an air cleaner! I'll check tomorrow after the snow has melted! Edit....no luck on finding the parts out in the shed, so I can't help ya with the rest of the schnizz.
 
Last edited:
Thank, mm. I'll hold off on buying a nos air cleaner assembly I found for $42.50 until I hear back from ya. That price didn't seem too bad, but it is only to hold an air filter, could care less if it is nos.
 
thank, mm. I'll hold off on buying a nos air cleaner assembly I found for $42.50 until I hear back from ya. That price didn't seem too bad, but it is only to hold an air filter, could care less if it is nos.

I edited the previous post, I don't have any of the other parts you need hidden in the shed after all!

Rack yore brain...is there anything else I can get for ya here before I pack the box??? No transmissions or axles though (or engines!).
 
Michael, if you have horn guts and a center cap for a 1980 style rallye wheel, I would gladly take that off your hands!
Other than that, just the choke stove parts you mentioned. I'll check w/ Jeff about the air cleaner, but May just buy the nos one I found if Jeff's aren't much less.
I'll send you the fuel selector before the new year.
 

Attachments

  • Ralle wheel.jpg
    Ralle wheel.jpg
    21.9 KB · Views: 359
michael, if you have horn guts and a center cap for a 1980 style rallye wheel, I would gladly take that off your hands!
Other than that, just the choke stove parts you mentioned. I'll check w/ Jeff about the air cleaner, but May just buy the nos one I found if Jeff's aren't much less.
I'll send you the fuel selector before the new year.

Now yore pressin' it dude! Parts for a rallye wheel, or even a real rallye wheel (not the fookin' egay clones)? Keep dreamin'!

What I do have is a decent supply of grant steering wheel hub kits for pickalls (not the '74/'75 column with the GM ignition lock), I have much smaller grant wheels (14") on both of my fullsize drivers and they are wonderful!
 
Thought you'd like that request! I didn't think about it, but I do have most of the guts anyway, just not a center cap.
So, I guess it's ok to send te choke stove, spring and screws. I'll wrestle with removing the old ones w/ a 4mm hex and keep on moving.
 
Back
Top