Thermoquad Rebuilders?

I will only post recommendations under certain situations.
1- is if I have personally used the service and was happy.
2- it is reasonable to say the known sources are unavailable at the moment.

This situation satisfies both now.... Not cheap but he is top notch. Referrals help.

Call john at c&j engineering..
www.candjengineering.com
14130 e. Alondra blvd. Suite j

santa fe springs, CA 90670

(562) 229-0222
 
Thanks Robert. I talked with john this afternoon and he was super helpful. He asked why I thought it needed a rebuild and then some questions to assess my abilities. He thinks I can rebuild it as it just sounds like seals and maybe fuel leakage at the fuel wells. I have two, so I can try my hand at one and if that doesn't work out, I have plan b which involves returning to the stock 2bbl setup.
Also found Super Scout Specialists rebuilds them, but charges $495 if it's a straight no complications rebuild.
 
Last edited:
I got the feeling john wasn't interested in rebuilding my thermoquad nor did he think very much of the thermoquad. :smile5:

I took apart the spare and found all the issues john thought I would. The fuel wells leak and the square cut o-rings in the body are shot. Overall the carb looks clean and undamaged internally, but there is a problem with the fast idle cam and linkage. It doesn't line up correctly and has a lot of slop.
My problem is, as of last Wednesday the Scout became my daily driver and I wasn't prepared for that. Also we moved and now reside in a smog check county which is due next month. I need it to run and start reliably and pass smog. I'm really leaning towards returning to the stock 2bbl manifold and getting a reman 2210.
I know some things now that I didn't know when I changed from 2bbl to 4 bbl and made some mistakes that May or May not be affecting the way the engine runs now. Example: I didn't know to put sealant on the manifold bolts and little things like that.
Of course, money is the other issue. :mad2:

I'm going to call around today and see about a rebuild kit for the tq. If not to expensive I'll give it a try.


Awesome pictures! That setup is sweet!
 
I got the feeling john wasn't interested in rebuilding my thermoquad nor did he think very much of the thermoquad. :smile5:

Lmao......
I don't know anyone who likes building the tq. From my smog mopar days the plastic bottom half has been a problem. Finding a good one was a pita even when you could get them from pick a part for 15 bucks by the dozen. We all went to the afb.

The tq or any other spread bore mixer has no benifit other than the super small primaries. The whole spread bore deal came from having the large secondaries and not because the larger bore spacing itself was better. The fact is that the tighter bore spacing of a square bore is a better delivery system.
 
I rebuild my own carbs. The tq is no more difficult than your standard carb rebuild in my opinion. I did some research and purchased a carbureator book that has tq data and rebuild instructions in it. Understanding what each part does and how each adjustment affects the engine is imperative.

Kit p/n: 96-246c

floats p/n: 779-1726

test your choke pull-off(s) and replace them if they are not functioning properly.
 

Attachments

  • Thermo-Quad_ 000  Rebuild Kit.jpg
    Thermo-Quad_ 000 Rebuild Kit.jpg
    66.7 KB · Views: 618
  • Thermo-Quad_ 003 New Nitrophyl Floats.jpg
    Thermo-Quad_ 003 New Nitrophyl Floats.jpg
    39.2 KB · Views: 557
  • Thermo-Quad_ 029 Reassembled Top View.jpg
    Thermo-Quad_ 029 Reassembled Top View.jpg
    65.6 KB · Views: 823
Thanks for the part numbers, that is a big help. I think both my carbs are beyond my ability to rebuild. The spare I took apart night before last has some issues with the fast idle linkage. Something is missing or bent/broken/mangled, pick your adjective. The other unit which is on the Scout is probably the better of the two, but I can hear the whistle of a vacuum leak. Don't know the proper terms here, but if I wiggle or push/pull on the shaft that runs through the carb that the butterfly valves are attached to, I can make the whistle go away.

I found a reman tq on rockauto for a 79 dodge with the 360. Would this be close enough to work on a 345?
 
It should run ok. You my have some linkage issues. If you have a warrantee there's nothing to lose.
One thing to remember is that the rebuilder is unknown so who knows how it is quality wise.
 
Soooooo, Friday night the Scout ran normally on the way home. Saturday morning I fired her up for a run down the freeway to get all the oils up to temp for some fluid changes. Got on the main street and couldn't do more than 20mph. No power, and minimal readings on the vac gauge. First thought, uh-oh, out of gas. Made it to the gas station but even after an expensive drink, same issues. Limped home pull in the garage decided to change fluids then tackle carb later. Engine oil smelled like pure gas when I dumped it.
Got to the carb in the afternoon. Took the carb apart and compared parts between the two tq's taking the best looking parts from each to make one. I had resealed the fuel wells on the bench tq and replaced the o-rings in the fuel bowl. Cleaned what I could and reassembled. Also found the choke pull off had come apart on the truck carb. The pull off from the bench unit looked ok and would hold under vacuum. Put the frankenstein carb back on the Scout and she fired right up. Idled beautifully, good vacuum, steady rpm. Backed out of the drive way started down the street and no power, vacuum down to 10, not firing on most cylinders unless I rev up over 2000 rpm, then it sounds and runs ok. Limp home, lock to door, go in house and sulk. Sunday, on a whim decided to test fuel pressure. Hooked up gauge, hit start button, engine fired right up, sounded great. 4.5lbs pressure at idle. Engine died as fuel bowls emptied. Reconnected fuel line and fired the truck up again to show the neighbor how bad it was running. Engine ran smooth and was pulling 19" of vacuum. Hasn't done that for a couple years. Blurped the throttle to wide open and back, sounded good. Decided to risk a drive. Holy smokes!! I guess the secondaries were never opening before. I put my foot down, there was this loud deep roar I had never heard before from under the hood and the tires broke loose. I rounded a corner at 20mph in 3rd gear, mashed the go pedal and both rear tires broke loose! It has never run like that in the 7 years I've had the truck.
This morning, hit the throttle once turned the key and she fired right up. Didn't have to crank for 5 minutes trying to get the engine to fire. Awesome!
I still need to do a proper rebuild, but so far I'm happy with the results. I think fuel economy is going to suffer though,cuz that noise is really cool.
 
"the noise" is waaay cool. I really miss that. Since I went to a q-jet, its just not the same. Even my wife knows what I'm talking about. I am always keeping an eye open for a tq that isn't beat to hell. They are cool when they work!
 
Perhaps there was a piece of crud that passed the float needle and now she's fine. The 2 barrels sure don't break the tires loose like that. Don't break anything in the drive train.
 
I had these on a Scout and a t'all. They can be tempermental but also can be made to run quite well. The problem areas have been described in detail here. Those caps at the bottom of the wells loosen and leak. The bowls warp. The quad rings sometimes don't seat or seal well (I've also had kits come with regular o-rings and those can work as well). I was on a road trip once and it started running crappy. The pull-off had ruptured. That'll kill the party. Another time I had a backfire and it then began running badly. After a back-fire check to see that both needles are still on the hanger! Dropping a needle makes it run super Rich and like crap. The base gaskets are also problematic. Real hard ones won't seal well and you get vacuum leaks. You get the picture. If/when you do your rebuild, warpage can be corrected by using a plate of glass and 240 grit sandpaper. Turn it over and see how it rocks. "sand" along that axis till flat. When assembling, with quad rings and top gasket in place, air horn should sit just proud of the surface. That will ensure adequate crush. I saw demon sizzler referenced above. Years ago I spoke with him about how to clean out the air bleeds, etc. His trick was to carefully dribble "the works" toilet bowl cleaner into those passages and let it fume, then flush out (don't do this more than 30 seconds!) flush well! Use a glass eyedropper for this. The active ingredient is hydrochloric acid, so use sparingly and don't get it in your eyes. :yikes: this will eat out the internal deposits and crud and spare the brass jets.
You then set it up all "by the numbers" in the factory manual. Also, chrysler had a great section on rebuilding these in their factory manuals. Same steps, slightly different settings (of course). A properly running thermoquad is a sweet thing and worthy of working with until you get it right. :icon_heart: just don't cut corners or steps. Oh, there were two idle adjustment needles available. One with a short taper, the other a long taper. Long taper (common) doesn't give much range to play with, but the short taper is better. He used to sell those needles. Good luck with this!
 
Thanks for the info Mark. I'm going to order a rebuild kit and attempt to do it right. I still have a slight bog right off idle. It's worse when cold.

Can someone explain how the choke is supposed to work? Now that I have replaced the choke pull off, it yanks the choke open as soon as there is vacuum. I've had two cold starts so far since replacing the pull off. I press the accelerator pedal once before starting. The choke sets and I turn the key. Engine fires immediately, but as soon as the vacuum builds the choke pull off pulls the choke full open and the engine dies. I go though this 3-4 times before the engine will stay running, abet poorly. The engine struggles for about a minute then slowly builds rpm, if I touch the throttle at all during this process, the engine dies. The high idle screw gets pulled up the cam and will stay up even when the choke gets pulled open but the engine won't high idle until it warms up some. About 5 minutes. Also the exhaust smells very Rich. The idle screws were adjusted down until the idle drops and then opened 1/2 turn.
 
I'd venture a guess that your choke linkage at the carb isn't set right. Mine would "set" after depressing the pedal, fire up and do the fast idle thing. It isn't magic - just follow the instructions carefully. I think the thing that trips people up is that that vacuum can does double or even triple duty, and the adjustments are interrelated. Thus do it step by step, don't get them out of order! Once you do it right the light will come on and it all makes sense. :001_icon_idea: the 1980 scouts had an extra vacuum can on the left side of the carb (the "vpoc"). This was connected to a vacuum switch in the radiator header tank (activated at 35 degrees f) and also an oil pressure switch on the 727 to sense third gear. I seem to recall there was also a coolant temp switch on the back end of the right side cylinder head. The rationale for all this was some monkey-motion regarding the choke at extremely cold temps while driving at moderate speeds and the engine not thoroughly warmed up (engine tvs operational but engine t-stat not opened yet - ergo, radiator still cold). If you have that and unless you need it to pass smog, I'd ditch all that.

A number of years ago a t-quad "guru" told me how to set up that adjustable rod in the center of the rod hanger. The manual states something like 15/32", but that could be just a starting place for an old carb because the holes where the rods hang (rod surfaces themselves) wear and the rods May be lower because of this. Rod step diameters are likely worn too. It goes like this (others feel free to criticize or elaborate). All warmed up, go for a drive and get it into second gear (automatic) around 45 mph and pulling a gooood vacuum. If it runs ok, stop, adjust the little screw to lower the rods a tad, say, go in half turns. Run it up again and repeat. Screw them down a tad and repeat until engine begins to surge (it's leaning out). Then reverse (unscrew) by half turns until surge stops. Then you are done.

I think I'll dig out my old notes on this. I have rod and jet numbers and actually miked the rod diamters at those three steps. Maybe useful, maybe not, but what the heck. One other little tip. If you are extremely fortunate, your carb will have a brass disc with a teeny ball bearing check valve at the bottom of the accelerator pump well. Modern kits use a crappy stamped metal disc containing a fiber disc thingie, imho. The brass part will live forever. If you have it, reuse it. Be very careful to not kink the little plastic tube that feeds the accel. Pump output to the spray nozzle. And if you can still get the brass floats, use them over the nitrophyl jobs.

As mentioned above, the sound of those secondaries opening up and actually improving acceleration is most pleasing.:icon_cool:
 
Last edited:
Mark, you just gave me a forehead slapping moment. I never mentioned that I have installed the tq on a 78 California emissions Scout. The tq wasn't an option for CA scouts until 79. I don't have any temp sensors in the radiator or head, but I remember noticing them in the service manual. That would explain the vpoc pulling the choke off early. Doh! :mad2:
this May prove an issue when I go to smog next month. Time to get out the service manual and study up on vac connections and temp sensors.
 
maybe i'm not smart enough to own a scout

Disconnected and plugged the left side vpoc vacuum line last night. This morning's cold start was much better. Engine fired up first try, stayed running and fast idle worked. Much better drive to work this morning.
Still have a stumble at about 1/4 throttle, just off idle, but it's not horrible.
Was thinking last night I need to buy a book on thermoquads. Moved my factory service manuals out of the way to get to my reminder note pad....doh! :mad2: factory service manual! There's a wealth of info in there. Answered many of my questions just briefly glancing over the tq section.
I swear this change to a healthier life style of weight loss via eating better, lower blood pressure by eating better, cutting out caffeine, alcohol and so on is affecting my brain cells. :icon_eek:
 
Here are some old notes I kept on the thermoquad's rods and jets, fwiw. Some of this info is from the 1975 Scout II xlc factory manual. As usual for IH, it included generic 392 engine info as well.

V345, 392, cal and fed: main jet: 0.098", rod 75-2020 has dimensions, in inches, of 0.064-0.052-0.045. As the tq was not offered on the Scout in 1975, I'd venture this was for the p'all series. These are tq #6590s (fed) and (cal) tq #6592s (manual) and tq 6551s (auto).

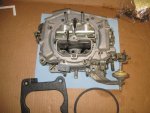
For the 77-78 345/392 we have tq #9128s. This is likely what you have, and it conforms to what I have documented on scouts with this carb. With the 0.098" jet, you have rod 2273: 0.080-0.064-0.044 (inches). IH list is 490561 c91. Phenolic bowl #2618a. Note that the rod has a slightly larger base diameter - this would yield a somewhat leaner mixture.

The bowls are funny. I last bought a new bowl from tomco around 2001, paid $75 and was glad to get it. A number of different styles are out there to match particular applications, mostly mopar. I will venture that more are useable than you May think, so if yours is trash, don't shy away from chrysler bowls. If you pay careful to what passages IH used, choose an appropriate air horn gasket that will block/enable those passages. Some mixing/matching appears feasible, but you'd have to sort it all out. There was even a mopar application that had an aneroid That bolted onto the front of that large "flat" on the front of the carb's air horn (air horns for those were drilled and had modified passages). It would lean out the mixture for vehicles running at higher elevations. Geee...that Has possibilities.

In short, if you have an actual Scout tq, and the bowl isn't too warped (can be fixed), and you can get brass floats - new nitrophyls if you can't, and the rods aren't too worn, and you get those teeeny air bleeds clean, and can put it all together "by the numbers", and fix any vacuum leaks caused by the manifold to carb gasket and related vacuum hoses, you should be successful. But you'd do this all anyway for any other carb, so this isn't really any different now, is it?

One last tip. When you get to the point of screwing down the air horn with those ten or whatever screws, do it in stages. A light stage to get it just compressed (criss-cross). Walk away for a few hours. Do another light tightening and walk away again for a few hours (I did mine the next day). Then snug up for a final, but don't overtighten and strip. Gaskets will slowly compress between tightenings and give a better set. Don't rush it. :nono:
 
Thanks for the info Mark. I have copied the info to my Scout file.
I added a t fitting in the line from egr valve to cold temp sensor and to the vpoc. That seems to be working ok now. I reinstalled the hot air duct from the exhaust manifold to air cleaner intake. Cold driving seems better now. I purchased a rebuild kit and brass floats from napa ($70) but have not rebuilt the carb yet. It's running so good right now, I'm going to see if it will pass smog as is.
I have to drop the fuel tank this weekend to deal with some vent issues as the fuel system is not holding pressure and will fail that part of the smog check. Plus the fuel sender float sunk again so I guess my repair didn't hold up.
 
Repaired my tank venting issues. The vapor/liquid separator had a crack at one of the fittings. Jb welded and made some 90 degree angle tubes so the hoses no longer pull sideways on the separator. Pressurized to 10lbs and it held fine. Fuel gauge float was full of gas again. This time I got it really hot under my 500 watt light and then shook it. A small area showed fluid but I couldn't see a crack there. I unsoldered the drain hole emptied the gas. Resoldered the drain hole and soldered a glob over the previous wet area. Heated the float again and then dunked in cold water. First time, water was sucked in, soldered again, reheated and dunked again; no water. Week later gauge still works!

Smog was due by 5/26 so I took the truck in for a smog, fingers crossed. Ole girl passed with flying colors!!!! Was worried about the visual since I'm missing the dtm, but it wasn't on the shops list of things to check and the tech had never heard of or seen a Scout. Had to go back and forth with him for about 10 minutes regarding what cylinder the engine was timed on. His book indicated #1.
 
Back
Top