SOA using IH Parts America Reverse Shacle Kit Question

kastlerock

New member
This is a two part question:

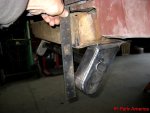
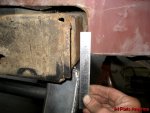
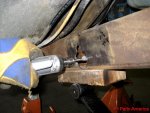
1. When aligning the spring hanger/fangs using the reverse shackle kit the instuctions specify 30" from center to center. At that length the fangs themselves hang about a 1/4 or so off the side of the frame. My question is, "is this correct?" I have squared up the frame and all looks good and I am about ready to weld it up and so I just want to be sure.

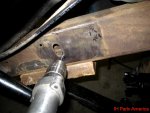
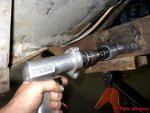
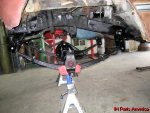
2. In regards to the shackle that needs to be inserted through the frame, the instructions call for the axle to be compressed. Does anyone have a suggestion for doing this when I have no weight on the chassis (the vehicle is completely stripped to the frame)?

Any help would be greatly appreciated.

Thanks,

david
 
1. Yes this is correct.
2. We stack cylinder heads when the chassis has no weight in it. Look around your yard/shop for heavy things such as cinder blocks, some tires, etc. Whatever you can find that is heavy.
 
With the stock springs and this reverse shackle kit is there a good measurement you guys have found for drilling that hole? Maybe from center of fang bolt to center of reverse shackle hole? I am limited on the items I a can stack to compress this baby and I figured you guys might have a good measurement made previously. I have seen 40 1/4" written in a few places but wasn't sure.

Thanks,


david
 
We do not have a solid measurement as to where to locate the shackle hanger sleeve as every set-up that we encounter seems to be a little different in some form or fashion. However most of the time when using stock springs we find that we are drilling the pilot hole right next to the oval hole in the side of the frame rail. After drilling the hole larger with the hole saw you will find the oval hole is drilled out in the process.


Here are a few pointers when installing one of our CPT reverse shackle kits.

Make sure the tip of the spring hanger is flush with the front of the frame.
attachment.php


The spring hanger should stick out past the side of the frame by a 1/4".
attachment.php


Set the shackle angle between 5 and 15 degrees.
attachment.php


The pilot hole normally ends up right next to the oval hole in the frame.
attachment.php


The holesaw will normally be drilling thru the oval hole so take extra caution when performing this step.
attachment.php


Use a die grinder to finish size the hole.
attachment.php


Once the hole is sized correctly weld the sleeve in place.
attachment.php


This is what your finished reverse shackle kit installation should look like when complete.
attachment.php
 

Attachments

  • IMG_3190.JPG
    IMG_3190.JPG
    89.1 KB · Views: 1,263
  • IMG_3191.JPG
    IMG_3191.JPG
    104.3 KB · Views: 1,228
  • IMG_3205.JPG
    IMG_3205.JPG
    96.4 KB · Views: 1,214
  • IMG_3207.JPG
    IMG_3207.JPG
    103.6 KB · Views: 1,436
  • IMG_3209.JPG
    IMG_3209.JPG
    112.6 KB · Views: 1,234
  • IMG_3211.JPG
    IMG_3211.JPG
    116.4 KB · Views: 1,253
  • IMG_3208.JPG
    IMG_3208.JPG
    115.4 KB · Views: 1,373
  • IMG_3212.JPG
    IMG_3212.JPG
    125.1 KB · Views: 2,512
Last edited:
You rock! Thanks so much for all your help. I have looked at these pics but having you lay it out should help me quite a bit.
 
From my experience, you have to have the hangers extend 1/2" past the frame on both sides. By doing this you will have the center of the hangers be at the required 31".

If you have the hangers 1/4" past the frame then the center of the hangers will only be 30 1/2".
 
Back
Top