Ok, here is the info on adding brake self adjusters to my '56 s120 Travelall. First is the finished installation. Flash and non-flash just to show a little different detail.
,
Now, I ordered an adjuster overhaul "kit" to get the parts by backwards referencing the shoes on ihc vehicle models that used the same shoes (12" drums). That did not exactly work. All the parts for this type of adjuster were there, but the cable length was incorrect. All these small parts are available individually at most good automotive parts stores.
I took some measurements and concluded that I needed a cable approximately one inch longer than what was in the "kit". The correct cable turned out to be 12.5" from the outside of the hook to the outside of the eye.
This "two cables per pack" was what I bought.
I adjusted the brakes "loose" to test the self-adjusters. Backed up and applied the brakes to actuate the adjusters. Then I lifted the front axle and found that the shoe clearance was exactly where it is supposed to be.
As I said, there is no listing for auto-adjusters for the '56 s120. Don't know why my reverse-reference search with the shoe part numbers didn't work. But, it was straight forward to get the correct parts (the cables).
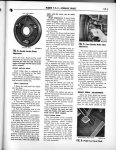
Now, there is one little problem with what you see here. The manual adjuster has to be flipped over to put the star wheel close to the back shoe. The adjuster slot in the backing plate does not line up with the star-wheel in this configuration. You can see the adjustment slot (difficult because in this picture the dusty rubber plug is still in the slot) just below the left end of the spring above the adjuster barrel. The adjustment wheel can be reached from the forward slot by using the long end of the brake adjustment tool. If that is unsatisfactory, you could do as I am going to, create a new adjustment slot in the backing plate with a drill and a dremel tool cutting wheel.
The backing plates on my vehicle are mirror image left to right. It would be a fair amount of work, but if you don't want to alter the backing plate, swapping the backing plates left to right and right to left appears that it would put the adjustment slots in the correct position for the self-adjuster configuration.
One last observation, this cable length works for me, but I see that the adjuster tab, that engages the star-wheel, sits high on the wheel. Most configurations I have looked at show that tab closer to the horizontal engaging the star near the mid point (3:00 o'clock?). The power to turn the star wheel is provided by the spring attached to the sheet-metal bracket. There May be some mechanical advantage lost with engagement that high on the wheel. The new star wheel adjuster turns smoothly in my case. A cable 1/16" to 3/32" longer might provide for better function and movement of the star wheel. Still, it is inexpensive to experiment and optimize the mechanism. If the cable lengths are not correct, all that happens is the auto-adjusters don't work. The brakes still work just fine...just requiring manual adjustment.