Oil filler tube removal....

medic230

New member
**1965 IH Scout 80 with 152ci motor.**

as a new Scout owner, I have been reading these forums in depth and have found answers to many of my questions, thank you all. I still have some "issues" that are really hindering my progress on this beast....

1.)the oil fill tube on my '65 Scout snapped where it enters the bottom of the motor. I have a replacement fill tube on the way, but I can't remove the remaining portion of the tube that is in the bottom of the motor. Any suggestions on how to remove this remaining piece of the tube? I loosened one bolt that appears to be involved in securing this tube, but the piece still wont budge.

2.) I drained the oil yesterday and it looks very thin, not like any oil I've ever seen. Also, my nose May be decieving me, but it smells of gas..?? Any ideas?

3.) as I was tinkering (pretending I knew what I was doing) I began tightening the bolts on the valve covers, among others. They spun as I tightened them...im no mechanic, but this can't be good, right?

4.) while the engine is drained of oil, is there anything I should be doing (seals, gaskets, etc). This truck came from ebay and its history is very unclear.


I have lots of other questions, but I dont think they belong in this forum. Thanks in advance for whatever tips I can get!!!
 
Last edited:
I moved your thread to a more appropriate forum!

As for removing the broken stub of the oil filler tube...how much is still sticking out? Post back what you have now (preferably with a picture) and I'll recommend a method, I've delt with this a few times in the past, I have one now to do!

I also need to know if the timing cover is currently removed from the engine for access to the filler tube location.

The bolt you removed is not a "pinch bolt" per se, it simply as a retaining fastener for the timing cover. The steel tube and the cast aluminum timing cover have kinda "grown together" over time due to being dissimilar metals. Originally, the tube was a simple press fit into the hole, but now the materials have mated!

Gasoline in the oil is indicative of a fuel pump with a leaking diaphragm...very common occurrence on any engine which mounts a mechanical fuel pump. Sometimes they leak oil or fuel externally, most of the time they leak gasoline internally. Replacing the fuel pump with a service part will handle that issue. And I'd replace the oil filter at the same time as the fuel pump, then run the engine on fresh oil and filter for no more than one hours at an idle and drain again (and replace filter) while hot.

It is possible that gasoline contaminated the oil over time due to a carburetor that was not "holding" fuel. I prolly recondition two of those carbs a week for that exact problem. Raw gasoline runs into the combustion chamber and past the rings over time, this does not happen quickly though, and if the carb is in that poor condition, then the motor prolly won't run anyway!

As for the valve cover retainers, early 152/196 motors used a round head machine screw (5/16-18 or "course" thread). Later rigs used a capscrew of the same pattern. It's unusual that the threads in the cast iron cylinder head are stripped, but you can try and use some bolts 1/4">3/8" longer and see if you can get some thread engagement. The actual threaded hole is approximately one inch deep from the machined gasket surface.

Regarding the four cylinder motors, the most difficult point to seal is the valve lifter chamber cover under the intake manifold. That is a real stupid casting design and a very difficult area to make oil tight. I have four I-4 motors in the shop here now and all four puke constantly from that location. Three of those are in-process for major rebuild so the oil leakage will be handled upon reassembly.

The second most common oil leak point is the front timing cover/crankshaft seal behind the crank hub. If your timing cover is currently removed, ya can replace that seal easily...but...I've never seen a crank hub that does not need to repaired with a "speedee sleeve" type repair part. The hub will have a nasty groove worn in it and if you don't fix that, a new seal will leak just as bad as the old one did! That crank hub is balanced to your engine and ya don't wanna replace it with another one! Fix whatcha got, very simple once it's on the bench!
 
Last edited:
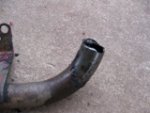
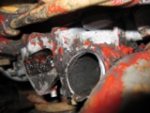
Here are some pics I took of the oil filler tube and the engine block. Any suggestions?
 

Attachments

  • 013small.JPG
    013small.JPG
    13.1 KB · Views: 670
  • 029small.JPG
    029small.JPG
    14.9 KB · Views: 649
That one is not good! Looks to be broken off flush so there is nothing to "grip" outside of the hole.

And obviously it's still on the motor, still in the truck, I can see the water tube above.

That one will be a bitch to remove even if the timing cover is on the bench. It would be well worth your time to pull it, ya need to service the front crank seal anyway.

If you don't pull the cover, then I'd remove the radiator and fan assembly for access. Then remove the water tube. Prolly need to pop the alternator off also to provide some additional room to maneuver.

Then I'd use an angle-head die grinder with a thin cutoff wheel and grind through the remains of the tube wall on the inside, being careful to not cut into the aluminum bore. Or an alternate would be a pneumatic hacksaw with a cut-down blade.

You May have to cut through the tube wall at two points. Idea is to remove the pressure of the "press" fit and also the fact that due to electrolysis, the two parts have grown together.

Once the tube wall is cut through, then soak the area in a penetrant...I like "kroil" for locations like this but anything will work such as pb blaster, etc.

Take a very thin chisel and carefully try and collapse the remains of the tube inward. Once it's collapsed slightly, then ya can pull it out with small vise grips. May need to help it with a careful application of heat from a heat gun.

You have to be very careful banging on that boss where the tube is inserted or it will crack/break.

The hotrod 152 I'm currently building will have that oil filler tube eliminated. The hole in the timing cover will be closed with a core plug. Then a later model valve cover with an oil filler port will be used instead of the oem valve cover.
 
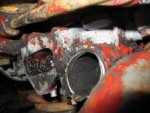
Actually there is a decent tab of the oild filler tube that you might not have been able to see in that original pic. I posted it again, but no so small this time. Since there is some of the old filler tube, whats the best way to pull it outta there?
 

Attachments

  • 029small.JPG
    029small.JPG
    56.9 KB · Views: 948
whats the best way to pull it outta there?
Perzactly as Mike has described for ya.
It was an interference fit, and has grown together. That tab that's remaining won't be enough to yank it out without breaking it off. You might get lucky, but the cards don't look in your favor for that play. If you go to cutting on it with it on the block, put something in the hole to catch the shavings. If you get it out without damaging the cover, I like the idea of bung'in it and going to a different valve cover.
 
I enlarged your pic but didn't see that piece sticking out!

I removed two filler tubes tonite from really rotten timing covers, your post got me motivated to do that nasty work! But at least mine have the tubes intact!

Keep in mind, both covers were off the engine and clamped securely in a vise with jaw protection. I heated both of them around the tube area witha propane torch, the heat gun would not expand the aluminum enough.

Using the tube for a lever, I was able to break 'em loose with mucho heat, once they rotated, then they came right out.

So...what ya might try is setting up some big visegrips on that remaining tab. Then apply significant heat and see if ya can break the stub loose. But please clean all around that area really well...we don't wanna hear about an underhood fire in another thread dude!!

But I really appreciate you posting here, that really stimulated me to get sum work done on my engine prep tonite! Got the timing cover all cleaned up, the oil filler tube hole blocked with a cup plug, a fresh valve cover ready to go, etc. The water pump housing, water tube, and oil filter setup are soaking tonite in the tyme bucket.

Good luck!
 
Well, after many hours of frustration, I finally bit the bullet and followed the advice posted above.....I have everything removed but the timing cover. I assume I need to loosen the giant bolt in the middle of the pulley? I dont have a socket big enough, does anyone know what size I need to get?

I also ordered a replacement oil filler tube from scoutparts.com.. This was a very unpleasant experience....they charged my credit card for the tube the day of the order but never even pulled it out of the junk yard for several days after. I finally got it today and they sent me the wrong one.....
 
I forgot to ask.....I have the oil pan off, flywheel cover off and hopefully, will have the timing cover off within a few days. Besides replacing gaskets, what else should I fix / inspect while its apart? I got shell rotunda (?sp) motor oil and a new oil filter. Ive read this oil is ok for this truck? How about draining the front and rear differentials? What should I use for the diff's as the local auto parts stores tell me to use some funky gear oil that nobody has. Is there a reliable source for these gaskets?

By the way, there is a large horozontal gash on the bottom side of the flywheel cover between two drilled holes. I assume because of the drilled holes that this nasty gash in the metal won't be allowing something vital to be draining out of this area?

Everything I am taking off is caked in gunk and grease that is more than "off the shelf" degreaser can tackle. Any suggestions here?
 
well, after many hours of frustration, I finally bit the bullet and followed the advice posted above.....I have everything removed but the timing cover. I assume I need to loosen the giant bolt in the middle of the pulley? I dont have a socket big enough, does anyone know what size I need to get?

I also ordered a replacement oil filler tube from scoutparts.com.. This was a very unpleasant experience....they charged my credit card for the tube the day of the order but never even pulled it out of the junk yard for several days after. I finally got it today and they sent me the wrong one.....

Live and lern dude! Yore dam shore not alone in yore dealin's!!!

By the way, we gotta couplea non-pcv tubes, and one pcv tube. If that "other" vendor ends up doin' right by ya, we can fix ya up with what ya need, all cleaned up real purdee and primer'd like a new one. And we make sure ya git a decent price to make up for the "customer service experience" that you are experiencing from brand z.

The retaining bolt for the crankshaft hub needs to see a 15/16" socket and that bolt will be tight!

Then ya need to use a #3 phillips head bit inna hand impact driver and bust the four screws out that retain the crank pulley to the hub...remove the pulley.

Then use a large three jaw puller (or a two jaw if real careful) and pull the hub off the crank snout and over the key.

Did ya take out the four bolts in the front lip of the oil pan that thread into the rail on the lower end of the timing cover??? If not, ya need to.

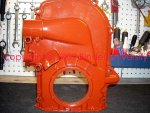
If ya end up inna bind and can't get the stub out, ya can send the cover to us for a re-work. We'll remove the stub, clean the cover so it looks like the one in the pic, and install the oil filler tube of your choice, and knock in a replacement seal. If your crank hub is "grooved", then send it along and we'll repair the seal surface with a sleeve. Cost for the total package would be $155 pus return shipping to yore door, and will include a replacement timing cover gasket and water tube "o" rings. The entire assembly will look better than new when ya get it back and ready to plug and play.
 

Attachments

  • Reconditioned Timing Cover.jpg
    Reconditioned Timing Cover.jpg
    118.4 KB · Views: 1,005
Last edited:
I forgot to ask.....I have the oil pan off, flywheel cover off and hopefully, will have the timing cover off within a few days. Besides replacing gaskets, what else should I fix / inspect while its apart? I got shell rotunda (?sp) motor oil and a new oil filter. Ive read this oil is ok for this truck? How about draining the front and rear differentials? What should I use for the diff's as the local auto parts stores tell me to use some funky gear oil that nobody has. Is there a reliable source for these gaskets?

By the way, there is a large horozontal gash on the bottom side of the flywheel cover between two drilled holes. I assume because of the drilled holes that this nasty gash in the metal won't be allowing something vital to be draining out of this area?

Everything I am taking off is caked in gunk and grease that is more than "off the shelf" degreaser can tackle. Any suggestions here?

Any gl3 or gl 5 gear lube in 80w-90 viscosity will work for the diffs. If the rear dif is a powrlok limited slip, then add a tube of limited slip treatment to the oil. We carry the superior quality swepco lubricant products here at ihon.

Your front axle is a Dana/spicer model 27, gaskets are available from any parts house or from ihon

your rear axle could be either a Dana 27 or a Dana 44 if that axle option was originally installed. Ya need to identify which rear axle ya have. Again, those axle cover gaskets are available from any source including us.

Some folks use rtv on the housing covers, if the cover is the "slotted" type, then rtv was spec'd for that cover with no gasket. If the cover has a solid/flat flange, then Dana/spicer uses a gasket.

I use gaskets on all Dana/spicer covers, I'll not allow rtv anywhere near my shop.

Do a search under the "axle" sub-forum and you will find much info regarding all Dana/spicer axles used in IH applications.

Your flywheel dust cover is not the plastic one??? It had a "drain slot" oem in order for water that can accumulate inside the cover to drain out. Also allows oil/tranny lube to drain as a "tell-tale" if the crankshaft seal or any portion of the front of the transmission should begin to leak.

No matter how bad your cover is, do not let it get away, those are extremely hard to come by. And if plastic, they May be repaired even if badly damaged using a plastic welding technique, ya can't "fiberglas" 'em for repair as neither polyester nor epoxy resin will not adhere to that type plastic. If steel, then they May be easily welded and worked similar to doing any type of body work.

For really heavy accumulated crud that is not "mud (water borne)", I currently am in love with "tek orange" gel degreaser, a product from winzer corp. And distributed by one of our members here, fred demmon, outta texas. Truly amazing stuff that just plain works! May take some scraping and poking, but it's the only product of that type I've ever found that is worth the money. And I follow up with the tex orange by using a powerwasher on all this kinda stuff.
 
My way to remove the stub from a broken oil filler tube is a bit of heat from a propane torch directed onto the housing around the stub. On or off the engine works. Since the aluminum expands faster than the steel tube, as you heat the cover the press fit gradually becomes clearance and the stup will slide out. I have done it this way a couple of times.

It is important to keep the flame moving while heating the aluminum so you don't over heat spots. Use a little water sprayed from a windex bottle or similar to gauge the temp. The droplets should just begin to boil on contact at 350f. That should be it. Grab the stub with pliers and it should slip out or a few taps from the inside.

I just saw that mm explained this method in an earlier post. I guess I shoul read more. :p
 
Well, I finally got the timing cover off last evening and began the process of removing the oil filler tube. To remove the tube, I used heat, penetrating oil, heat, chisels, files, saws, screwdrivers, two boys and a mule, and did I mention heat? That little bastard won't budge, no matter what I try. Can someone offer another suggestion before I push this deamon off a steep cliff? (its not insured, so this aint an insurance scam...)

ill be collecting a wish list of parts from everyone before I send it airborn!!!
 
I do have a nice sound system in the rig.....maybe I can roll it through the yard, park it next to the fire pit and use it as an entertainment system / flower pot / additional seating?
 
well, I finally got the timing cover off last evening and began the process of removing the oil filler tube. To remove the tube, I used heat, penetrating oil, heat, chisels, files, saws, screwdrivers, two boys and a mule, and did I mention heat? That little bastard won't budge, no matter what I try. Can someone offer another suggestion before I push this deamon off a steep cliff? (its not insured, so this aint an insurance scam...)

ill be collecting a wish list of parts from everyone before I send it airborn!!!

The offer still stands of course, if you don't take the reconditioned timing cover, someone else will!

You will not receive your oem timing cover back, this is an exchange deal. Then I get to deal with removing the chunk which is no big deal if ya have the resources I have here!
 
Michael, some what off topic but concerning the timing cover crank seal. Did I see in the manual that there is an IH sleeve for centering the timing cover seal on the crank? It's been a while since I put one in put I was not aware centering was an issue.
Ron
 
michael, some what off topic but concerning the timing cover crank seal. Did I see in the manual that there is an IH sleeve for centering the timing cover seal on the crank? It's been a while since I put one in put I was not aware centering was an issue.
Ron

"kinda...not really ron".

If the crank hub/harmonic balancer is removed, and then the timing cover is removed for service in some manner, there is "kinda" an issue regarding re-installing the timing cover on the face of the block. There are no alignment dowels used at the timing cover-to-block interface, therefore all that aligns the cover front seal "bore" with the centerline of the crankshaft snout are the retaining bolts. So the timing cover can be moved out of center when re-installing.

There was/is a ihc-produced tool for centering the cover on the block, p/n se-1949. However, nobody has that tool and this can be done in an alternative fashion very simply.

I install the new seal in the timing cover, it can only go in one way since it's a flanged case seal design. Then I slide the timing cover into position and run all the bolts up until they "just" almost seat the cover on the gasket. At that point install the crank hub/balancer (after insuring that the seal surface is either excellent or it's been repaired with a sleeve) and tighten to spec, I always use loctite on the retaining bolt also.

By having the hub on the crank, that will serve to allow the seal/cover to kinda "float" and achieve a self-alignment position. Then run the bolts in snug inna cris-cross pattern before final torquing.

If you are simply replacing the seal and not removing the timing cover, then the alignment procedure is not necessary. But again, the key to making certain the seal interface does not continue to leak, is to have a perfect seating area on the hub/balancer nose where the seal rides. The slightest imperfection on the machined surface where the seal rides will eat the new seal very quickly. If a repair sleeve is simply out of the question for some reason, then do not knock the replacement seal into the bore quite all the way, so the seal lip can ride on "undisturbed" machined surface. The front seal has a flange formed on it so keep the flange slightly off the flange seat on the face of the cover.

For those who have never delt with a "repair sleeve" for a machined surface renewal, I'll post a typical later today since I'm in the midst of doing one now.
 
That's probably why my timing cover seal seeped after I rebuilt the 345 in my 75. In my defense I did not have a manual then or did I have access to the internet then, just good old fashion shade tree mechanic smarts:idea: .
If I remember right the rear seal comes with a gasket spacer to actually move the seal to a slightly different surface on the crank, of course the timing cover seal that is not an option.
Thanks for clearing that up, I am sure I will be rebuilding another 345 in the future, hopefully not too soon!
Ron
 
If the timing cover location is not disturbed, then no special tool or procedure is needed for seal replacement. The tool is certainly nice for knocking in a replacement seal with the motor installed in the vehicle, but there are other ways of getting it in there.

Don't foller ya regarding a "spacer gasket " on the rear main/crank seal. There are two types of seals used though, one is full silicone, the other is a composite with a teflon derivative lip. And of course the rubber tube "side" seals.

Aftermarket crank seals normally have their sealing lip "offset" slightly as compared to an oem-supply seal. That will position the seal lip on "hopefully" an unworn portion of the rotating element. A little careful measurement of both the old part and the replacement part can confirm that.

For instance...today I compared an oem seal inna 152 timing cover with a current production fel-pro replacement. The oem seal is not a flanged type outer case, the fel-pro is...so ya drive it in until the flange is flush. When comparing the two lip locations, the new seal is 2mm further "in" on the machined surface of the crank hub so it avoids the badly worn section...but that crank hub will get a repair sleeve anyway.
 
don't foller ya regarding a "spacer gasket " on the rear main/crank seal. There are two types of seals used though, one is full silicone, the other is a composite with a teflon derivative lip. And of course the rubber tube "side" seals.

I just remeber the rebuild gasket set I got had a gasket the same size as the rear (I think) seal and I asked a local IH guy and he said to put it behind the seal so it re-positions it on the seal surface.
Ron
 
Ok, I got the water pump, timing cover, oil pan and oil filter can removed, degreased and repainted real nice.....I put everything back together after replacing the gaskets and sealing them up with some gasket sealer stuff....

I filled her up with oil, cranked it a few times, added some more oil and then let her run for about 25 seconds. When I was done, there was some smoke coming from under the valve cover, near the plugs. There was also light smoke coming from the opening in the timing cover.

So....I drained most of the oil and it was much darker than it was 10 minutes prior when it was poured in the replacement sum' bitch oil filler tube that started this whole process.

Sooo....I come back to the computer, read this thread (that I started..) and find mention of repacking / resealing the timing cover or something like that. I did remove it, and replaced it without any repacking or sealing as I didnt see anything like this when I took it apart.

What didn't I do regarding the timing cover and should I have done something else to the motor before dumping oil inside and cranking it up...?

I am willing to accept any verbal lashings or "you dumb ass" comments, as long as they are accompanied by a solution to this problem.

Signed,

"I should have gotten professional help with this project"
 
I would thing that the resealing part was in referance to the round oil seal that seals the crank where it passes through the timing cover. If it doesn't leak then leave it alone but if it does............ Doh :icon_gonk: the crank hub needs to come off so the seal can be pulled out and a new one pressed back in. This can be accomplished with the cover on the engine. I suppose that is the good news.
 
Back
Top