new IHPA master cylinder questions

chevyman

New member
So, I installed a new m.c. from IH parts, post bench bleeding, bled brakes, re-checked pedal height and push rod length, adjusted shoes and it normally stops great. Except twice now the push rod has slid through the push nut inside the M.C. bore and gets stuck with the pedal half way down. My push rod looks exactly like the one pictured on the main store site but not sure if perhaps the push nut (retaining clip?) was installed backwards from factory?
does anyone have a picture of what there master cyilinder looks like going down the bore without the pushrod installed? When this happens, the rod gets stuck inside the inner bore of the first piston and is a pain to remove. its acting almost as if the od on the ground down end of the pushrod is too small and is slipping inside the bore.
 

Attachments

  • mc push rod.jpg
    mc push rod.jpg
    33.9 KB · Views: 615
Found a 7/16 fine thread bolt and turned it down on the lathe, I'm going to try this but I think the problem may be in the master cylinder. Anyone have a picture of what the scout 800B master from IH parts america looks like as viewed down the bore?
 

Attachments

  • mc pushrod 2.jpg
    mc pushrod 2.jpg
    34.8 KB · Views: 599
What master # and for what? Photo of the push nut you are referring to would be super helpful. ;)
The actuator rod would seat hard against the piston and usually in a hemispherical seat.
 
The master cylinder is # S800-BRK-MC-ASSY for a 71 800B

The part I'm referring to is either a push nut or internal tooth locking washer.

On most other master cylinders I've installed the rod seats into a tapered cone that is machined into the rear most piston/plunger. On this model it seems to use one of these washers to make up for the difference in push rod cone outer diameter vs piston hemispherical seat.
In the first attached picture (not mine) you'll notice the inner black washer with 4 tangs. The one on my m.c. has 8, more similar to the second attached picture.

The supplied pushrod pushed through those tangs and got stuck.
I believe I have remedied the problem by modifying my newest pushrod to have a larger conical seat preventing it from pushing through the washer. Very phallic looking :)

I welded some padding around the end of that bolt and turned it down to about .535" with a matching 45 degree taper. The factory one was .440 ish. I'll get a picture of that up tomorrow if it can help anyone in the future.
 

Attachments

  • New_deep_piston_cup.jpg
    New_deep_piston_cup.jpg
    40.5 KB · Views: 456
  • push nut.jpg
    push nut.jpg
    25 KB · Views: 430
The pushrod needs to push thru and be up against the back of the piston of the master cylinder. The toothed washer is there to hold that push rod in there. You should not have to be modifying any of these parts, unless of course a mistake was made and a wrong part was shipped. From what I can see you need to put everything back together the way you originally had it and thread out the adjuster so the brake pedal height matches the clutch pedal height.

Hope that all makes sense, if not let us know so we can better explain or post pictures.
 
Thanks for the reply. Its not in front of me now and I'll try to get some pics of it. I absolutely understand what your saying, but, what has me confuzzled is depth of the hole after the washer. When it pushes through that washer, the back of that hole is about 2" past and when its seated there the arc of the pedal swing binds hard as you can see by the slight bend in the factory push rod. I'll get at it this weekend, take pics, figure it out and post back. Thanks again for all your help.
 
You have manual brakes and that master may be for a power booster. The geometry binding you are having can’t be avoided. Is there a non power master available?
 
So, spent some time this afternoon with the old scout and pedal pushrods and master cylinder. The first picture is the master that came in the box from ihpa as installed on this scout.
Gave the included pushrod another try. After it pushes through the washer, it binds the pedal in the brake applied position. There just isnt enough spring to return the pedal. Its as if it gets past center of the swing and binds. It does not matter where the rod is adjusted from tight to turnbuckle to ALL the way out.

I gave my home made push rod end a try. It sits tight against the cup in the washer and does not push through it. It is the second and fourth pictures. I adjusted it so the pedal sits near the height of the clutch pedal and the pushrod cant back out because the pedal hits the brake light switch solid.

It currently stops good and the brake light switch works.

Thanks for all the replies.
 

Attachments

  • 20190113_145413 (1).jpg
    20190113_145413 (1).jpg
    65.8 KB · Views: 443
  • 20190113_151234.jpg
    20190113_151234.jpg
    65 KB · Views: 445
  • 20190113_150308 (1).jpg
    20190113_150308 (1).jpg
    49.4 KB · Views: 443
  • 20190113_151237.jpg
    20190113_151237.jpg
    60.7 KB · Views: 455
Last edited:
I installed the same master cylinder and universal pushrod today. I have the same exact issue! Very frustrating! The push rod will intermittently push through the retainer and the pedal will get “stuck” halfway down and bind!
I, unfortunately don’t have the equipment to modify my pushrod like you have done ( looks great) so not sure what to do? Any suggestions would be great!
 
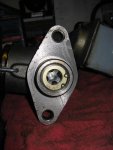
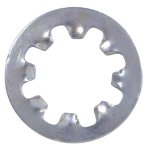
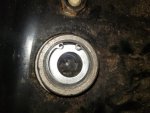
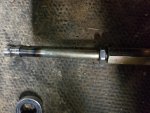
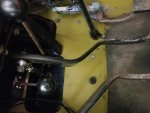
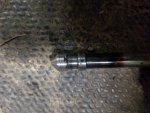
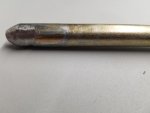
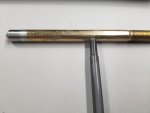
The pushrod on the adjustable linkage MUST be slid through the toothed springsteel washer into the bore of the master cylinder and bottomed out in the internal plunger it slides into (visual inspection shows those two parts are made to fit together). I ran into the same issue as you during installation because of how physically difficult it is to slide the pushrod through those teeth, which is compounded by the fact that if using the supplied pushrod during bench-bleeding, it is not necessary to slide it through those teeth to get a successful bleed, as the “teeth” are strong enough to allow for adequate plunger-movement to complete the task. (It is compounded even further when comparing the new items to the OEM part, where the pedal linkage is very “floppy” where it exits the master cylinder, and the only way to achieve that “floppiness” on the new part is by NOT sliding the pushrod past those teeth.) I couldn’t push it through by hand which confused me, so I bolted the Master to the firewall, shortened the adjustable rod all the way, and used the pedal to push the rod past those teeth - and when it slid through it scared the crap out of me - this is the point that you got scared and felt things were “binding up” because I did as well, lol! After you feel the pushrod slide past those teeth and subsequently the pedal remains in a lowered position and things feel “bound up” or “wrong,” then just simply readjust the rod to the proper length, ensuring there’s just enough free-play for the plunger to return out all the way while still making your brake light switch function. After bench-bleeding and installation, this master cylinder provides VERY little pedal-motion, so expect that! As long as your brakes aren’t dragging and you’ve got your brake lights working properly, you are good to go. The manufacturer should really provide some paperwork regarding their bizarre toothed-washer and the fact that it takes about 150 pounds of force to slide the pushrod past those teeth… They found the time to provide bench-bleeding instructions which are readily available at over 500,000 websites, yet neglected to provide ANY instruction or insight into their hokey adjustable rod assembly which is the main point of confusion during installation. Other than having to make sense of the pushrod situation, this master cylinder was a direct fit to replace my OEM part, the adjustable pushrod works well, and while it took some getting use to, I’m now only having to push my brake pedal 1” or so for full stopping power, rather than mushing it to the floor. If the manufacturer provided instructions - or simply shipped the part with the pushrod preinstalled - there would be zero confusion during installation. For the average DIY fella’ it can be quite confusing and discouraging the way it arrives and installs.
 
Last edited:
Back
Top