Installing Front Suspension Kit

Soft_Click

Member
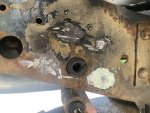
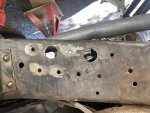
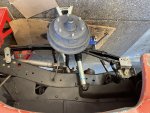
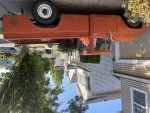
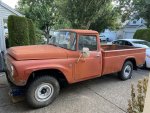
I just got this suspension kit for my 1966 IH Pickup and I have a lot of questions!

1. How can I use this hole saw bit? Somehow I need a drill chuck on one end and a threaded rod on the other?

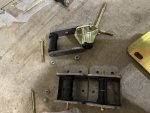
2. How do I assemble these rear shackles? It’s hard to know if I have the correct bushings in the right place. Also not sure I’m using the right bolts. I’m trying to match it to the photo on IHPA but I can’t figure it out. The bolts seem to be too long or too short. I don’t have the leaf springs for some reason so I may get some more clues when I have them.

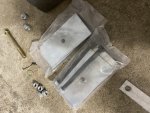
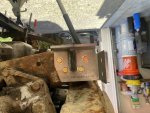
3. What are these rectangular pieces of steel for with the hole in the center?

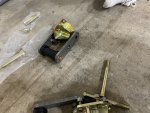
4. Can I use these rounded U-bolts on my RWD truck? The front axle isn’t round.

5. Do I have more bolts than I need? Should I be using all these washers somewhere?

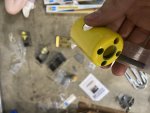
6. Where does all this grease go? Inside the bushings?

I can usually figure this kind of stuff out but I’m totally lost here. Any help is much appreciated as always!
 

Attachments

  • 0BD8B9D1-708B-4618-BC80-5ADEAA42FA2A.jpeg
    0BD8B9D1-708B-4618-BC80-5ADEAA42FA2A.jpeg
    198.9 KB · Views: 185
  • 56F4FE44-748A-44A3-84CC-1CC75B044336.jpeg
    56F4FE44-748A-44A3-84CC-1CC75B044336.jpeg
    212.2 KB · Views: 166
  • 724792D3-F753-4B2E-A09E-6686C2BA4EA8.jpeg
    724792D3-F753-4B2E-A09E-6686C2BA4EA8.jpeg
    183.4 KB · Views: 175
  • 4B41E874-4E41-4BA4-AC71-3ACAFE726EDA.jpeg
    4B41E874-4E41-4BA4-AC71-3ACAFE726EDA.jpeg
    87.3 KB · Views: 181
What would that mean? Is it very similar? The hardware I have looks almost identical to the photo from the shop.
 
Thanks, Jeff. One of those two was included but it still leaves me with a lot of questions. I feel pretty good about the frame modification but not so much on the shackle assembly, UBolts, and the rest of my original questions.
 
Any trick to getting these rivets out? Do I need to remove the head on the back side as well? Air hammer and sledge with chisel isn’t doing anything!
 

Attachments

  • 763C2B5F-883A-4302-8551-9A5425B6FD01.jpeg
    763C2B5F-883A-4302-8551-9A5425B6FD01.jpeg
    219.6 KB · Views: 179
I see on the instructions I’m supposed to grind down the heads of the rivets on the back and then punch them through the front, is that correct? Idk how I’d get my grinder back there…
 
I did get my grinder back there for one of the rivets, still no luck.
I drilled a hole halfway through it and have been wailing on it with a 4lb sledge / punch. No movement at all.

I picked up this torsion bar tool which is like a threaded rod press but it doesn’t fit around the frame. I think some kind of press like this might be the way to go. I didn’t think this part would be so hard
 
I managed to remove all four rivets from the front mount which really boosted my confidence. If I can get four I can probably do 16. My technique for the first rivet was to grind it flush, then heat the head on the back with a propane torch for 5 minutes until blue, then hit it with the air hammer while I continued to torch.

Once I got the first one out, I put the chisel bit into my air hammer and drove it in between the frame and the front bumper / spring mount and it popped off leaving me with expose rivets that I slammed with my sledge without issue.

When I go to move on to the rears, I think some kind of bigger / longer punch might help and maybe a heavier sledge. Torching and airgunning may work and it may not.

I’m also having to guess which bolts go where and it doesn’t seem like I’ll have enough for both sides? I may have to buy more.

feels good to make some progress at least!
 

Attachments

  • 07558D86-04D7-4B8D-ADF8-5A7E378B760B.jpeg
    07558D86-04D7-4B8D-ADF8-5A7E378B760B.jpeg
    160.8 KB · Views: 162
Last edited:
Thank you, I’m never out about that for sure. Just banging away at the driver’s side now. Not sure what I’ll do over there. I’m hoping somebody will have some advice for me. Like maybe my medium air hammer isn’t powerful enough and I need a long?
 
Finally!!!!!! This has been such a nightmare!

My hot tip: instead of trying to punch out each rivet, get all four at once. Once I started hitting all of them with my air hammer, it came off easily. What a relief. Dreading the passenger side
 

Attachments

  • B7934066-E126-45FC-B789-E9E7E1817DD4.jpeg
    B7934066-E126-45FC-B789-E9E7E1817DD4.jpeg
    171.1 KB · Views: 160
Sorry all my pictures get uploaded upside down, I’m not sure what’s up with that. I bet if I flipped it upside down it would upload correctly haha

I wanted to update this thread with my progress and provide some tips for anyone else considering doing this.

I finished one side, but it’s not exactly how I wanted it. (I flipped this one and it’s still upside down. You’d think being a systems administrator / software developer would help me with these things)

The main problem I ran into is I couldn’t reasonably add a leaf like I was expecting to. RoughCountry says their springs are not meant for adding leaves because their spring clamps are riveted on. He said maybe I could grind and pop the river out but he didn’t recommend it. I called IHPA and they recommended I torch the clamps red hot and pry them open, then torch them again and hammer them back down. Unfortunately I don’t have a torch or any friends with one.

I decided 1” lift would be fine and just went ahead without the leaves, which of course caused more problems.

The square U-bolts IHPA sent me are too long now that my springs are thinner, so I’m using my old ones.

The shock is now very compressed. There’s maybe 5” of travel with the front axle hanging from the springs.

One idea I had was to slip the heavy duty mounting plate (which I don’t think I need with my 2WD) underneath the springs and on top of the axle. This would give me a little more lift and allow me to use the new bolts.

What do you guys think about that?
 

Attachments

  • C171181E-14ED-4F1D-B2B8-0A9E9DBAC3DB.jpeg
    C171181E-14ED-4F1D-B2B8-0A9E9DBAC3DB.jpeg
    216.5 KB · Views: 165
  • 2FF9D9F7-7F17-4DB5-8FDB-7EB7E4823720.jpeg
    2FF9D9F7-7F17-4DB5-8FDB-7EB7E4823720.jpeg
    217 KB · Views: 164
Final update:
I took the new suspension to a shop and had them fit in some add-a-leafs for me. Just finished the install and wanted to share a before and after. I’m stoked!!
 

Attachments

  • 336BE359-29D6-4EA7-A065-273E16442E43.jpeg
    336BE359-29D6-4EA7-A065-273E16442E43.jpeg
    213.3 KB · Views: 147
  • AA19742D-9F88-409C-9DE0-0E7BA21852CA.jpeg
    AA19742D-9F88-409C-9DE0-0E7BA21852CA.jpeg
    262.4 KB · Views: 151
Back
Top